Table of Contents
Advertisement
Quick Links
**Extendable: Combine 2 or more kits to add additional
gates and expand barrier's length--hinged connectors allow
use on beds made of 4' boards.
KIT CONTAINS:
1
x 2
x 4
9
x 4
x 1
16
x 2
20
x 4
*Stackable – combine or more
kits to create as high a barrier as
needed
3
2
1.37"
x 1
11
10
x 2
17
x 2
21
x 1
x 4
Customer Service: 1800-914-9835 |
© Frame It All. All Rights Reserved.
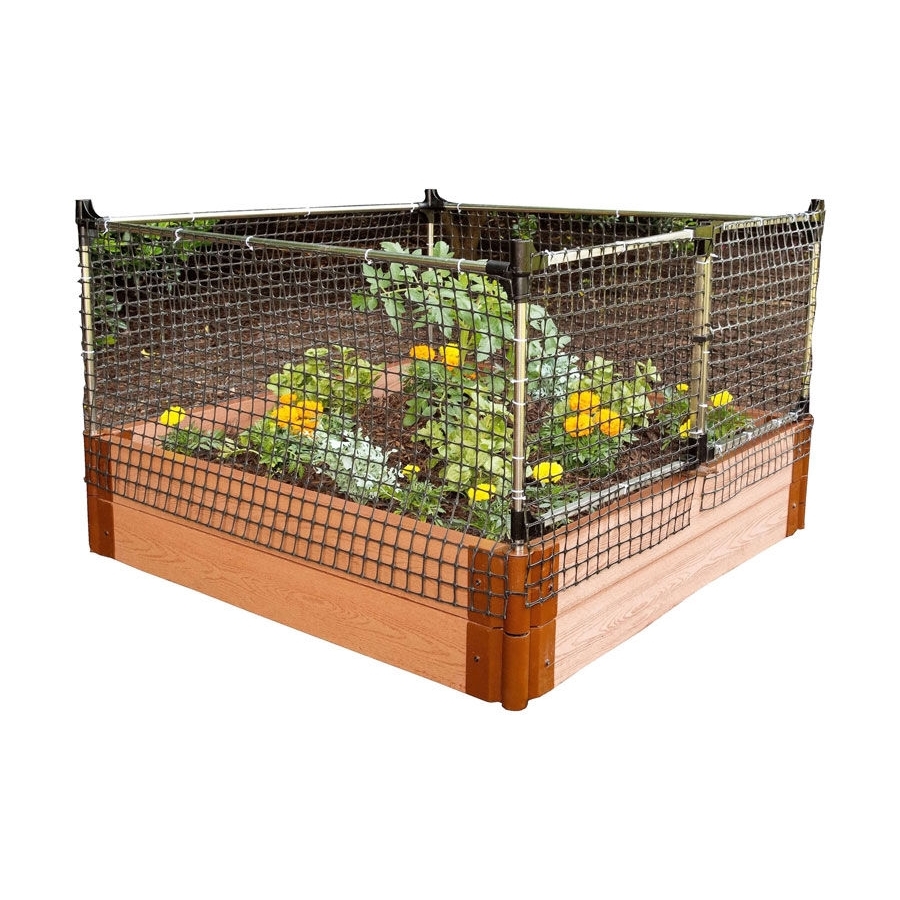
ANIMAL BARRIER
Stack &
*
Each kit will protect a 4ft. x 4ft. garden to a height of 2 feet.
Additional kits provide more protection by increasing the
length or height of the basic 4ft x 4ft x 2ft high module..
RAISED BED SOLD SEPARATELY
4
1.37"
5
1.37"
x 1
x 2
12
13
x 1
x 4
18
x 4
22
Use this part only if
joining 2 or more kits
to extend animal
barrier
support@frameitall.com
**
- Used with *curved raised bed
7
6
1.06"
1.06"
x 1
x 1
14
Zip tie
x 50
19
x 3
300001003
Extend
8
1.06"
x 1
15
x 1
Advertisement
Table of Contents

Related Manuals for FRAME IT ALL Stack & Extend


Summary of Contents for FRAME IT ALL Stack & Extend
- Page 1 RAISED BED SOLD SEPARATELY 1.37” 1.06” 1.37” 1.06” 1.37” 1.06” Zip tie x 50 Use this part only if joining 2 or more kits to extend animal barrier Customer Service: 1800-914-9835 | support@frameitall.com © Frame It All. All Rights Reserved.
- Page 2 ASSEMBLY INSTRUCTIONS Your animal barrier kit goes together by sliding the ends of the metal tubes into the plastic connectors to create a frame, then zip-tying netting to the frame. STEP 1: BUILD THE LEFT GATE THIRD: Add two square tubes (18) to create the top and the bottom FIRST: Use edges of the left gate--Insert one square tube into the square connector connectors 2, 5, 3, &...
- Page 3 ASSEMBLY INSTRUCTIONS – continued STEP 2: BUILD THE RIGHT GATE FIRST: Use connectors THIRD: Add two square tubes (18) to 2, 4, 5, & 13 to form the create the top and the bottom of the right upper right gate hinge gate frame.
- Page 4 ASSEMBLY INSTRUCTIONS – continued STEP 4: Attach rest of framework to gate frame SECOND: Slide three round tubes (19) into the connectors to create the remaining upper edges of the animal barrier. FIRST: Use connectors (2, 1 & 13) to form the joints for each of the back corners at the top of the animal barrier.
- Page 5 JOINING MULIPLE ANIMAL BARRIER KITS Stacking kits to make a higher barrier – Assemble the kit for the upper level in the same way as for the lower level except, before installing the gate assemblies, slide a round sleeve, (Part 22) onto the corner post of the gate, below the gate hinges.
- Page 6 JOINING MULIPLE ANIMAL BARRIER KITS - (continued) EXTENSION OPTION 2: PLACING THE GATES NEXT TO EACH OTHER Remove Small Sleeve (8) from the right gate of Kit 1 and replace it with Gate Hinge (7) from the Kit 2. The round tube Remove Large Sleeve (5) from the right gate now supports the of Kit 1 and replace it with Gate Hinge (3) from...
Need help?
Do you have a question about the Stack & Extend and is the answer not in the manual?
Questions and answers