Table of Contents
Advertisement
Quick Links
170001018-MD350, 70002018-MD750, 71001018-MD1000
71001018-EC1200, 71002018-MD1250, 71002018-EC1200
72001018-MD1250, 72001018-EC1200, 72002018-MD1500
72002018-EC1900, 72002018-EP2000, 73001018-EC1900
73001018-EP2000, 73002018-EC2700, 73002018-EP3000
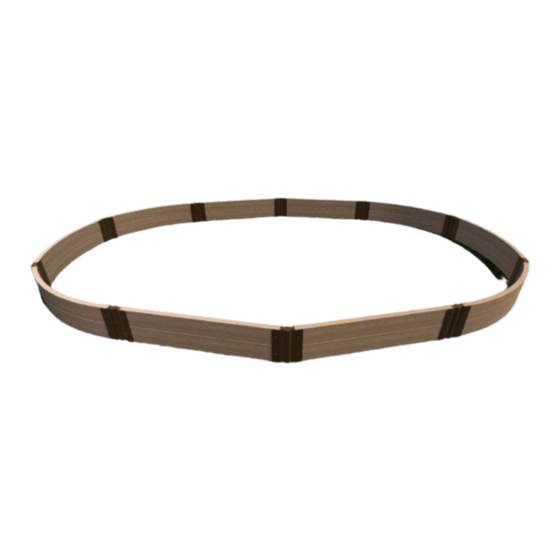
1 LEVEL KIT CONTAINS:
•
6 x Composite Timbers 4' Curved
•
4 x Composite Timbers 4' Straight
•
20 x Stacking Brackets
•
10 x Anchor/Ground Level Serrated Stakes
•
40 x Plugs/Locking Nubs
•
10 x Caps
•
1 x Rubber Liner
•
1 x Underlayment
•
1 x Water Pump
•
1 x Pump Tubing
IMPORTANT: READ ALL
INSTRUCTIONS BEFORE
STARTING YOUR BUILD!
**NOTE
Stacking stakes should only be used
when stacking boards for water
garden application.
ONLY Stacking Stakes can stack!
Customer Service: 1800-914-9835 |
support@frameitall.com
© Frame It All. All Rights Reserved.
Water Garden
1 LEVEL
Required Tools:
•
Shovel
•
Levelling tool
•
Hammer
Recommended Tools:
•
Pond Safe Foam
Sealant
•
Grading Rake
2 LEVEL KIT CONTAINS:
•
12 x Composite Timbers 4' Curved
Ellipse
•
8 x Composite Timbers 4' Straight
•
40 x Stacking Brackets
•
10 x Stacking Stakes (**See Note Below)
•
10 x Anchor/Ground Level Serrated Stakes
•
80 x Plugs/Locking Nubs
•
10 x Caps
•
1 x Rubber Liner
•
1 x Underlayment
•
1 x Water Pump
•
1 x Pump Tubing
ASSEMBLY INSTRUCTIONS – Building the Frame
Step 1a:
Assemble the curved timbers by sliding one end of the timber into the channel end of one
of the brackets. Use plugs to lock the bracket in place.
Repeat this process on the other end of the timber flipping the bracket in the opposite
direction. Make sure that all your curved timbers have brackets connected in the same
way with relation to the curve. (see example). Repeat for all curved timbers.
STEP 1b.
Connect all other 4ft straight timbers with brackets with each side having a bracket oriented
the opposite way. (See example). Repeat for all remaining 4ft straight timbers.
How the Joints Work
Use a Cap to
complete the
top level.
Use anchor
stakes for
ground level
frames and
Use plugs to
stacking stakes
cover the holes
for additional
– two plugs are
levels.
required per
bracket (1 on
each side)
2 LEVELS
Use plugs (included)
to cover the holes on
both side of timbers
Use stacking
stake when
creating a multi-
level
Advertisement
Table of Contents

Related Manuals for FRAME IT ALL 170001018-MD350


Summary of Contents for FRAME IT ALL 170001018-MD350
- Page 1 Customer Service: 1800-914-9835 | for additional – two plugs are both side of timbers levels. required per support@frameitall.com bracket (1 on each side) © Frame It All. All Rights Reserved.
- Page 2 If you are using stones to level make sure to fill in the gaps under your boards with soil later. This will prevent water from running under your liner when it rains. Customer Service: 1800-914-9835 | support@frameitall.com © Frame It All. All Rights Reserved.
- Page 3 Roll up any excess underlayment to the pond edge or trim it to size AFTER you have added water. Note: Trimming underlayment to size before adding water can result in your underlayment being pulled and not covering certain areas. Customer Service: 1800-914-9835 | support@frameitall.com © Frame It All. All Rights Reserved.
- Page 4 See our waterfall building video on YouTube.com/Frame It All Videos for a visual guide on how to construct your waterfall feature! Direct Link: https://www.youtube.com/watch?v=lC9zbXTbkag...
Need help?
Do you have a question about the 170001018-MD350 and is the answer not in the manual?
Questions and answers