Table of Contents
Advertisement
Quick Links
KIT CONTAINS:
1
x 2
x 4
9
Zip tie
x 4
x30
21.65"
x 2
*Stackable – combine or more
kits to create as high a barrier
as needed
3
2
1.37"
x 1
10
x 1
14
22.4"
x 7
Customer Service: 1800-914-9835 |
© Frame It All. All Rights Reserved.
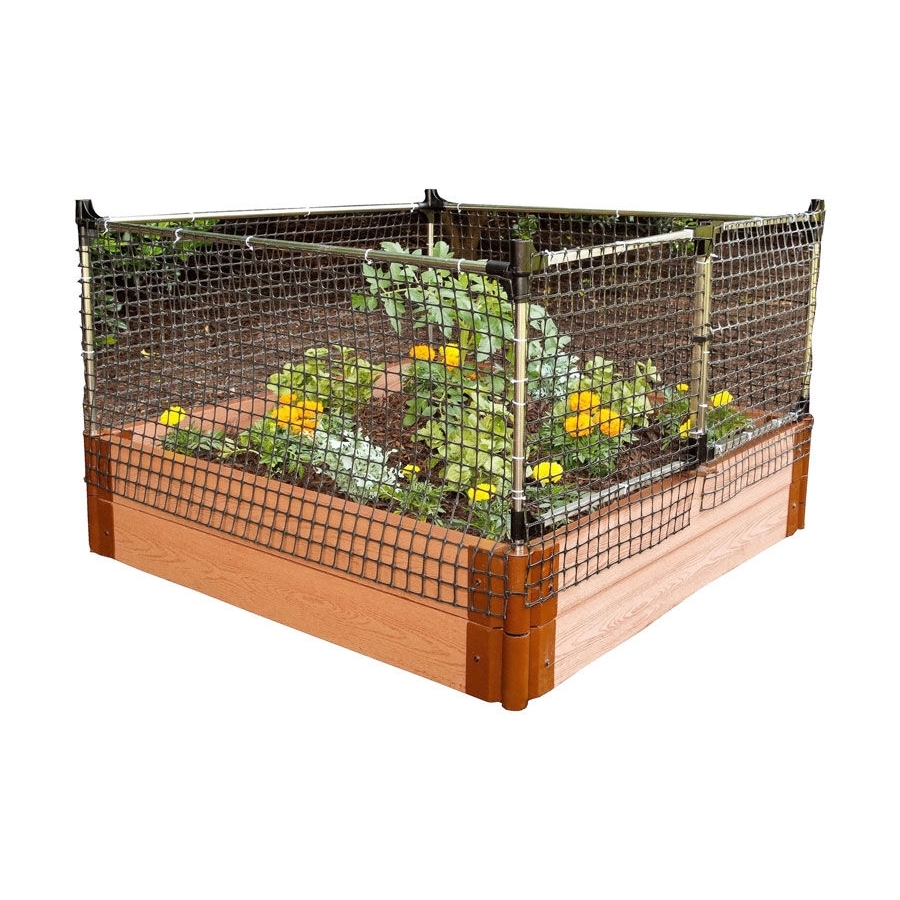
ANIMAL BARRIER
Stack &
*
Each kit will protect a 2ft. x 2ft. garden to a height of 2 feet.
Additional kits provide more protection by increasing the
length or height of the basic 2ft x 2ft x 2ft high module..
1.37"
4
5
1.06"
x 1
x 1
11
12
x 1
16
15
x 4
support@frameitall.com
**
1.06"
7
6
x 2
x 1
13
x 1
17
Use this part only if
joining 2 or more kits
to extend animal
x 1
barrier
200001003
Extend
8
x 1
Advertisement
Table of Contents

Subscribe to Our Youtube Channel
Related Manuals for FRAME IT ALL Stack & Extend


Summary of Contents for FRAME IT ALL Stack & Extend
- Page 1 2ft x 2ft x 2ft high module.. 1.37” 1.06” 1.37” 1.06” Zip tie 22.4” Use this part only if 21.65” joining 2 or more kits to extend animal barrier Customer Service: 1800-914-9835 | support@frameitall.com © Frame It All. All Rights Reserved.
- Page 2 ASSEMBLY INSTRUCTIONS Your animal barrier kit goes together by sliding the ends of the metal tubes into the plastic connectors to create a frame, then zip-tying netting to the frame. STEP 1: BUILD THE GATE FIRST: Use connectors SECOND: Use connectors 2, 3, 4, &...
- Page 3 ASSEMBLY INSTRUCTIONS – continued STEP 2: Attach the gates to the raised bed boards FIRST: Slide the round tubes at the bottom of each gate section into the bracket connecting the raised bed boards. (You may need to remove the cap on top of these brackets-- the cap will be replaced with the cap on the gate assembly (Part 16) STEP 3: Attach rest of framework to gate frame...
- Page 4 ASSEMBLY INSTRUCTIONS – continued STEP 4: APPLY NETTING Apply the netting to both the vertical and horizontal tubes of the gate and main frame using zip ties. Attach the top of the netting flush with the upper tubes so the netting hangs over your raised bed. JOINING MULIPLE ANIMAL BARRIER KITS Stacking kits to make a higher barrier –...
- Page 5 JOINING MULIPLE ANIMAL BARRIER KITS - Continued EXPANDING BARRIER AREA WITH MULITPLE KITS - EXTENSION OPTION 1: PLACING GATES PLACED IN DIFFERENT AREAS OF THE GARDEN BED To extend your animal barrier with additional kits, simply connect them in a loop using additional vertical poles and Horizontal Poles (Part 15) connected with Part 1 &...
Need help?
Do you have a question about the Stack & Extend and is the answer not in the manual?
Questions and answers