Advertisement
KIT CONTAINS:
1
x 2
x 4
9
x 4
x 1
x 2
x 4
3
2
35mm
x 1
11
10
x 2
17
x 3
18
x 4
Customer Service: 1800-914-9835 | support@frameitall.com
© 2020 Frame It All. All Rights Reserved.
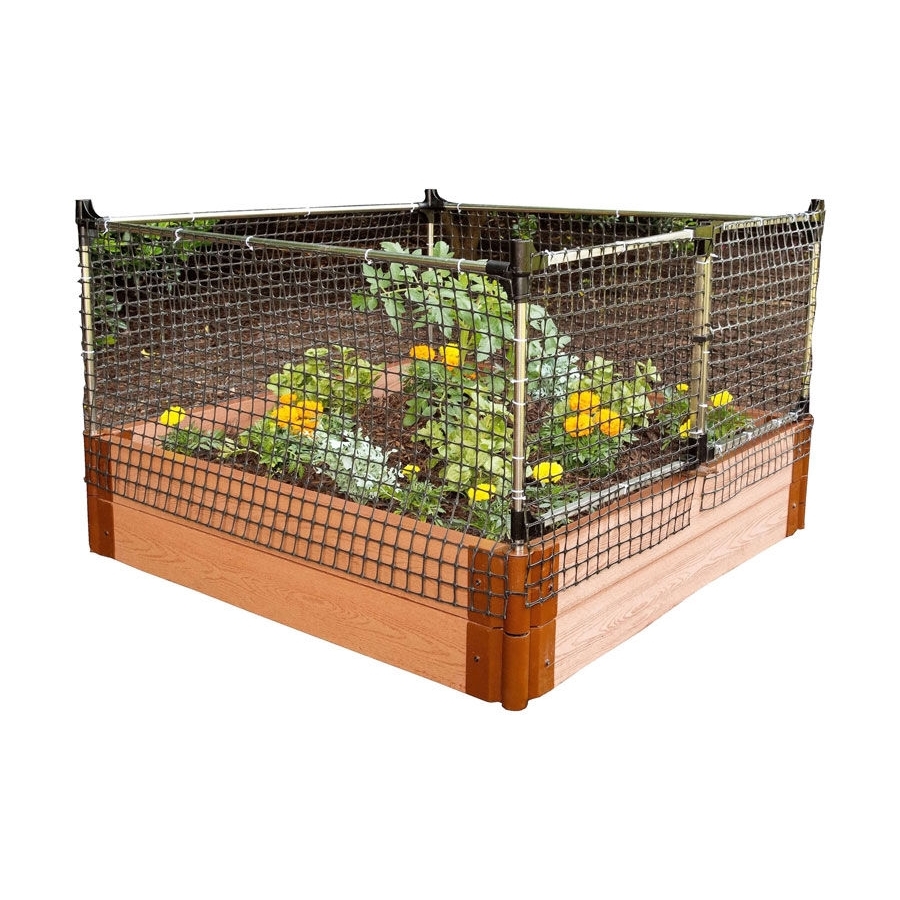
ANIMAL BARRIER
Stack &
*
Each kit will protect a 4ft. x 4ft. garden to a height of 2
feet. Stackable & Extendable requires 2 or more kits.
4
5
35mm
35mm
x 1
x 2
12
13
x 1
x 4
19
21
x 4
20
**
RAISED BED SOLD SEPARATELY
6
27mm
27mm
x 1
x 1
14
x 50
22
x 1
x 1
300001003
Extend
8
7
27mm
x 1
15
x 1
23
16
x 2
Advertisement
Table of Contents

Subscribe to Our Youtube Channel
Related Manuals for FRAME IT ALL Stack & Extend


Summary of Contents for FRAME IT ALL Stack & Extend
- Page 1 Each kit will protect a 4ft. x 4ft. garden to a height of 2 feet. Stackable & Extendable requires 2 or more kits. KIT CONTAINS: 35mm 27mm 35mm 27mm 35mm 27mm x 50 Customer Service: 1800-914-9835 | support@frameitall.com © 2020 Frame It All. All Rights Reserved.
- Page 2 ASSEMBLY INSTRUCTIONS Your animal barrier kit goes together by plugging the various tubes into the pivoting connectors and connecting the netting with zip ties. STEP 1: Install the left gate Connect the other end of L-connector Use connectors with square tube (18) (parts 13, 3, 5 &...
- Page 3 ASSEMBLY INSTRUCTIONS - continued STEP 3: Attach the gates to the raised bed boards Install gate stopper (12) with screws (11) on the inner side of the board to prevent the gate from swinging inward View from the inner side of the board.
- Page 4 ASSEMBLY INSTRUCTIONS - continued STEP 5: Apply black netting to frame- work Apply the netting onto the remaining framework using zip ties. Attach top of netting flush with horizontal poles so the netting will hang over your raised bed. Attach zip ties all along the top horizontal steel tubes and vertical tubes as well. Customer Service: 1800-914-9835 | support@frameitall.com...
- Page 5 ASSEMBLY INSTRUCTIONS – stack and extend Add additional kits to create a higher or larger barrier area. To stack another animal barrier – same way of assembling the barrier and use the additional round sleeves (part 22 – 1 sleeve is included in each pack). Slide the round sleeve (22) below the short sleeve.
- Page 6 ASSEMBLY INSTRUCTIONS – stack and extend (continued) To extend another animal barrier - where the door is parallel as the 1 barrier Remove bottom hinge connector (2) and replaced it with extension connector (23) Remove middle sleeve (8) and replaced it with hinge connector (7) Remove middle sleeve (8) and replaced it with hinge connector (7)
Need help?
Do you have a question about the Stack & Extend and is the answer not in the manual?
Questions and answers