Table of Contents
Advertisement
Quick Links
Advertisement
Chapters
Table of Contents

Related Manuals for Baumer Hübner DeviceNet HMG10


Summary of Contents for Baumer Hübner DeviceNet HMG10
- Page 1 Operating Manual HMG10 & HMG10P DeviceNet EN-US Absolute Encoder...
-
Page 2: Table Of Contents
List of contents Baumer Hübner List of contents 1 About this document........................... Purpose .............................. Warnings in this manual ........................Labels in this manual .......................... Disclaimer ............................Scope of delivery ..........................Name plate ............................Maintenance and service life ......................Approvals and warranty ........................ - Page 3 Baumer Hübner List of contents Terminal box ............................33 6.2.1 Pin assignment at terminal box ..................... 33 6.2.2 Output signals additional incremental output (optional) ............33 6.2.3 Switching level additional output incremental (optional) ............34 6.2.4 Programming interface (only for programmable variant) ............34 6.2.5...
-
Page 4: About This Document
In addition, the local occupational health and safety regulations and general safety regulations apply. The illustrations in this manual are examples only. Deviations are at the discretion of Baumer at all times. Warnings in this manual Warnings draw attention to potential personal injury or material damage. -
Page 5: Disclaimer
Baumer Hübner About this document Disclaimer The manufacturer is not liable for personal injury and/or property damage resulting from im- proper use of the device. Scope of delivery The scope of delivery includes: 1 x rotary encoder 1 x instruction manual... -
Page 6: Approvals And Warranty
About this document Baumer Hübner Do not perform any modifications at the device. The expected service life of the device depends on the ball bearings featuring permanent lubri- cation. For any queries or subsequent deliveries refer to the product data specified on the device label, in particular type and serial number. -
Page 7: General Information
For further information see www.baumer.com. V1, T1 | HMG10 & HMG10P DeviceNet Operating Manual... -
Page 8: Transport And Storage
Transport and storage Baumer Hübner Transport and storage Transport NOTICE Material damage due to improper transport. a) Ensure maximum diligence when unloading the delivered packages as well as when trans- porting them inside the company. b) Note the information and symbols on the packaging. -
Page 9: Description
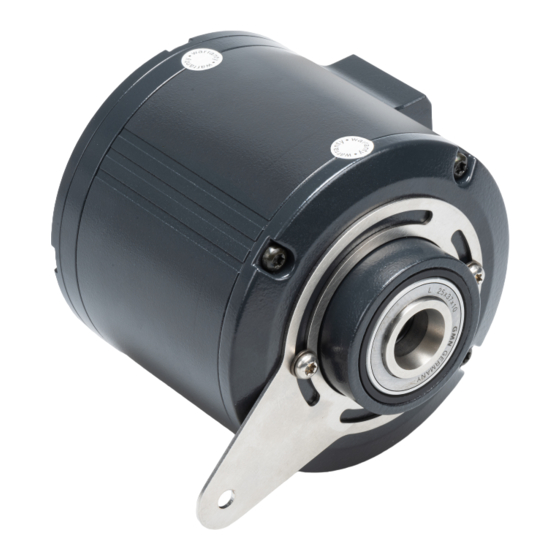
Baumer Hübner Description Description Rotary encoder Ill. 1: Description HMG10 Hexagon head screw M6x18 mm (ISO Washer B6.4 (ISO 7090) 4017) Self-locking nut M6 (ISO 10511) Torx screw M4x10 mm, TX20 (ISO 14583) Torque plate 360°, attachable in any posi- Housing... -
Page 10: Mounting Accessories (Not Included)
Description Baumer Hübner Mounting accessories (not included) Ill. 2: Mounting accessories Torque arm of length L (see table) Threaded rod M6, variable length ≤ 210 Washer B6.4 for grounding strap (ISO Cheese-head screw M6x8 mm for 7090) grounding strap (ISO 1207) Washer B6.4 (ISO 7090) -
Page 11: Tools Required
Baumer Hübner Description Tools required 3 mm, 5 mm, 6 mm 1,6×8 mm, 0,8×4 mm 10 mm (2×), 17 mm, 22 mm 10 mm, 20 mm V1, T1 | HMG10 & HMG10P DeviceNet Operating Manual... -
Page 12: Installation
Installation Baumer Hübner Installation NOTICE Equipment damage due to mechanical shock Strong vibration may lead to overload by constraining force. a) Never apply force. If properly assembled, everything fits smoothly together. b) Use only suitable tools for disassembly (see chapter on disassembly). - Page 13 Baumer Hübner Installation Instruction: a) Loosen the Torx screws. b) If required, you may remove the Torx screws completely for turning around the torque plate. Then carefully screw the Torx screws back in, but do not tighten already. c) Move the torque support to the desired position.
-
Page 14: Attaching The Torque Arm To The Device
Installation Baumer Hübner Attaching the torque arm to the device Ill. 3: Attaching the torque arm to the device Hexagon head screw M6x18 mm (ISO Torque arm 4017) Torque plate Tool 10 mm (2×) Instruction: w Screw torque arm onto the support plate using hexagon head bolt, washer and self-locking nut. -
Page 15: Blind Hollow Shaft Encoder Installation
Baumer Hübner Installation Blind hollow shaft encoder installation DANGER Injuries caused by shaft rotation Hair and clothing may get caught in rotating shafts which may lead to serious personal injury. a) Make sure the device is idle. b) Before performing any work at the device, make sure power supply is and remains discon- nected. - Page 16 Installation Baumer Hübner DIN 332-D M6x16 mm 16 mm Clamping element (not for cone shaft) Blind hollow shaft or cone shaft with wrench flat SW 17 mm Cover Torx/slotted head screw M4x10 mm (DIN 7964) Cheese-head screw M6x30 mm (ISO...
-
Page 17: Mounting The Encoder To Cone Shaft
Baumer Hübner Installation Instruction: a) Verify drive shaft about any concentricity error (see further links). b) Mount the encoder in a way ensuring the electrical connection is protected against water ingress. c) Loosen the encoder cover. d) Apply grease onto the drive shaft. - Page 18 Installation Baumer Hübner Blind hollow shaft or cone shaft with Cover wrench flat SW 17 mm Torx/slotted head screw M4x10 mm (DIN Cheese-head screw M6x30 mm (ISO 7964) 4762) Spring washer 6 (DIN 7980) Self-locking nut M6 (ISO 10511) Torque arm Washer B6.4 (ISO 7090)
-
Page 19: Hollow Shaft Mount
Baumer Hübner Installation f) Attach cover using the Torx/ slotted screws (4x). g) Mount the torque arm together with threaded rod, washers (3x) and self-locking nuts (3x). Observe the torque arm mounting instructions (see further links). h) Attach grounding strap using cheese head screw and washer. - Page 20 Installation Baumer Hübner >113 mm Self-locking nut M6 (ISO 10511) Threaded rod M6 (variable length ≤ 210 Grounding strap Washer B6.4 (ISO 7090) Through hollow shaft Torx screw M3x12 mm (ISO 7045) Torque arm Cheese-head screw M6x8 mm for grounding strap (ISO 1207) Washer B6.4 for grounding strap (ISO...
- Page 21 Baumer Hübner Installation 2 Avoiding and calculating angular errors [} 25] 2 Mounting the torque arm at drive [} 22] V1, T1 | HMG10 & HMG10P DeviceNet Operating Manual...
-
Page 22: Mounting The Torque Arm At Drive
Installation Baumer Hübner Mounting the torque arm at drive NOTICE Incorrect mounting of the torque arm may reduce service life and cause angular errors A torque arm backlash of ±0.03 mm, for example, means concentricity errors of 0.06 mm at the drive shaft which may result in severe angular errors. -
Page 23: Hmg10 Installation Versus Hog10
Baumer Hübner Installation 5.6.1 HMG10 installation versus HOG10 Maximum compatibility in HOG10 mounting is obtained with the torque arm facing away from the motor. However, this can only be achieved using the terminal box (connection code -P) and mounting that is shifted by 180°, or alternatively with a M23 flange connector. - Page 24 Installation Baumer Hübner Or, for the 1st generation of HMG10 (2015-2020) using the cranked torque plate ( no.11241731) HMG10 (1. Generation) HMG10 with cranked support plate 69.5 Also see about this 2 Avoiding and calculating angular errors [} 25] Operating Manual...
-
Page 25: Avoiding And Calculating Angular Errors
Baumer Hübner Installation Avoiding and calculating angular errors INFO For further information, please call the telephone hotline at +49 (0)30 69003-111. Instruction: a) Make sure that concentricity errors of the drive shaft do not exceed 0.2 mm (0.03 mm rec- ommended) to prevent angular errors. -
Page 26: Electrical Installation
Electrical installation Baumer Hübner Electrical installation DANGER Injury by to secondary damage Encoder failure or incorrect signals may entail system control errors. a) Eliminate secondary encoder damage by the relevant safety precautions in the downstream electronics. NOTICE Sensor damage due to faulty power supply. -
Page 27: Devicenet
Electrical installation DeviceNet 6.1.1 DeviceNet features INFO Detailed instructions for the DeviceNet interface as well as the EDS file can be found on the Baumer website www.baumer.com. Fieldbus protocol DeviceNet Device profile Device Profil for Encoders V 1.0 Operating modes... -
Page 28: Connecting The Devicenet Connection Cable
Electrical installation Baumer Hübner 6.1.2 Connecting the DeviceNet connection cable NOTICE Equipment damage by ESD The electronic components in the device are sensitive to high voltage a) Do not touch terminals or electronic components. b) Protect output terminals from external voltage. -
Page 29: Ill. 4 Connecting The Supply Cable
Baumer Hübner Electrical installation Ill. 4: Connecting the supply cable Torx / slotted screw M4x32 mm Washer A4 (DIN 137) DeviceNet bus terminal box D-SUB connector D-SUB socket Terminals Cable shield Cable gland M16x1.5 mm (for cable di- ameter 5-9 mm) -
Page 30: Pin Assignment Devicenet
Electrical installation Baumer Hübner f) Connect cable shield to cable gland and make sure it covers a large area. g) Attach the cable gland to the terminal box. h) Mount the terminal box at the encoder. To do this, tighten the screws with a torque of 2-3 6.1.3... -
Page 31: Mating Connector (5-Contact, A-Coding)
Baumer Hübner Electrical installation 6.1.3.2 Mating connector (5-contact, A-coding) Ill. 7: Mating connector (5-contact, A-coded) Mating connector Connection Description DRAIN Shield connection Operating voltage 10-30 V DC Ground connection for UB CAN_H CAN Bus Signal (dominant HIGH) CAN_L CAN Bus Signal (dominant LOW) 6.1.4... -
Page 32: Setting The Terminating Resistor
Electrical installation Baumer Hübner 6.1.5 Setting the terminating resistor ON = final bus user OFF = any bus user 6.1.6 Setting the bus user address 1. Digit user address 2. Digit user address (Illustration shows example user address 23). 6.1.7... -
Page 33: Terminal Box
Baumer Hübner Electrical installation Terminal box 6.2.1 Pin assignment at terminal box Connection Description Operating voltage Ground connection Output signal channel 1 Output signal channel 1 inverted Output signal channel 2 (90° offset to channel 1) Output signal channel 2 inverted... -
Page 34: Switching Level Additional Output Incremental (Optional)
Electrical installation Baumer Hübner 6.2.3 Switching level additional output incremental (optional) Switching level TTL/RS422 TTL/HTL (Vin = Vout) High/Low ≥ 2,5 V / ≤ 0,5 V ≥ 2,5 V / ≤ 0,5 V (TTL) ≥ Ub − 3 V / ≤ 1,5 V (HTL) Transmission length ≤ 550 m bei 100 kHz ≤ 550 m bei 100 kHz (TTL) ≤ 350 m bei 100 kHz (HTL) Output frequency ≤ 600 kHz... -
Page 35: Output Switching Behavior Speed Switch (Optional)
Baumer Hübner Electrical installation 6.2.6 Output switching behavior Speed switch (optional) INFO Default switching speed is 6000 rpm for HMG10P and PMG10P. HMG10 and PMG10 without programming interface come with the individually ordered permanent switching speed. Event Speed switching output state... -
Page 36: Ill. 10 Connecting The Supply Cable
Electrical installation Baumer Hübner Ill. 10: Connecting the supply cable Torx / slotted screw M4x32 mm Terminal box cover Cable gland M20x1.5 mm for cable di- Connection terminals (wire cross-sec- ameter 5...13 mm tion ≤ 1.5 mm Cable shield Tool 20 mm 22 mm... -
Page 37: Pin Assignment
Baumer Hübner Electrical installation 6.2.8 Pin assignment NOTICE Operating voltage present at the outputs results in encoder damage. The encoder might be damaged by any operating voltage being present at the outputs. a) Make sure that no operating voltage is present at the outputs. -
Page 38: Sensor Cable
Electrical installation Baumer Hübner Sensor cable HEK 8 - 10-core sensor cable for rotary encoders 2 cores 0.5 mm (supply), 4 twisted pairs 0.25 mm (signal), cable length on request. HEK 17 - 16-core sensor cable for rotary encoders 2 cores 0.5 mm (supply), 3 twisted pairs 0.14 mm... -
Page 39: Disassembly
Baumer Hübner Disassembly Disassembly NOTICE Equipment damage due to mechanical shock Strong vibration may lead to overload by constraining force. a) Never apply force. If properly assembled, everything fits smoothly together. b) Use only suitable tools for disassembly (see chapter on disassembly). -
Page 40: Removing The Encoder From Blind Hollow Shafts Or Cone Shafts
Disassembly Baumer Hübner Removing the encoder from blind hollow shafts or cone shafts DANGER Burns caused by heat The device heats up at high torque. There is a risk of getting burned after use. a) Avoid overheating the device. b) Wear suitable gloves. -
Page 41: Threaded Pin To Secure At Blind Hollow Shaft
Baumer Hübner Disassembly Tool 5 mm 1,6×8 mm 10 mm, 17 mm 20 mm Instruction: a) Disconnect the electrical connection to the encoder using the plug-in terminal boxes and contacts. b) Remove the cover at rear. c) Unscrew the cheese-head screw and secure at the hollow shaft using a wrench. -
Page 42: Detaching The Encoder From Blind Hollow Shafts
Disassembly Baumer Hübner 7.1.3 Detaching the encoder from blind hollow shafts Cheese head screw M8x45 mm (ISO 4762) Werkzeug 6 mm 17 mm Instruction: w Slide encoder off the shaft by loosening the cheese-head screw and support the shaft using a wrench. -
Page 43: Detaching The Encoder From Through-Hollow Shaft
Baumer Hübner Disassembly Detaching the encoder from through-hollow shaft DANGER Burns caused by heat The device heats up at high torque. There is a risk of getting burned after use. a) Avoid overheating the device. b) Wear suitable gloves. >113 mm Ill. 13: Detaching the encoder from the through-hollow shaft... -
Page 44: Technical Data
Technical data Baumer Hübner Technical data HMG10 Electrical Data Voltage supply Ub 10-30 V DC Short-circuit proof Operating current without load ≤ 200 mA Initializing time ≤ 500 ms after switch-on Sensing principle Magnetic Fieldbus interface DeviceNet Data rate (fieldbus) 125-500 kBaud User address Rotary switch inside the bus terminal box Steps per turn 8192 / 13 Bit... - Page 45 Baumer Hübner Technical data HMG10 Operating speed ≤6000 rpm Switching speed range ns (off) = ±2 ... ±6000 rpm, (HMG10P: factory setting 6000 rpm) Operating torque typically. 10 Ncm Rotor torque 950 gcm Maximum permitted shaft load ≤ 450 N axial ≤ 650 N radial Materials Housing: aluminium alloy Shaft: stainless steel Operating temperature −40 ...+85 °C...
-
Page 46: Blind-Hollow Shaft Dimensions
Technical data Baumer Hübner Blind-hollow shaft dimensions 14.6 ± 9° 79.5 69.5 86.5 66.6 86.5 Positive ød L1 L2 direction of 16 53 65.5 ± 15° 20 35 50 111.5 rotation Ill. 14: Dimensions of blind hollow shaft in mm (unless specified otherwise) Through hollow shaft dimensions 14.6... -
Page 47: Cone Shaft Dimensions
Baumer Hübner Technical data Cone shaft dimensions 14.6 79.5 ± 9° 69.5 86.5 86.5 6kt SW17 1:10 Positive 22.5 direction of 37.5 ± 15° rotation 110.5 Ill. 16: Cone shaft dimensions (in mm unless specified otherwise) V1, T1 | HMG10 & HMG10P DeviceNet... - Page 48 List of illustrations Baumer Hübner List of illustrations Ill. 1 Description HMG10 ..........................Ill. 2 Mounting accessories ......................... 10 Ill. 3 Attaching the torque arm to the device ....................14 Ill. 4 Connecting the supply cable....................... 29 Ill. 5 Connections HMG10 DeviceNet......................30 Ill.
- Page 52 www.baumer.com/worldwide...
Need help?
Do you have a question about the Hübner DeviceNet HMG10 and is the answer not in the manual?
Questions and answers