Table of Contents
Advertisement
Quick Links
Advertisement
Table of Contents

Subscribe to Our Youtube Channel
Related Manuals for hadewe Veloria


Summary of Contents for hadewe Veloria
- Page 1 Manual Veloria Art. No. 0975 FB 04-267 Rev. 2 Date: 02.06.2016...
-
Page 2: Table Of Contents
Directory Foreword Safety instructions Cleaning & Disinfection Getting to know the unit Before the use Operation Working positioning Suction Changing filter bag Changing control unit filter Clamping the bur/ tool Setting up the speed Foot switch Maintenance & Care Cleaning the chuck Maintance overview Handling instructions Troubleshooting... -
Page 3: Foreword
Veloria unit. If you have any questions or suggestions you can contact us by telephone or email. This user manual belongs with the Veloria unit. Keep it somewhere safe. If you give this product to someone else please include this document as it includes important infor- mation on how to correctly use the product. - Page 4 Safety Instructions This appliance can be used by children aged from 8 years and above and persons with reduced physical, sensory or mental capabilities or lack of experience and knowledge if they have been given supervision or instruction concerning use of the appliance in a safe way and understand the hazards involved.
-
Page 5: Safety Instructions
Safety Instructions Only when pulling the mains cable, you can ensure that the device will be completely disconnected from mains. Check the mains cable regularly for damages and in case of such, have it be changed or repaired by an authorized service center. - Page 6 Safety Instructions Before using the equipment, assure that: the tool can be pushed far enough into the chuck (Test this with a dipstick and clean if necessary) the inserted tool sits properly in the chuck and will not cant/jam while clamping it ...
- Page 7 Safety Instructions When the device is brought out of standby mode it will run with the rotation speed and suction power used last. Take care to not start the mill at an overly high rotation speed. Select the required rotation speed before chang- ing the milling tool.
-
Page 8: Cleaning & Disinfection
Safety Instructions Cleaning and disinfection The device is designed to be compatible with rotating in- struments which do not penetrate the skin or mucosal or inadvertently may still cause injuries. For this application please adhere to the cleaning and disinfection instructions provided be- low. -
Page 9: Getting To Know The Unit
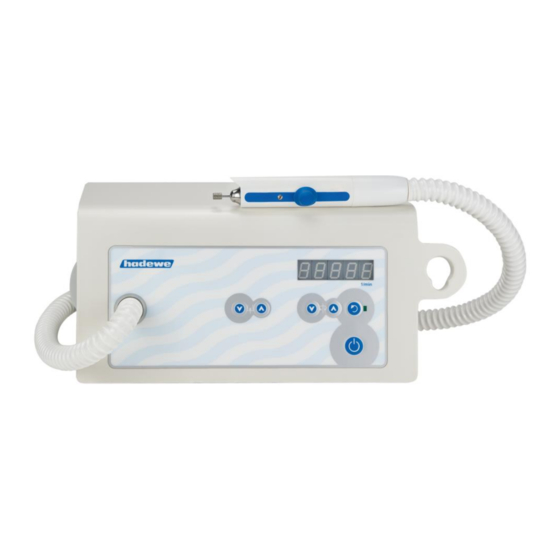
Getting to know the unit Gerät kennen lernen 1 Decrease the suction output 2 Increase the suction output 3 Reduce the speed 4 Increase the speed 5 Display of speed/ suction level 6 Change direction of rotation 7 LED: ON during reverse rotation 8 Main switch 9 Switching ON/OFF the unit (Standby) 10 Connecting socket for foot switch... -
Page 10: Before The Use
Before the use Please read through the instructions Operation carefully before using the unit and The working area must conform to carefully note the safety advice. the conditions described. Set up the Always keep this manual accessible unit in such a way, that the air slits to any users of the drill. - Page 11 Before the use Should the handpiece be twisted by the If you have a foot switch insert its hose you can adjust that at the con- plug into the port on the right of the trol unit. device which displays this sym- Check that the filter bag and dust filter are correctly fitted.
-
Page 12: Use Operation
Operation If you want to take a break or finish In the following section the order in the job press the standby button (9). which you should use the device is The handpiece motor and suction described. Additionally the individu- will turn off. -
Page 13: Working Positioning
Work positioning The following images are examples of how to work on various parts of the foot. Always make sure that the foot is firmly gripped and that you can work freely and without strain. -
Page 15: Suction
Suction Pull out the lid of the dust chamber Switch on the suction with button and remove the old filter. (2). The suction output can be regu- lated in 5 levels. You will see the Hold the filter in the middle to pre- selected level in the display. -
Page 16: Clamping The Bur/ Tool
Foot switch (Art. 0970) Commencement of foot switch Only use the original hadewe foot switch to avoid damages. Insert the plug of the foot switch into the socket with this symbol: Function of the foot switch... -
Page 17: Cleaning The Chuck
Maintance & Care Set the screw spanner (wrench) on Cleaning the chuck the axle and hold it tight. Now use Because of the additional protection the front of the second spanner to washer (see right), not much dirt is unscrew the chuck. usually entering the handpiece. -
Page 18: Maintance Overview
A damage of the handpiece. the ball bearings, clamping tech- nique or motor could be the conse- materials used quence. hadewe prevend a formation of rust. In cases in which a rust infestation was found within the handpiece, thorough inspections examinations... - Page 19 Maintance & Care Working with high pressure will not improve the out- come of your work, since the motor will even be slowed down. A second disadvantage is the stronger impact on the ball bearings and the motor, which will shorten their life span in the long run.
-
Page 20: Troubleshooting
Footswitch is used constantly or faulty Pull out the socket of the bur/tool itself can be tested with the hadewe Bur Shaft Tester (Art. No. foot switch to see if this is the cause (4990) to see if it is bent). -
Page 21: Technical Data
Protection class II 2014/30/EU directive EMC Accuracy of speed display: ±10% 2014/35/EU low voltage directive Handpiece: Type B applied part hadewe GmbH – Grambartstraße 10 – Diameter: 19-25 mm 30165 Hannover Length: 144mm Speed: 6.000 - 40.000 rpm Ambient conditions: The device is intended for use in dry, closed rooms. -
Page 22: Disposal
(WEEE Reg.Nr DE20392713, b2b device). For disposal of this unit out of Germany, please contact the site where you bought this hadewe product. Note for the disposal of the device/ treatment system: Wear protecting gloves of the class... -
Page 23: Symbol
Technical data Symbol Caution! Important Note! Follow instructions for use Temperature limit (indicates the lower and upper temperature limit) pressure: permissible range humidity: permissible range Keep dry ON/ OFF button (standby) (no disconnection from main power supply) Change direction Suction Rotation Alternating current Direct current... -
Page 24: Safety Check
Technical data Safety Check A safety check must be done in compli- ance with the regulations of the country where the device is used. The inspec- tion interval is once a year. Accessories Art. No. 5179 Micro filter 3752 filter 0970 Foot switch The clamping system is designed... - Page 28 GmbH Grambartstraße 10 30165 Hannover Germany info@hadewe.de www.hadewe.de...
Need help?
Do you have a question about the Veloria and is the answer not in the manual?
Questions and answers