Table of Contents
Advertisement
Quick Links
Advertisement
Table of Contents

Related Manuals for hadewe Azuras PLUS


Summary of Contents for hadewe Azuras PLUS
- Page 1 Manual Azuras PLUS Art. 0983 FB 04-301 Rev. 1 Date: 30.01.2019...
-
Page 2: Table Of Contents
Directory Foreword Safety Instructions Cleaning & Disinfection Discover Device Before Use Area of Application Operation Usage Operating Steps Work Positioning Infilling the Spray Speed Spray Insert Bur Adjusting the Speed Memory Keys Foot Switch Select Menu Help Menu Settings Menu Confirm Washer Change Turn Light ON/OFF Pictures &... -
Page 3: Foreword
This user manual includes a detailed description and explanation of how to use the Azuras Plus unit. If you have any questions or suggestions, you can contact us by telephone or email. This user manual belongs with the Azuras Plus unit. Keep it somewhere safe. -
Page 4: Safety Instructions
Safety Instructions The installation of the working area has to correspond to the relevant regulations. Set up the unit in such a way, that the air slits are not blocked and the extracted air can escape well. This device shall only be used by persons who are familiar with feature and function of the unit. - Page 5 Safety Instructions Only switch on the unit if the handpiece rests secured in the handpiece holder, or if you hold it safely in your hand. Prevent any liquids from entering into the control unit, since this could damage the electronic elements. Clean the outside of the box only with a damped cloth.
- Page 6 Only use distilled water plus a sterilizing additive, e.g. hadewe AquaHy (art. no. 8555). If you use other brands pay attention to their manuals if you can use them for this purpose.
- Page 7 Safety Instructions Change the spray liquid every day. Always add disinfection additive to the distilled water. Rinse the tank daily and fill it with fresh water every day. Empty the unit if it is not in use for a longer period of time, e.g.
- Page 8 Safety Instructions speed (see manufacturer’s instructions), or • only use the speed required by the instrument, • the tool is absolutely dry. For safety reasons, do not change the tool while the motor is running. Switch off the unit immediately if the bur comes off during the treatment itself, •...
- Page 9 Safety Instructions handling (e.g. trying to repair the unit) of the equipment will immediately nullify guarantee/warranty and any other liabilities of the manufacturer. Using the memory buttons: Only use burs/tools which are permitted for speed level saved under (15) to (17)! When the device is brought out of standby mode, it will run with the rotation speed used last.
-
Page 10: Cleaning & Disinfection
Cleaning and Disinfection The device is designed to be compatible with rotating instruments which do not penetrate the skin or mucosal or inadvertently may still cause injuries. For this application please adhere to the cleaning and disinfection instructions provided below. After every treatment please carry out the following steps: •... -
Page 11: Discover Device
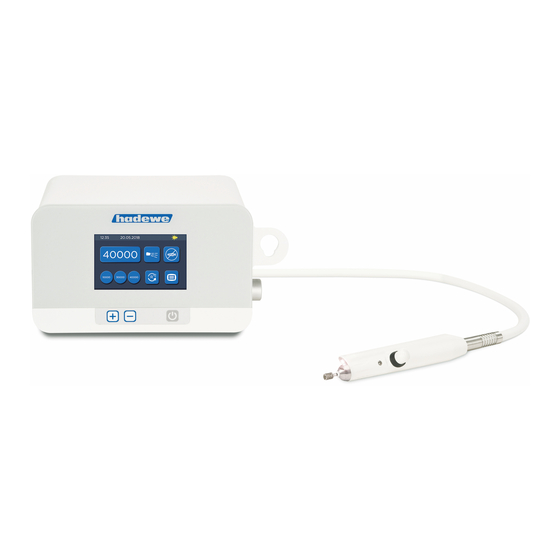
Discover Device 10 11 12 main power switch speed display USB port turn OFF / ON spray increase speed maintenance required reduce speed USB stick plugged in (green press briefly: switch unit on light) press again briefly: turn on the light (yellow when switched on) handpiece turn off handpiece &... -
Page 12: Before Use
Before Use Please read through the instructions Caution: area carefully before using the unit and pedicure you have to work carefully note the safety advice. with spray techniques. Always keep this manual accessible to any users of the drill. Operation The working area must conform to Area of Application the conditions described. - Page 13 Before Use This is followed by 5 other pages Image: Bird's-eye view of work area with important clues. With proceed to the next page. On the If you have a foot switch, insert its last page press to start the plug into the port on the right of the device.
-
Page 14: Usage
Usage In the following section the order in spray amount, you can start with which you should use the device is working. described. Additionally, individual steps will be explained in Frequently used speed can be detail. Read the complete manual saved. -
Page 15: Work Positioning
Usage Work Positioning The following images are examples of how to work on various parts of the foot. Always make sure that the foot is firmly gripped and that you can work freely and without strain. - Page 16 Usage...
-
Page 17: Infilling The Spray Speed
Usage Infilling the Spray Liquid based spray fluids often attack hoses and make them Switch off the device. Pull out the porous. spray tank on its handle. Hold the cover of the tank in hand and unscrew the tank. Now fill it with Spray distilled water and anti-germ liquid, e.g. -
Page 18: Insert Bur
Usage Insert Bur Adjusting the Speed The handpiece is equipped with a Put the handpiece back in the chuck, which can hold all burs with handpiece holder or keep it in your a diameter of 2.35 mm (this is the hand. -
Page 19: Memory Keys
Foot Switch Operation of the foot switch Only use the original hadewe foot switch to avoid any (art. no. 0970) damages. Insert the plug of the foot switch into the socket with the... -
Page 20: Select Menu
Usage Select Menu Help Menu In the select menu, you can use the Manual: Here is a short form of the following functions: manual. This does not replace the original manual in paper form, as Pictures/Videos: viewing pictures or the latter contains more detailed videos from your USB stick instructions and safety instructions. -
Page 21: Settings Menu
Usage Settings Menu Confirm Washer Change Every 50 hours of operation you will get the message to "Please change washer!". After the washer change, the following must be entered into the instrument. On the start screen, click the icon for the Select Menu: Time: set the system time Date: set the system date Language: set the language for the... -
Page 22: Pictures & Videos
Usage Pictures & Videos The image and video viewer can be used to view images in JPG format and videos in EMF format from the USB stick. Preferably, use the supplied USB stick (4 GB, art. no. 6354). USB sticks from other manufacturers are mostly compatible. - Page 23 <Date>, the file list is sorted in descending order by date. Available video formats The EMF format can be viewed. At http://www.hadewe.net/video-library/ provide a program ready to convert your own videos from other formats to EMF format. Open the file to begin installation. Follow the instructions on the monitor.
- Page 24 Clicking Convert starts the conversion. The video file [*.emf] is written in the destination folder. Video library http://www.hadewe.net/video-library/ you can download videos and pictures on the subject of foot care for your device. Download this on the USB flash drive in order to consider the devices.
-
Page 25: Messages
Messages RECOMMENDED MAINTENANCE See chapter Cleaning the Chuck → After prolonged use, replace- and help video “Clean Chuck” under ment of wearing parts such as ball the menu item “Help”. bearings is recommended. The control unit evaluates the period SHUTDOWN SPEED since the last maintenance and the DIFFERENCE... -
Page 26: Maintenance & Care
Maintenance & Care Washer Water Filter handpiece Even smallest parts of dirt could equipped with a white washer (art. block the nozzle, which sits in the no. 4571). This washer has to be top. Avoiding such blockages, there replaced by a new one every 50 is a water filter installed in the cap operation hours,... -
Page 27: Cleaning Function
Maintenance & Care Cleaning Function Cleaning the Chuck Use the cleaning function if the Because of the washer, very little nozzle is blocked. Turn the unit off dirt might enter the handpiece. In using button 5 (Standby). the curse of the time, dirt can appear and might interrupt the Remove the water filter at first. -
Page 28: Maintenance Overview
Maintenance & Care Rinse the chuck very well, and make sure you let it dry well afterwards. Cover your index finger with a very little amount (just a drop) of oil and rub in between your thumb and index finger. Dab off the oil until your fingers is only covered with a very thin film of oil. -
Page 29: Upload Firmware
5. As soon as the last line "Please 1. Download the firmware from restart device" is displayed, the http://www.hadewe.net/video-library update is complete and you can Save the file on a USB stick. The switch the device off using the main file must be located in the root power switch (1). -
Page 30: Handling Instructions
Working with high pressure materials used will not improve the outcome hadewe prevent a formation of your work, since the of rust. In cases in which a motor will even be slowed down. A rust infestation was found within the... -
Page 31: Troubleshooting
There are parts of dirt in the bur/tool itself can be tested with spray system. → Cleaning the the hadewe Bur Shaft Tester spray system according to the (art. no. 4990) to see if it is bent. instructions in the manual. - Page 32 Troubleshooting Handpiece motor stutters shortly (approx. 1 sec) when turning unit In very rare cases this effect did appear. It will not harm or damage the device. Spray stream stutters. There is air in the spray system. After 5 min running, this effect will disappear.
-
Page 33: Technical Details
2014/30/EU directive EMC The clamping system is designed 2014/35/EU low voltage directive for rotating instruments, which have a shaft of 2,35 mm in accordance hadewe GmbH – Grambartstraße 10 with DIN EN ISO 179-1. 30165 Hannover – Germany Operating Time Safety Check... - Page 34 ON / OFF button (standby) (WEEE Reg. No. DE20392713, b2b (no disconnection from main device). For disposal of this unit out power supply) of Germany, please contact the site where you bought this hadewe set spray product. alternating current direct current safety fuse...
- Page 36 GmbH Grambartstraße 10 30165 Hannover Germany info@hadewe.de www.hadewe.de...
Need help?
Do you have a question about the Azuras PLUS and is the answer not in the manual?
Questions and answers