Table of Contents
Advertisement
Quick Links
Advertisement
Table of Contents

Subscribe to Our Youtube Channel
Related Manuals for hadewe Argos 2


Summary of Contents for hadewe Argos 2
- Page 1 Manual Argos² 0572 Art. No. 0572 FB 04-278 Rev. 0 Date: 10.05.2016...
-
Page 2: Table Of Contents
Safety Instructions Foreword Safety instructions Cleaning & Disinfection Getting to know the unit Before the use Area of Application Fill in the spray liquid Operation Application Operation Work positioning Infilling the spray liquid Mounting/Changing the filter Insert the bur Adjusting the speed Spray Drying / changing tool Footswitch... -
Page 3: Foreword
Safety Instructions The Argos foot care unit was produced according to strict quality criteria and uses the latest technology in its design. The images in this manual may vary slightly from the product you have bought as we are constantly developing our products. -
Page 4: Safety Instructions
Safety Instructions Children should be supervised not to play with the appli- ance. The installation of the working area has to correspond to the relevant regulations. Set up the unit in such a way, that the louvers are not covered and the extracted air can es- cape well. - Page 5 The unit has to be separated from the socket and cannot be used any longer Only use distilled water plus a sterilizing additive (e.g. hadewe Aqua Hy item no. 8555). If you use other brands pay attention to their manuals if you can use them for this purpose. Never use tap water.
- Page 6 Safety Instructions Rinse the tank daily and fill it with fresh water every day. Empty the unit if it is not in use for a longer period of time (e.g. before vacations). Clean out the tank. Set the spray function on maximum. Now start the spray function, and the water will spray for approx.
- Page 7 Safety Instructions Switch off the unit immediately if: the bur comes off during the treatment itself. the motor blocks during the treatment. Always follow the operating instructions. Do not carry out any repairs, modifications or maintenance work yourself. This is only to be accomplished by an authorized special- ist.
-
Page 8: Cleaning & Disinfection
Cleaning and disinfection Cleaning and disinfection The device is designed to be compatible with rotating in- struments which do not penetrate the skin or mucosal or inadvertently may still cause injuries. For this application please adhere to the cleaning and disinfection instructions provided be- low. -
Page 9: Getting To Know The Unit
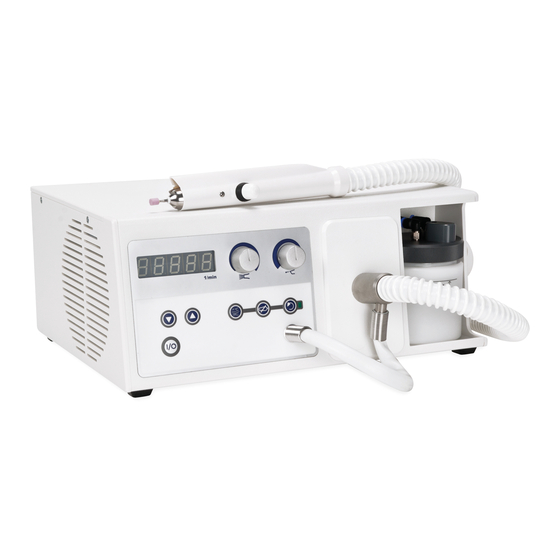
Getting to know the unit 8 9 10 11 12 13 Display Knob to start the suction and for adjusting the suction level Knob for adjusting the amount of spray Connection for suction hose Lid of the water tank Water tank ON / OFF button (line voltage is not disconnected, unit in standby) handpiece speed down... -
Page 10: Before The Use
Before the use Do not exceed the maximum Please read through the instructions level when filling the tank. carefully before using the unit and carefully note the safety advice. While screwing back the cover on Always keep this manual accessible the tank, make sure that is closed to any users of the drill. -
Page 11: Operation
Before the use If you have a foot switch insert its Operation plug into the port on the right of the device which displays this sym- The working area must conform to the conditions described. Set up the unit in such a way, that the air slits are not blocked and the extracted Make sure, that the tank is filled air can escape well. -
Page 12: Application
Application After setting the speed and the Operation spray amount or suction, you can start with working. In the following section the order in which you should use the device is If you want to take a break or finish described. -
Page 13: Work Positioning
Application Work positioning The following images are examples of how to work on various parts of the foot. Always make sure that the foot is firmly gripped and that you can work freely and without strain. - Page 14 Application...
-
Page 15: Infilling The Spray Liquid
Application Infilling the spray liquid Mounting/Changing the filter Switch off the device. Pull out the spray tank on its handle. Hold the Remove cover plate with filter cover of the tank in hand and un- (Art.5115). Now the filter can be screw the tank. -
Page 16: Adjusting The Speed
Foot switch (Art. 0970) Commencement of foot switch Only use the original hadewe foot switch to avoid damages. Insert the For security reasons, only plug of the foot switch into the socket... -
Page 17: Maintance And Care
Maintenance & Care Washer The top of the handpiece is equipped with a white washer (article no. 4571). This washer has to be replaced by a new one every four weeks, unless exchanging it, water could enter the handpiece and cause a lot of damag- es of the internal parts. -
Page 18: Cleaning Function
Maintenance & Care Cleaning the chuck Cleaning function Because of the washer, very little Use the cleaning function, if the nozzle dirt might enter the handpiece. In is blocked. the curse of the time, dirt can ap- Turn the unit off. Remove the water pear and might interrupt the perfor- filter at first. -
Page 19: Maintance Overview
Maintenance & Care Set the first key (see picture below) on Maintance overview the axle and hold it tight. Screw out the chuck with the second key, which has What has to be done? How often? the forefront Done by whom? Cleaning the chuck, Monthly by user changing the washer... -
Page 20: Handling Instructions
Working with high pressure will interior parts of the handpiece. not improve the outcome of your work, since the motor will Any materials used by hadewe even be slowed down. A second prevend a formation of rust. In disadvantage is the stronger impact... -
Page 21: Troubleshooting
There are parts of dirt in the spray sys- tem cleaning the spray system bur/tool itself can be tested with the hadewe Bur Shaft Tester (Art. No. according to page 10. (4990) to see if it is bent). The blue water filter (art. No. 3497) in the tank is blocked ... - Page 22 Troubleshooting HS, EE in Display The motor does not start, because thechuck is still open Insert the bur and tighten it well (pull the black buttonbackwards).Than start handpiece at max. speed. Spray stream stutters There is air in the spray system. Af- ter 5 min running, this effect will dis- appear.
-
Page 23: Technical Details
The device is designed for extended ity, that the following footcare control usage. units 0572 are consistent with the fol- lowing guidelines: 2014/30/EU EMC guide line 2014/35/EU low voltage guide line hadewe GmbH – Grambartstraße 10 – 30165 Hannover - Germany... - Page 24 Temperature limit (indicates the (WEEE Reg.Nr DE20392713, b2b lower and upper temperature limit) device). For disposal of this unit out of Germany, please contact the site pressure: permissible where you bought this hadewe range product. humidity: permissible range...
- Page 25 Techniqual Details Safety Check Accessories A safety check must be done in compliance with the regulations of Art. No. Description the country where the device is 4571 Protection washer used. The inspection interval is 3497 Spray filter once a year. 5179 Micro filter 5116...
- Page 28 GmbH Grambartstraße 10 30165 Hannover Germany info@hadewe.de www.hadewe.de...
Need help?
Do you have a question about the Argos 2 and is the answer not in the manual?
Questions and answers