Table of Contents
Advertisement
Quick Links
Advertisement
Table of Contents

Subscribe to Our Youtube Channel
Related Manuals for hadewe Veloria Chrome


Summary of Contents for hadewe Veloria Chrome
- Page 1 Manual Veloria Chrome Art. 0978 FB 04-299 Rev. 1 Date: 14.06.2019...
-
Page 2: Table Of Contents
Directory Foreword Safety Instructions Cleaning & Disinfection Getting to Know the Unit Before First Use Area of Application Operation Application Operation Steps Working Positioning Suction Exchange Micro Filter Exchange Control Unit Filter Clamping the Bur/Tool Adjusting the Speed Foot Switch Maintenance &... -
Page 3: Foreword
Short description of functions The Veloria Chrome is a device for the treatment of callus and nails. The handpiece is compatible with rotating tools such as diamond polishers, steel cutters, and ceramic cutters. -
Page 4: Safety Instructions
Safety Instructions The installation of the working area has to cor- respond to the relevant regulations. Set up the unit in such a way, that the air slits are not blocked and the extracted air can escape well. To avoid the risk of electrocution only connect the device to the mains power supply. - Page 5 Safety Instructions Prevent your hair from wrapping itself around moving parts. If applicable, wear a hair net. When working with materials, which might cre- ate dust or moisture, use a drilling unit with suction or spray technique. Wear a nose and mouth protection.
- Page 6 Safety Instructions Before using the equipment, assure that • the tool can be pushed far enough into the chuck (Test this with a dipstick and clean if necessary.) • the inserted tool sits properly in the chuck and will not cant/jam while clamping it, •...
- Page 7 Safety Instructions 10 operating hours. If it is full, please exchange it. A filter should be exchanged at least after 50 operating hours. Never use the suction to vacuum any liquids (or air/water fog which contains particles of liq- uids). Always follow the operating instructions.
- Page 8 Safety Instructions the required rotation speed before changing the milling tool. This appliance can be used by children aged from 8 years and above and persons with re- duced physical, sensory or mental capabilities or lack of experience and knowledge if they have been given supervision or instruction concerning use of the appliance in a safe way and understand the hazards involved.
-
Page 9: Cleaning & Disinfection
Cleaning & Disinfection The device is designed to be compatible with rotating in- struments which do not penetrate the skin or mucosal or inadvertently may still cause injuries. For this application please adhere to the cleaning and disinfection instructions provided be- low. -
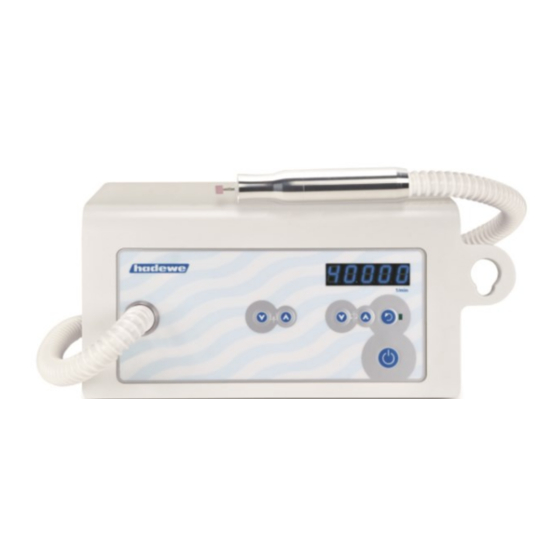
Page 10: Getting To Know The Unit
Getting to Know the Unit decrease the suction level increase the suction level reduce the speed increase the speed display of speed/suction level change direction of rotation LED is ON during anti-clockwise rotation main switch ON/OFF button (standby) connecting socket for foot switch... -
Page 11: Before First Use
Before First Use Please read through the instructions Operation carefully before using the unit and The working area must conform to carefully note the safety advice. the conditions described. Set up the Always keep this manual accessible unit in such a way, that the air slits to any users of the drill. - Page 12 Before First Use If you have a foot switch, insert its Take up the handpiece. Should the plug into the socket (10) which dis- handpiece be twisted by the hose you can adjust that at the control plays this symbol unit.
-
Page 13: Application
Application Operation Steps and suction will turn off. The hand- piece can now be placed in its In the following section the order in holder on the right of the unit. Alter- which you should use the device is natively, you can switch the device described. -
Page 14: Working Positioning
Application Work Positioning The following images are examples of how to work on various parts of the foot. Always make sure that the foot is firmly gripped and that you can work freely and without strain. - Page 15 Application...
-
Page 16: Suction
Application Suction Pull out the lid of the dust chamber and remove the old filter. Switch on the suction with button (2). The suction output can be regu- When installing the new filter, hold lated in 5 levels. You will see the the filter in the middle to prevent it selected level in the display. -
Page 17: Clamping The Bur/Tool
Foot Switch Connecting with control unit Only use the original hadewe foot switch (art. 0970) to avoid damag- es. Insert the plug of the foot switch into the socket (10) with this symbol... -
Page 18: Maintenance & Care
Maintenance & Care Cleaning the Clamping Turn the drill clockwise while you hold fast the white plastic part: System When inserting the instruments, it may happen that dust enters the clamping system. This may cause that instruments can no longer be inserted deep enough and that a tight grip is no longer granted. -
Page 19: Maintenance Overview
Maintenance & Care Maintenance Overview What has to be How often? done? Done by whom? cleaning the monthly by user chuck changing every 50 hours of the micro filter operation by user (check after each 10 hours) changing the every 200 hours control unit filter of operation by user... -
Page 20: Handling Instructions
Working with high pressure hadewe prevend a formation will not improve the outcome of rust. In cases in which a of your work, since the mo- rust infestation was found within the tor will even be slowed down. A... -
Page 21: Troubleshooting
Use of bent burs/tools. → Pull out the mains plug to Use a different bur/tool to test reset the device. this. The bur/tool itself can be tested with the hadewe Bur unit shows different Shaft Tester (art. 4990) to sound levels at different sites see if it is bent. -
Page 22: Technical Data
2014/30/EU directive EMC 2.35 mm in accordance with EN 2014/35/EU low voltage directive ISO 1797-1. hadewe GmbH – Grambartstraße 10 – 30165 Hannover Operating Time The device is designed for extend- ed usage. Safety Check... - Page 23 (WEEE Reg.-Nr. DE20392713, b2b Keep dry! device). For disposal of this unit out of Germany, please contact the site ON/OFF button (standby) where you bought this hadewe (no disconnection from main product. power supply) change direction Note for the disposal of the device/...
- Page 24 GmbH Grambartstraße 10 30165 Hannover Germany info@hadewe.de www.hadewe.de...
Need help?
Do you have a question about the Veloria Chrome and is the answer not in the manual?
Questions and answers
Non riesco a svitare il tappo del serbatoio perché è andato sotto pressione cosa devo fare?