Table of Contents
Advertisement
Quick Links
Advertisement
Table of Contents

Subscribe to Our Youtube Channel
Related Manuals for Shini SG-50 Series


Summary of Contents for Shini SG-50 Series
- Page 1 SG-50/50B "Regular" Central Granulators Date: Feb, 2019 Version: Ver.B (English)
-
Page 3: Table Of Contents
Contents General Description ..................9 1.1 Coding Principle ..................10 1.2 Feature ....................10 1.3 Technical Specifications ................ 12 1.3.1 Outline Dimension(SG-50B) ............12 1.3.2 Technical Specification(SG-50B) ..........12 1.3.3 Outline Dimension(SG-50) ............14 1.3.4 Technical Specification(SG-50) ..........15 1.4 Safety Regulations ................16 1.4.1 Safety Signs and Labels ............. - Page 4 3.2 Installation Place ................... 29 3.3 Feed Box Installation ................31 3.4 Cooling Water Connection ..............32 3.5 Power Connection ................. 32 3.5.1 Check the Running Direction of the Motor ........33 3.5.2 Check the Running Direction of the Blower ........ 34 3.6 Options Installation ................
- Page 5 6.5.2 Adjustments of V Belts ..............54 6.6 Lubrication .................... 54 6.6.1 Lubricating Oils (Following brands are suggested.) ....54 6.6.2 Please Grease the Bearing with Lubricating Oils Periodically ..55 6.7 Maintenance ..................55 6.7.1 Daily Check ................55 6.7.2 Weekly Check ................
- Page 6 Picture 2-5: Locking Bolt of Feed Box ............... 24 Picture 2-6: Dust Separator System ..............24 Picture 2-7: Screen ................... 24 Picture 2-8: Optional Cutter (High Cutting Point) ..........25 Picture 2-9: Automatic Conveying Device ............26 Picture 2-10: Belt Conveyor ................26 Picture 2-11: Material Side Feed Pipe ..............
- Page 7 Picture 6-15: Daily Maintenance of V Belts ............53 Picture 6-16: Belt Adjustment ................54 Picture 6-17: Oil Throat ..................55 7(59)
- Page 8 8(59)
-
Page 9: General Description
1. General Description Please read this manual carefully before using this machine in order to operate correctly against any damage caused due to improper operation. Note! Always take great care when the blades are within reach, they are very sharp and can cause personal injury. Forbidden to process flammable or toxic material! SG-50(B) series granulators are applicable to granulate various kinds of plastic materials from injection molding, blow molding or extrusion molding. -
Page 10: Coding Principle
1.1 Coding Principle 1.2 Feature l Rotating cutters adopt newly developed V-type cutting technology which can send the feeding material into the center of rotating cutters so to prevent the material from adhering onto the inner side of the cutting chamber while enhancing its wearability. - Page 11 Other chapters contain instructions for the daily operator. Any modifications of the machine must be approved by SHINI in order to avoid personal injury and damage to machine. We shall not be liable for any damage caused by unauthorized change of the machine.
-
Page 12: Technical Specifications
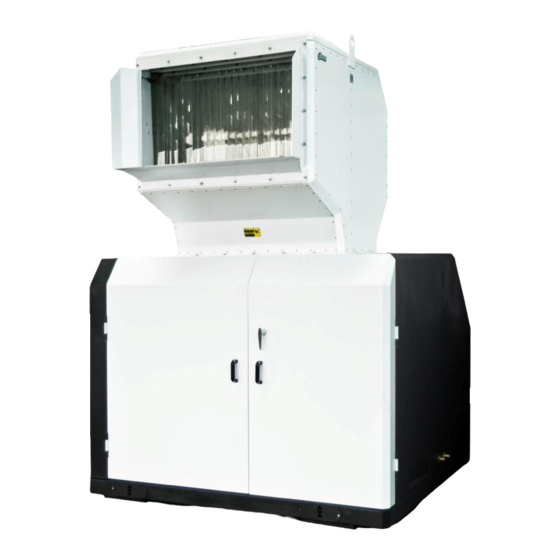
1.3 Technical Specifications 1.3.1 Outline Dimension(SG-50B) Main unit Control box Conveyor belt is optional Optional height-increasing storage bin Picture 1-1: Outline Dimension (SG-50B) 1.3.2 Technical Specification(SG-50B) Table 1-1: Technical Specification (SG-50B) Model SG-5080B SG-50110B Ver. Motor Power (kW) (50/60Hz) Rotor Speed (rpm) (50/60Hz) Conveying blower (kW)(50/60Hz) Handspike Motor Power (kW, 50/60Hz) 0.32... - Page 13 Cutting Chamber (mm) 500×800 500×1100 Max. Output(kg/hr) 1100 1500 Noise Level dB(A) 110~115 110~115 ● ● Cooling Water Device Screen (mm) Ф12 Ф12 ○ ○ Height-increasing storage bin Dimension H (mm) 2980 2980 H1 (mm) 2170 2170 H2 (mm) H6 (mm) H7 (mm) 1260 1260...
-
Page 14: Outline Dimension(Sg-50)
1.3.3 Outline Dimension(SG-50) Main unit Optional DS+300kg material storage tank Control box Side feed pipe is optional Conveyor belt is optional Optional DS Optional material storage tank 14(59) -
Page 15: Technical Specification(Sg-50)
Optional height-increasing storage bin Picture 1-2: Outline Dimension (SG-50) 1.3.4 Technical Specification(SG-50) Table 1-2: Technical Specification(SG-50) Model 5080 50110 Ver. Motor Power (kW) (50/60Hz) Rotor Speed (rpm) (50/60Hz) Conveying blower (kW)(50/60Hz) Handspike Motor Power (kW, 50/60Hz) 0.25 0.25 Material of Blades SKD11 SKD11 Quantity of Fixed Blades(Optional) -
Page 16: Safety Regulations
D (mm) 2000 2000 D1(mm) 1740 1740 D2(mm) 5470 5470 D3(mm) W1 (mm) 1740 2040 W2 (mm) 2730 2730 W3 (mm) 1100 W4(mm) W5(mm) 215×215 215×215 Weight(kg) 3280 3820 Note:1) SKD11 is material code number of Japanese JIS standard. We reserve the right to change 2) Maximum output is subject to the diameter and material of specifications without prior notice. - Page 17 Be careful with the rotating knives, they are very sharp and can cause personal injury! If the rotor must be turned manually-do this with great care! The granulator should not be able to start before the hopper and screen bracket are properly closed. Attention please! Ear protection is used during granulating of plastic materials.
-
Page 18: Transportation And Storage Of The Machine
When operate the granulator, please notice the following signs. Please do maintenance regularly. Water outlet: cooling water. Water inlet: inlet for replenishing water and cooling water. 1.4.2 Transportation and Storage of the Machine Transportation 1) SG-50(B) series of granulators are packed in crate or plywood cases with wooden pallet at the bottom, suitable for quick positioning by fork lift. -
Page 19: Rejected Parts Disposal
Storage 1) SG-50(B) series should be stored indoors with temperature kept from 5℃to 40℃ and humidity below 80%. 2) Disconnect all power supply and turn off main switch and control switch. 3) Keep the whole machine, especially the electrical components away from water to avoid potential troubles caused by the water. -
Page 20: Exemption Clause
The following statements clarify the responsibilities and regulations born by any buyer or user who purchases products and accessories from Shini (including employees and agents). Shini is exempted from liability for any costs, fees, claims and losses caused by reasons below: 1) Any careless or man-made installations, operation and maintenances upon machines without referring to the Manual prior to machine using. -
Page 21: Structural Features And Working Principle
2. Structural Features and Working Principle 2.1 General Description SG-50(B) series granulators applicable to granulate waste plastic of wastes and rejected products from injection, blow moulding and extrusion lines. Make sure to clean the metal scraps and dirt before granulating! 2.1.1 Working Principle Parts name: 1. -
Page 22: Safety System
If any safety system change takes place, no commitment will be fulfilled and all replaced components should be provided by SHINI. 2.2.1 Emergency Stop Button Emergency stop button is a red button on the control panel. Press it then the machine will stop working. -
Page 23: Safety Switch
The breaker interlock is fixed on the granulator, if control box door changes or circuit breaker trips, it would cut off the power supply to stop the machine. Picture 2-3: Breaker Interlock 2.2.3 Safety Switch The granulator SG-50 has three safety switches; one is located between the feed box and cutting chamber, and the other two are located at the front and rear door. -
Page 24: Optional Accessories
Picture 2-5: Locking Bolt of Feed Box 2.3 Optional Accessories 2.3.1 Dust Separating System Picture 2-6: Dust Separator System Dust Separator can separate the dust in the regrind for immediate recycle use. The dust will be kept in filter bag, thus working environment will remain clean.This device ensures full use of regrind to avoid material wasting and enhance the economy returns. -
Page 25: Cutter
Special screen mesh sizes: Ф8, Ф10, Ф14, Ф17, Ф25 (mm). Add "SS + screen diameter" at the end of model code, e.g.: Ф 8mm, add "SS08". Note: Screen diameter directly affects granulator performance! 2.3.3 Cutter International code Material China GB USA ASTM Japan JIC SKD11... -
Page 26: Automatic Conveying Device
with thick wall and sheet. Based on the high cutting point of standard layout, a row of fixed blade is added and makes it a 3 rows of fixed blades so that cutting performance is higher than that of 2 rows of fixed blades. But 3 rows have the same design parameter, features and applications as the 2 rows. -
Page 27: Material Side Feed Pipe
Material feeding for traditional large granulators is quite a difficult matter. They are generally installed at a lower place or a platform must be built for material feeding. Add “BCF”at the model behind. 2.3.6 Material Side Feed Pipe Picture 2-11: Material Side Feed Pipe The design of feeding hopper of traditional granulators is not suitable for longer pipes and section bars. -
Page 28: Sound-Proof Box
2.3.8 Sound-proof Box Picture 2-13: Sound-proof Box Optimized structure and hermetic double sound-proof layers keep noise level low. (Standard equipped in SG-50) 2.3.9 Height-increasing Storage Bin Picture 2-14: Height-increasing Storage Bin When some customers crush car bumpers, the standard feed box inlet may not suitable for the long bumpers. -
Page 29: Installation And Debugging
3. Installation and Debugging Read through this chapter before installation. Install as following orders to avoid any accident! Be careful! Not to be cut by the sharp blade. Power connection must be done by the professional electrician to avoid electrical shock! 3.1 Installation Notice 1) The machine is standard equipped with anti-vibration pad, there is no need other device for postion fixing. -
Page 30: Picture 3-1: Installation Diagram 1
Step1 Step2 Step3 Picture 3-1: Installation Diagram 1 Note: Make enough installation space to help the repair and maintenance. Check and make sure the installation ground is level. There is enough intensity when it is running.Use spirit level to adjust the cutting chamber to the level position. Picture 3-2: Installation Diagram 2 Note: Make sure there is at least 500mm safety space to open the feed box. -
Page 31: Feed Box Installation
3.3 Feed Box Installation 1) Open the two front doors of the machine. Picture 3-4: Feed Box Installation 1 2) Carefully lift the feed box above the cutting chamber and aim to the screw holes. Picture 3-5: Feed Box Installation 2 3) Lock the screws of the feed box. -
Page 32: Cooling Water Connection
3.4 Cooling Water Connection The cooling water device is mounted in the rear-block water tank of the machine. Connect the water pipe connector of the rear block and the water pipe connector on machine shell with ordinary water pipe (Ф26mm), pressure 2~3bar. Lock them up with pipe clamp and make sure there is no leakage. -
Page 33: Check The Running Direction Of The Motor
3.5.1 Check the Running Direction of the Motor 1) Open the door to check whether the feed box, screen and storage box are fixed. 2) Close the door. 3) Ensure the main power switch is in ON position. 4) Check the emergency stop button is pressed or not, rotate the button clockwisely to reset. -
Page 34: Check The Running Direction Of The Blower
3.5.2 Check the Running Direction of the Blower 1) Check whether the running direction of the blower is in accordance with the symbol on the shield. 2) Connect to the power and stop again to check the blower’s running direction. Picture 3-6: Blower Running Direction CAUTION! If the blower’s running direction is not in accordance with the symbol, the... -
Page 35: Installtion Of Separating Conveying Device
2) Connect to conveying pipe, and the diameter is 4’’×2. 3) Mount dust collection device including air and dust separate bags. 4) Place a container under the separator to help collecting plastic material after dustremoving. Notes! If use cloth bag to connect the separator, please make sure a good ventilation within the cloth bag. -
Page 36: Operation Guide
2) If the surface of the rotor is loosen. If any of the above suitation is found, please contact local representative or SHINI company for help. 4.1 Startup Pretest Unpainted part of the machine has been covered with stainless oil. Before use, the stainless oil should be cleaned. -
Page 37: After First Startup For 2 Hours
4.1.2 After First Startup for 2 Hours 1) Check the space of the cutting tools of the fixed blades and rotating blades again; check whether the lockup screws of the blades are loose. 2) Check the position-adjusting screws of the motor and check whether the position-adjusting screws are tightened. -
Page 38: Open The Feed Box, Screen Bracket And The Storage Box
Start/Stop Button: The granulator has start/stop button, which controls machine’s start/stop. Emergency Stop Button: Besides, the machine has design of emergency stop button. When accident or emergency happens, press down the emergency stop button to stop the machine. Picture 4-6: Start/stop and Emergency Stop Button Note: Never stop the granulator before any material in the hopper or cutter chamber is completely granulated. -
Page 39: Open The Feed Box
4.3.1 Open the Feed Box 1) Firstly, loosen the lock screw of the feed-box fixing bolt. Picture 4-2: Electric Handspike Button 2) Check if the feed box and cutting chamber are emptied totally or not. 3) Press the electric handspike button, it pushes forwardly to open the feed box, and then turn off the main power. -
Page 40: Open The Storage Box And Screen
4.3.2 Open the Storage Box and Screen 1) Power off the granulator. 2) Open the front door. 3) Loosen the fast pipe clamp at the end of outlet pipe and put it aside. Picture 4-3: Loosen the Fast Pipe Clamp 4) Loosen the two star screws, and draw out the storage box. -
Page 41: Timer (Optional With Feeding Blower)
Note: The screen bracket is supported by pneumatic stick to avoid its dropping when opening it. 4.4 Timer (Optional with feeding blower) Press down the stop button to stop the machine, the feeding blower working time can be prolonged by the timer, which enables the granules in the storage box be fully conveyed. -
Page 42: Trouble-Shooting
5. Trouble-shooting 5.1 Granulator Can Not Work 1) Check if the emergency stop has not been reset. If not, rotate the Button clockwise to reset it. 2) Check whether the door is closed. If not, the machine could not be started. 3) Check if the feed box is completely closed. -
Page 43: Maintenance And Repair
6. Maintenance and Repair 6.1 Repair All the repair work should be done by professionals in order to prevent personal injuries and damage of the machine. 6.1.1 Operation and Maintenance of Dust-separating System Start and stop of the machine. Start and stop of the machine is controlled by main power switch. Daily check Air bag and dust bag: check if these bags are damaged, if there is any damage, please replace them. -
Page 44: Dust-Separating System Cleaning
Weekly check Check to see if the wire has any damage and the condition of the wire,if it has any problem, please fix it. 6.1.2 Dust-separating System Cleaning Notes! Clean the machine when the processing material is changed or after every 300-hour running time. -
Page 45: Picture 6-1: Remove The Rotating Blade
Caution! During blade dismantlement and replacement, please complete it by oneself. Do avoid other human injury, and the blade replacement should be conducted individually! Caution! Do not install the cutters by working together, because this could bring personal injury. Use a thick wood block to stop the rotating knives from turning. -
Page 46: Picture 6-2: Blades Installation Adjusting
2. Remove the Fixed Blade 1) Revolve the screws of the front fixed blades. 2) Loosen and remove the inner hexagon screw on front pressing block. 3) Remove the pressing block and blades, and clean the blade rest at last. 4) Loosen and remove the screws on the back blades. -
Page 47: Picture 6-3: Installation Of Rotating And Fixed Blade
the blade without any shaking (in order to adjust the clearance between the rotating and fixed blade). 3) Mount front / back pressing block of the rotating and fixed blade on front /back block, fasten the screw till the blade without any shaking. 4) Use the feeler gauge to check the clearance between rotating and fixed blade, the distance is 0.2~0.3mm;... - Page 48 rest and main shaft should be inspected carefully, to check if there is any damage. Table 6-1: Attached Form, Cutters and Other Fixing Screw Torque Stretching Force Fv(N) Tightening Torque Ma (N.M) Threading Threading Grade Grade Grade Grade Grade Grade Type Specification -8.8...
-
Page 49: Installation Of Bearing And Blade Rest
6.2 Installation of Bearing and Blade Rest 1) Lock up the right bearing base on right block of cutting chamber, then install right-side material fender. 2) Put the blade-rest shaft inside the right bearing block. 3) 3) Mount the material fender on left bearing block, and insert to the blade-rest shaft, then lock them tightly on left block of the cutting chamber. -
Page 50: Picture 6-6: Installation Of Belt Pulley And Motor 2
3) Adjust the balance of the large pulleywith dial gauge. Stick the dial gauge to the large pulley and rotate the large pulleyto see whether the value of gauge is within 0~0.1 mm. 4) After balance, screw tightly the 3 inner hexagon screws (Torque: 710 Nm) 5) Install the small pulley on the shaft of the motor. -
Page 51: Installation Of Screen, Screen Bracket And Storage Box
Picture 6-8: Installation of Belt Pulley and Motor 4 6.4 Installation of Screen, Screen Bracket and Storage Box 1) Insert the rotary shaft of screen bracket in left / right block hole. Make the right end of rotary shaft and right block outside in a line. Picture 6-9: Installation of Storage Box, Screen and Screen Bracket 1 2) Mount the screen bracket on the rotary shaft under the cutting chamber,fix the pin hole cover with serew tightening. -
Page 52: Picture 6-11: Installation Of Storage Box, Screen And Screen Bracket 3
Picture 6-11: Installation of Storage Box, Screen and Screen Bracket 3 4) Mount the tensioning sleeve inside the swing arm of pneumatic spring, and then put through the end of left rotary shaft. 5) Mount the pneumatic spring and adjust the angle of the swing arm to the correct angle then fasten the tentioning sleeve. -
Page 53: Transmission
7) Lock the two star bolts in front of the screen bracket tightly. Picture 6-14: Installation of Storage Box, Screen and Screen Bracket 6 6.5 Transmission Pressing down the emergency stop button and main power switch before maintenance and repairing. 6.5.1 Daily Maintenance of V Belts There are four to six V belts according to motor power. -
Page 54: Adjustments Of V Belts
Table 6-2: Daily Maintenance of V Belts Dia.(mm) 18.5/22kW 30/37kW 45-55kW New belt 15mm 14mm 15mm Old belt (Six- month later) 19mm 19mm 19mm Motor 60Hz 18.5/22kW 30/37kW 45-55kW New belt 18mm 17mm 16mm Old belt (Six- month later) 23mm 23mm 20mm 6.5.2 Adjustments of V Belts... -
Page 55: Please Grease The Bearing With Lubricating Oils Periodically
Mobil:Mobilux EP2 Shell:Shell Alvania EP2 Texaco:Multifak Ep2, Novotex Grease EP2 6.6.2 Please Grease the Bearing with Lubricating Oils Periodically 1) Open the front door of the machine. 2) Inject lubricating oil via throat with an oil greaser. Picture 6-17: Oil Throat 6.7 Maintenance During maintenance, make sure there is no residue left in the granulator. -
Page 56: Monthly Check
6.7.3 Monthly Check 1) Check the belt to see whether there is some damage. 2) Check the belt's tensility every 6 months. More details to see chapter 6.2 Transmission. 3) Check the blades and screws to see if they get loose. 6.8 Cleaning CAUTION! The sharp blade may cause human injury when opening the feed box! - Page 57 12) Clean both surfaces of the cutting chamber. 13) Clean every feeding pipe, blower, and cyclone dust separator. 14) Clean the pulley with bright dust-precipitator. Re-install the machine after cleaning. Note: Take care not to be squeezed when closing the door! 57(59)
-
Page 58: Maintenance Schedule
6.9 Maintenance Schedule 6.9.1 About the Machine Model Manufacture date Voltage Ф V Frequency Power 6.9.2 Check After Installation Check if pipe connections are firmed locked by clips. Check the gap between fixed blade and rotating blade. (0.2~0.3mm). Check the rotating balance of the belt wheel. Electrical Installation Voltage: Specs of the fuse:1 Phase... -
Page 59: Monthly Check
6.9.5 Monthly Check Check the status of gear motor. Check the overload protection function of the motor. Check the tightness of the blades. Chech the pneumatic stick. Check start/stop delay function of the conveying motor Check whether clamp ring of pulley is fastened. Check belt tension.
Need help?
Do you have a question about the SG-50 Series and is the answer not in the manual?
Questions and answers