
Subscribe to Our Youtube Channel
Related Manuals for Power Fist 8536609


Summary of Contents for Power Fist 8536609
- Page 1 8536609 Pipe/Tube Notcher User Manual Please read and understand all instructions before use. Retain this manual for future reference.
-
Page 2: Specifications
Pipe/Tube Notcher SPECIFICATIONS Pipe/Tube Capacity (mm//in) 50 // 2 Steel Material of Pipe/Tube Notcher Chuck Dimension (mm//in) 13 // 1/2 Adjustment Degree Range/Increments 0-45° left / 1° Clearance between Chuck & Table (mm//in) 356 // 14 Spindle Threads for Mounting Hole Saw (mm/in) 13,16//1/2,5/8 SAVE THIS MANUAL You will need the manual for the safety warnings and precautions, assembly instructions,... - Page 3 Pipe/Tube Notcher 8536609 a full face shield if you are producing metal filings or wood chips. Wear an ANSI approved dust mask or respirator when working around metal, wood, and chemical dusts and mists. 9. Do not overreach. Keep proper footing and balance at all times. Do not reach over or across running machines.
-
Page 4: Operation
8536609 Pipe/Tube Notcher 5. Works with any standard drill press, and is adaptable to a large variety of round cutters, hole saws, and milling bits. WARNING: When using this Pipe/Tube Notcher with any powered tool, observe all safety precautions relevant to that equipment. Refer to the owner’s manual of the power equipment for safe practices in the use of attachments. -
Page 5: Maintenance
Pipe/Tube Notcher 8536609 2. Set the speed of your drill press to approximately 500 rpm for most materals. When cutting thin wall, hard alloy tubing such as chrome-moly,higher speeds will be required.When cutting softer, coarser materals,slower speeds may be ideal. -
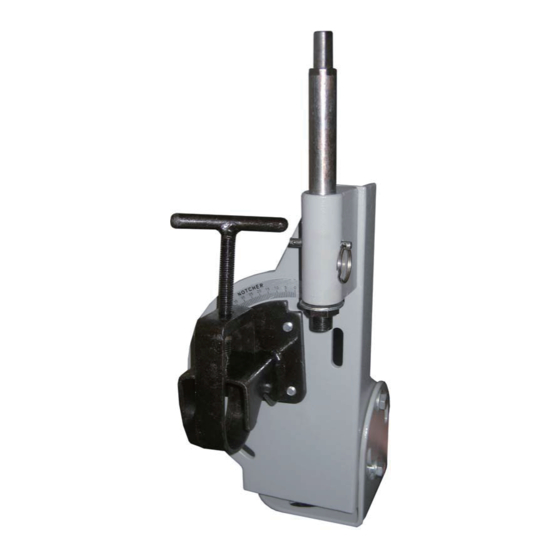
Page 6: Parts Diagram
Pipe/Tube Notcher 8536609 PARTS DIAGRAM PARTS LIST Description Description Part No. Part No. Clamp Assembly Nut M10 Washer 8mm Handle/Clamp Screw Assembly Body Hole Saw Adapter Locking Pin Bolt M8x16 Spindle Support Bolt M10x25 Adjustable Angle Joint Plate Washer 10mm... - Page 7 8536609 OUTIL À ENCOCHER LES TUYAUX/TUBES ARTICLE Manuel d'utilisateur Vous devez lire et comprendre toutes les instructions avant d'utiliser l'appareil. Conservez ce manuel afin de pouvoir le consulter plus tard.
-
Page 8: Spécifications
8536609 OUTIL À ENCOCHER LES TUYAUX/TUBES SPÉCIFICATIONS Capacité du tuyau/tube (mm//po) 50//2 Acier Matériau de l'outil à encocher les tuyaux/tubes Dimensions du mandrin (mm//po) 13//1/2 Plage/incréments de réglage en degrés 0 à 45° gauche/1° Jeu entre le mandrin et la table (mm//po) 356//14 Filets de la broche destinée à... -
Page 9: Caractéristiques
OUTIL À ENCOCHER LES TUYAUX/TUBES 8536609 lunettes antiprojections approuvées par l'ANSI. Portez un écran facial panoramique si votre travail produit des limailles ou des copeaux de bois. Portez un masque antipoussières ou un appareil respiratoire approuvé par l'ANSI lorsque vous travaillez où il y a des poussières et des vapeurs provenant du métal, du bois ou de produits chimiques. - Page 10 8536609 OUTIL À ENCOCHER LES TUYAUX/TUBES 3. La plaque de jonction à inclinaison réglable (n o 17) s'adapte à toute table de travail et convient tout particulièrement pour la perceuse à colonne. 4. La plaque de jonction à inclinaison réglable (n o 17) peut pivoter et tourner, ce qui conjointement avec le dispositif de retenue ajustable facilite grandement les angles de coupe composés.
-
Page 11: Entretien
8536609 OUTIL À ENCOCHER LES TUYAUX/TUBES UTILISATION 1. Insérez le tube que vous désirez couper dans l'ensemble de bride (n o 1), soit sous le « V » inversé. Le « V » inversé de la bride retiendra votre tube (d'une longueur maximale de 2 po) en place. -
Page 12: Diagramme Des Pièces
OUTIL À ENCOCHER LES TUYAUX/TUBES 8536609 7. Laissez la goupille de sécurité (n o 14) en place dans le support de broche (n o 16) au moment de déplacer ou de remiser cet appareil. 8. Remisez l'outil à encocher les tuyaux/tubes recouvert dans un endroit sec et exempt de poussière. -
Page 13: Liste Des Pièces
OUTIL À ENCOCHER LES TUYAUX/TUBES 8536609 LISTE DES PIÈCES N o de pièce N o de pièce Description Qté Description Qté Ensemble de bride Écrou M10 Ensemble de poignée/vis Rondelle de 8 mm de bride Corps Adaptateur de scie-cloche Goupille de sécurité...
Need help?
Do you have a question about the 8536609 and is the answer not in the manual?
Questions and answers