ROBOTIQ 2F-85 Manual
Hide thumbs
Also See for 2F-85:
- Original notice (126 pages) ,
- Quick start manual (2 pages) ,
- Instruction manual (152 pages)

Related Manuals for ROBOTIQ 2F-85


Summary of Contents for ROBOTIQ 2F-85
- Page 1 Original Notice © 2021 Robotiq Inc. Robotiq 2F-85 & 2F-140 for Cobots robotiq.com | leanrobotics.org Instruction Manual...
- Page 2 Contact http://www.hinyeung.com Email: jim@hinyeung.com Contact Us Phone 0755-83215213 (+86) 18670025215 Head Office 显扬科技(深圳) 深圳市福田区长富金茂大厦1号楼4112室 显扬科技(佛山) 佛山市南海区狮山镇广工大数控装备协同创新 研究院A座507 Where automation Pros come to share their know-how and get answers. dof.robotiq.com FT 300-SForce Torque Sensor - Instruction Manual...
-
Page 3: Table Of Contents
3.1. Scope of Delivery 3.2. Required Tools and Equipment 3.3. Environmental and Operating Conditions 3.4. Mechanical Installation 3.5. Electrical Setup 3.6. Testing the Gripper with the Robotiq User Interface (RUI) 4. Control 4.1. Overview 4.2. Gripper Register Mapping 4.3. Robot Output Registers & Functionalities 4.4. - Page 4 6.3. Fingertip replacement 6.4. Overhaul 7. Spare Parts, Kits and Accessories 8. Troubleshooting 8.1. Using the Robotiq User Interface (RUI) 9. Warranty and Patent 10. Harmonized Standards, Declarations and Certificates 10.1. Translation of original EC declaration of incorporation 10.2. Applied standards 11.
- Page 5 Revisions Robotiq may modify this product without notice, when necessary, due to product improvements, modifications or changes in specifications. If such modification is made, the manual will also be revised, see revision information. See the latest version of this manual online at support.robotiq.com.
- Page 6 Information provided by Robotiq in this document is believed to be accurate and reliable. However, no responsibility is assumed by Robotiq for its use. There may be some differences between the manual and the product if the product has been modified after the edition date.
-
Page 7: General Presentation
Adaptive Gripper has two versions, 85 and 140. The 2-Finger version will change finger opening dimensions, which will be 85 mm (2F-85) or 140 mm (2F-140). Both versions use the same base, installation and control will be exactly the same. The 2-Finger Gripper is a robotic peripheral that is designed for industrial applications. -
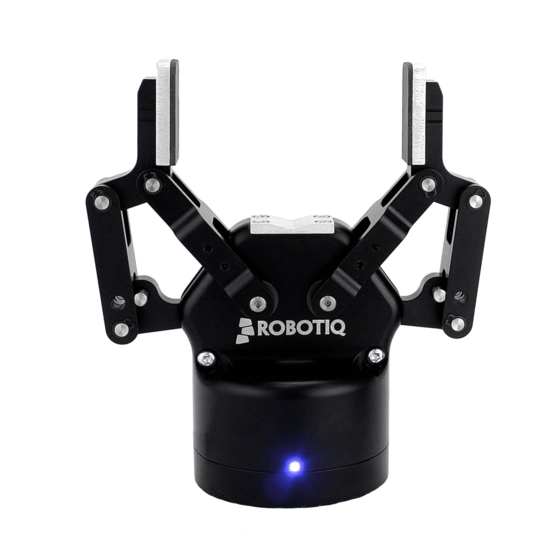
Page 8: Gripper Nomenclature
Fig. 1-1: Robotiq 2-Finger Adaptive Gripper. Please refer to the Spare Parts, Kits and Accessories section for details on standard and optional parts. -
Page 9: 85 Vs. 2F-140
Finger kits are available in the Spare Parts, Kits and Accessories section. Info Details on the 2-Finger 85 and 2-Finger 140 (dimensions and specifications) can be found in the Specifications section. Fig. 1-2: The 2-Finger 85 and 140 mm versions. 2F-85 & 2F-140 - Instruction Manual... -
Page 10: Object Picking
Also, to ensure stability, the object should be held against the gripper palm while performing an encompassing grip. Refer to Fig. 1-5 for a visual representation of the parallel and encompassing grasp regions on the distal phalanx of the 2-Finger Gripper. 2F-85 & 2F-140 - Instruction Manual... - Page 11 Refer to the figure below for a visual representation and to the Picking Features section for details on the possible position commands of your gripper. Fig. 1-4: Finger internal and external grasping. 2F-85 & 2F-140 - Instruction Manual...
- Page 12 Grasping an object that could be grasped by an encompassing grasp (a cylinder for example) on the equilibrium line is not recommended, as slight variations on the position will switch the grasp from parallel to encompassing and vice versa. Robot programming should be done so that the grasping mode will be predetermined. 2F-85 & 2F-140 - Instruction Manual...
-
Page 13: Setup And Control
(various software packages are available for control via various robot controllers). Info Robotiq Universal Controller is available when industrial communication protocols are required (other then Modbus RTU). A gripper coupling is required for using 2-Finger, the coupling will provide mechanical and electrical connectivity. Please refer to the Mechanical Installation section for installation of the coupling, to the Specifications section for technical drawings, and to the Spare Parts, Kits and Accessories section for available couplings. -
Page 14: Safety
2. Safety Warning The operator must have read and understood all of the instructions in the following manual before handling the Robotiq 2-Finger Adaptive Robot Gripper. Caution The term "operator" refers to anyone responsible for any of the following operations on the 2-Finger Adaptive Robot... -
Page 15: Warning
2.1.1. Risk assessment and final application: The Robotiq 2-Finger Adaptive Gripper is meant to be used on an industrial robot. The robot, Gripper, and any other equipment used in the final application must be evaluated with a risk assessment. It is the robot integrator's duty to ensure that all local safety measures and regulations are met. -
Page 16: Installation
3. Installation The following subsections will guide you through the installation and general setup of your Robotiq 2-Finger Adaptive Gripper. The Scope of Delivery section The Required Tools and Equipment section The Environmental and Operating Conditions section The Mechanical Installation section... -
Page 17: Scope Of Delivery
Robotiq device cable USB to RS485 signal converter Screw Kit Fig. 3-1: Schema of the required hardware. Depending on the robot, an adapter plate might be available. Refer to the Couplings section for more details. 2F-85 & 2F-140 - Instruction Manual... -
Page 18: Required Tools And Equipment
Depending on the communication protocol available, the user might need an additional signal converter such as a USB to RS232 converter, for serial ports, or a Robotiq Universal Controller for ethernet based communication. The Universal Controller supports: Ethernet/IP Modbus TCP... - Page 19 The gripper needs to be supplied by a DC voltage source. This power supply is not included with the gripper. Required power supply must match the Robotiq device. The following table shows the specifications with regards to the power supply required to operate the gripper and the optional Robotiq Controller.
-
Page 20: Environmental And Operating Conditions
Some couplings may require an additional adapter plate. To create your own coupling or adapter plate you can refer to the Couplings section. To see the details of the available couplings and adapter plates, please refer to the Spare Parts, Kits and Accessories section. 2F-85 & 2F-140 - Instruction Manual... - Page 21 2. Screw the coupling to the adapter plate (if applicable) or on the robot. 3. Screw the gripper onto its coupling. Fig. 3-2: Installing the Gripper to a Robot Using an Adapter Plate and Coupling. 2F-85 & 2F-140 - Instruction Manual...
- Page 22 2. Mount the grippers' couplings on the mounting plate using the provided M6 X 12 mm screws and tooth lock washers. 3. Mount the grippers onto the coupling using the provided M5 X 25 mm screws and tooth lock washers. Fig. 3-3: Dual 2F Gripper Configuration 2F-85 & 2F-140 - Instruction Manual...
- Page 23 3. Insert the proximal axis in the holes located on the proximal and through the chassis axis. 4. Apply medium strength threadlocker on the provided screws and secure the finger to the chassis. 5. Repeat for the other finger. Fig. 3-4: Installing the Fingers on the Gripper. 2F-85 & 2F-140 - Instruction Manual...
- Page 24 1. Align the fingertip dowel pins with the finger dowel holes. 2. Apply low strength threadlocker on the provided screws and secure the fingertips to the fingers. Fig. 3-5: Installing the Fingertips on the Gripper. 2F-85 & 2F-140 - Instruction Manual...
- Page 25 3.4.4. Installing a Protector Kit on the Gripper Fingers An optional protector kit (AGC-PRO-KIT-V4 / AGC-PRO-KIT-140) can be ordered to cover the fingers of the 2F-85/2F-140 and therefore protect users and assets against pinch points. You can install them using eight (8) M3 screws.
-
Page 26: Electrical Setup
3.5.1. Electrostatic Discharge Safety Robotiq 2F-85 & 2F-140 Gripper are not ESD safe. If installed properly using the tooth lock washers, the casing and internal mechanism are grounded through the screws used to mount the gripper on the coupling. The same is true for the coupling. For the 2F grippers, the finger mechanisms and fingertips are isolated from the rest of the gripper. - Page 27 If a Robotiq Universal Controller is used, please refer to the Robotiq Universal Controller manual. The figure below illustrates the wiring schematic of the 2-Finger with device cable, power supply, fuse (please refer to the Required Tools and Equipment section), and grounding.
- Page 28 Prior to any software installation or communication setup on the robot, connect the white, green, and bare wires to the proper signal converter required (RS485-USB, RS85-RS232, Robotiq Universal Controller). Also connect the red (24V) and black (0V) wires to the power supply.
-
Page 29: Testing The Gripper With The Robotiq User Interface (Rui)
Please refer to the Spare Parts, Kits and Accessories section for more details. 3.6. Testing the Gripper with the Robotiq User Interface (RUI) Once installed and properly secured, your Robotiq 2-Finger Adaptive Gripper should be tested with the Robotiq User Interface test software using the provided USB converter. Follow these instructions: Install the Robotiq User Interface (RUI). -
Page 30: Control
4.1. Overview The Robotiq 2-Finger Adaptive Gripper is controlled directly via Modbus RTU using a RS 485 signal. It can also be controlled via an optional Robotiq Universal Controller using an industrial protocol. The programming of the gripper can be done with the teach pendant of the robot or by offline programming. - Page 31 Fig. 4-1: 2-Finger control logic overview 2F-85 & 2F-140 - Instruction Manual...
-
Page 32: Gripper Register Mapping
ACTION REQUEST GRIPPER STATUS Byte 1 RESERVED RESERVED Byte 2 RESERVED FAULT STATUS Byte 3 POSITION REQUEST POS REQUEST ECHO Byte 4 SPEED POSITION Byte 5 FORCE CURRENT Byte 6 to 15 RESERVED RESERVED Table 4-1: Registers of the 2-Finger Gripper. 2F-85 & 2F-140 - Instruction Manual... -
Page 33: Robot Output Registers & Functionalities
3, 4 and 5 will determine aimed position, force and speed. The only motions performed without the rGTO bit are activation and automatic release routines. 0x0 - Stop. 0x1 - Go to requested position. 2F-85 & 2F-140 - Instruction Manual... - Page 34 Reserved rLBP Reserved rLBP: This register is used to bypass the red and blue LEDs and therefore turn them ON/OFF. 0x0 - Normal LED indicator behavior (default setting) 0x1 - LED indicator is forced to OFF status 2F-85 & 2F-140 - Instruction Manual...
- Page 35 Address: Byte 4 Bits Symbol This register is used to set the gripper closing or opening speed in real time, however, setting a speed will not initiate a motion. 0x00 - Minimum speed 0xFF - Maximum speed 2F-85 & 2F-140 - Instruction Manual...
- Page 36 Please refer to the Picking Features section for details on force control. 0x00 - Minimum force 0xFF - Maximum force Info Register bytes 6 to 15 are reserved and should be set to 0. 2F-85 & 2F-140 - Instruction Manual...
-
Page 37: Robot Input Registers & Status
Gripper status, returns the current status and motion of the gripper fingers. 0x00 - Gripper is in reset ( or automatic release ) state. See Fault Status if gripper is activated. 0x01 - Activation in progress. 0x02 - Not used. 0x03 - Activation is completed. 2F-85 & 2F-140 - Instruction Manual... - Page 38 Priority faults (solid blue LED) 0x05 - Action delayed, the activation (re-activation) must be completed prior to performing the action. 0x07 - The activation bit must be set prior to performing the action. Minor faults (solid red LED) 2F-85 & 2F-140 - Instruction Manual...
- Page 39 Major faults (LED blinking red/blue) - Reset is required (rising edge on activation bit (rACT) needed). 0x0A - Under minimum operating voltage. 0x0B - Automatic release in progress. 0x0C - Internal fault; contact support@robotiq.com. 0x0D - Activation fault, verify that no interference or other error occurred. 0x0E - Overcurrent triggered.
- Page 40 The current is read instantaneously from the motor drive, value between 0x00 and 0xFF, approximate current equivalent is 10 * value read in mA. Built-in features like object detection and force control use the fingers' electrical current readings. The user does not need to create these features. 2F-85 & 2F-140 - Instruction Manual...
-
Page 41: Picking Features
The table below shows the expected applied force according to the payload material hardness, speed setting rSP and force setting rFR. All tests were done with the 2-Finger Gripper with firmware GC3-1.3.9. Data was obtained with a Load Cell from Phidget, S Type, model 3138. 2F-85 & 2F-140 - Instruction Manual... - Page 42 Aluminium 6061 rubber Available with V-Groove fingertip AGC-TIP-205-0085 / AGC-TIP-421-140. Available with flat silicone fingertip AGC-TIP-204-085 / AGC-TIP-420-140. HV refers to Vickers hardness test. Durometer refers to Shore durometer hardness, scale A or scale OO. 2F-85 & 2F-140 - Instruction Manual...
- Page 43 Fig. 4-2: Grip force on hardness 220 HV (4340 annealed carbon steel). Fig. 4-3: Grip force on hardness 95 HV (6061-T6 aluminium). 2F-85 & 2F-140 - Instruction Manual...
- Page 44 Fig. 4-4: Grip force on hardness 60A (silicone). Fig. 4-5: Grip force on hardness 40 A (silicone). 2F-85 & 2F-140 - Instruction Manual...
- Page 45 Fig. 4-6: Grip force on hardness 10 A (neoprene). Fig. 4-7: Grip force on hardness 30 OO (polyurethane). 2F-85 & 2F-140 - Instruction Manual...
- Page 46 While your initial settings for force and speed are not used for Re-grasp, they will never be exceeded to prevent damaging the object. Caution The gOBJ status is cleared when a finger motion is detected. 2F-85 & 2F-140 - Instruction Manual...
- Page 47 Example of contact lost with an object: 1. From previous example, after an object is picked a. gOBJ = 0x02 2. If the gOBJ status displays 0x03 after it was 0x02, user can assume contact with the object has been lost. 2F-85 & 2F-140 - Instruction Manual...
-
Page 48: Control Logic Example
4.6. Control Logic Example Fig. 4-8: Example of Gripper control logic with corresponding registers. 2F-85 & 2F-140 - Instruction Manual... -
Page 49: Modbus Rtu Communication
Modbus RTU is a communication protocol based on a Big Endian byte order. Therefore, the 16-bit register addresses are transmitted with the most significant byte first. However, the data port is in the case of Robotiq products based on the Little Endian byte order. As such, the data parts of Modbus RTU messages are sent with the less significant byte first. - Page 50 Modbus register(0x07D0) is composed from the first 2 Robotiq Gripper bytes (byte 0 and byte 1). Info 200 Hz is the maximum speed when commanding / reading from the Robotiq Gripper. It is therefore recommended to send commands with a minimum delay of 5 ms between them.
- Page 51 Function Code 04 (Read Input Registers) Number of data bytes to follow (2 registers x 2 bytes/register = 4 bytes) E000 Content of register 07D0 0000 Content of register 07D1 4584 Cyclic Redundancy Check (CRC) 2F-85 & 2F-140 - Instruction Manual...
- Page 52 Response is: 09 10 03 E9 00 02 91 30 Bits Description SlaveID Function Code 16 (Preset Multiple Registers) 03E9 Address of the first register 0002 Number of written registers 9130 Cyclic Redundancy Check (CRC) 2F-85 & 2F-140 - Instruction Manual...
- Page 53 Number of registers written to (2) Number of data bytes to follow (2 registers X 2 bytes/registers = 4 bytes) 00E6 Value written to register 0x03E9 3CC8 Value written to register 0x03EA 2D0C Cyclic Redundancy Check (CRC) 2F-85 & 2F-140 - Instruction Manual...
- Page 54 F6C1 Cyclic Redundancy Check (CRC) Response contents might change depending on gripper status. Info Gripper executes the input command ("write" command), executes one cycle of motion, updates the output, then returns the Modbus response read. 2F-85 & 2F-140 - Instruction Manual...
- Page 55 Response is: 09 10 03 E8 00 03 01 30 Bits Description SlaveID Function Code 16 (Preset Multiple Registers) 03E8 Address of the first register 0003 Number of written registers 0130 Cyclic Redundancy Check (CRC) 2F-85 & 2F-140 - Instruction Manual...
- Page 56 Response is: 09 10 03 E8 00 03 01 30 Bits Description SlaveID Function Code 16 (Preset Multiple Registers) 03E8 Address of the first register 0003 Number of written registers 0130 Cyclic Redundancy Check (CRC) 2F-85 & 2F-140 - Instruction Manual...
- Page 57 Number of data bytes to follow (1 register x 2 bytes/register = 2 bytes) Content of register 07D0 (GRIPPER STATUS = 0x31, RESERVED = 0x00): gACT = 1 for "Gripper Activation", gSTA = 3 3100 for "Activation is completed" 4D61 Cyclic Redundancy Check (CRC) 2F-85 & 2F-140 - Instruction Manual...
- Page 58 Response is: 09 10 03 E8 00 03 01 30 Bits Description SlaveID Function Code 16 (Preset Multiple Registers) 03E8 Address of the first register 0003 Number of written registers 0130 Cyclic Redundancy Check (CRC) 2F-85 & 2F-140 - Instruction Manual...
- Page 59 GRIPPER STATUS is valid. Content of register 07D2 (POSITION = 0x0E, FINGER CURRENT = 0x0A): the position is 14/255 and the motor 0E0A current is 100mA (these values will change during motion) B66D Cyclic Redundancy Check (CRC) 2F-85 & 2F-140 - Instruction Manual...
- Page 60 GRIPPER STATUS is valid. Content of register 07D2 (POSITION = 0xBD, FINGER CURRENT = 0x00): the position is 189/255 (can be used to BD00 validate the size of the seized object) 5C9A Cyclic Redundancy Check (CRC) 2F-85 & 2F-140 - Instruction Manual...
- Page 61 Response is: 09 10 03 E8 00 03 01 30 Bits Description SlaveID Function Code 16 (Preset Multiple Registers) 03E8 Address of the first register 0003 Number of written registers 0130 Cyclic Redundancy Check (CRC) 2F-85 & 2F-140 - Instruction Manual...
- Page 62 GRIPPER STATUS is valid. Content of register 07D2 (POSITION = 0xBB, FINGER CURRENT = 0x10): the position is 187/255 and the motor BB10 current is 160mA (these values will change during motion) 7106 Cyclic Redundancy Check (CRC) 2F-85 & 2F-140 - Instruction Manual...
- Page 63 Content of register 07D2 (POSITION = 0x0D, FINGER CURRENT = 0x00): the position is 13/255 (the fingers have 0D00 reached their software limit) 17AA Cyclic Redundancy Check (CRC) Step 9: To grip additional objects, loop from step 3 2F-85 & 2F-140 - Instruction Manual...
-
Page 64: Specifications
Info This manual uses the metric system. Unless otherwise specified, all dimensions are in millimeters. The following subsections provide data on the various specifications for the Robotiq 2-Finger 85 and 140 Adaptive Grippers. Technical dimensions section Dimensions of the Gripper... -
Page 65: Technical Dimensions
Fig. 5-1: General dimensions of 2F-85 (opened). The height and width of the fingers vary with opening position. The figure above represents the 2F-85 Gripper in the opened position (position request = 0), while the figure below represents the 2F-85 Gripper in the closed position (position request = 255). - Page 66 Fig. 5-2: 2F-85 dimensions (closed). Fig. 5-3: General dimension of 2F-140 (opened). 2F-85 & 2F-140 - Instruction Manual...
- Page 67 The height and width of the fingers vary with opening position. Fig. 5-3 represents the 2F-140 Gripper in the opened position (position request = 0), while Fig. 5-4 represents the 2F-140 Gripper in the closed position (position request = 255). 2F-85 & 2F-140 - Instruction Manual...
- Page 68 5.1.2. Couplings The 2-Finger Adaptive Gripper requires a coupling provided by Robotiq to operate. The coupling is mandatory since it integrates electronics and electrical contacts. Info The coupling is common to both the 2F-85 and the 2F-140. Blank coupling Below are the dimensions of the blank coupling, AGC-CPL-BLANK-002 (refer to the Spare Parts, Kits and Accessories section), available to create a custom bolt pattern.
- Page 69 Bolt pattern for couplings GRP-CPL-062 and GRP-ES-CPL-062 (refer to the Spare Parts, Kits and Accessories section) is compatible with: 50 mm pitch circle diameter : (4) M6-1.0 low head socket cap screw clearance (1) M6 dowel pin ISO 9409-1 standard 50-4-M6 Fig. 5-6: Coupling for ISO 9409-1-50-4-M6. 2F-85 & 2F-140 - Instruction Manual...
- Page 70 Bolt pattern for coupling GRP-CPL-063 (refer to the Spare Parts, Kits and Accessories section) is compatible with: 31.5 mm pitch circle diameter : (4) M5-0.8 low head socket cap screw clearance (1) M5 dowel pin ISO 9409-1 standard 31.5-4-M5 Fig. 5-7: Coupling for ISO 9409-1-31.5-4-M5. 2F-85 & 2F-140 - Instruction Manual...
- Page 71 Bolt pattern for coupling GRP-CPL-064 (refer to the Spare Parts, Kits and Accessories section) is compatible with : 40 mm pitch circle diameter : (4) M6-1.0 low head socket cap screw clearance (1) M6 dowel pin ISO 9409-1 standard 40-4-M6 Fig. 5-8: Coupling for ISO 9409-1-40-4-M6. 2F-85 & 2F-140 - Instruction Manual...
- Page 72 Fig. 5-9: Coupling for PCD 56 mm with 8 x M4 clearance. Info Although coupling AGC-CPL-065-002 is compatible with 8 x M4 threads on a 56 mm PCD it uses only 6 of the 8 normally present holes. 2F-85 & 2F-140 - Instruction Manual...
- Page 73 Bolt pattern for coupling AGC-CPL-066-002 (refer to the Spare Parts, Kits and Accessories section) is compatible with: 56 mm pitch circle diameter: (6) M4-0.7 low head socket cap screw clearance (1) M6 dowel pin 42 mm diameter external insert Fig. 5-10: Coupling for PCD 56 mm with 6 x M4 clearance. 2F-85 & 2F-140 - Instruction Manual...
- Page 74 60 mm pitch circle diameter : (4) M5-0.8 low head socket cap screw clearance (1) M5 dowel pin 34 mm diameter external insert Fig. 5-11: Coupling for PCD 60 mm with 4 x M5 clearance. 2F-85 & 2F-140 - Instruction Manual...
- Page 75 Bolt pattern for coupling AGC-CPL-068-002 (refer to the Spare Parts, Kits and Accessories section) is compatible with : 63 mm pitch circle diameter : (6) M6-1.0 low head socket cap screw clearance (2) M6 dowel pins Fig. 5-12: Coupling for PCD 63 mm with 6 x M6 clearance. 2F-85 & 2F-140 - Instruction Manual...
- Page 76 The contact grip points for the Robotiq 2-Finger Adaptive Gripper are its two fingertips and palm pad. Robotiq offers a selection of fingertips (see the Spare Parts, Kits and Accessories section) and users can create custom fingertips. The figure below represents the distal phalanx (which acts as the fingertip holder). This part is the permanent, non customizable part of the gripper finger on which the fingertip must be mounted.
- Page 77 Flat Rubber (NBR) Overmolded Fingertip The figure below represents a flat rubber (NBR) overmolded fingertip (AGC-TIP-MLD-KIT-85 for 2F-85 and AGC-TIP-MLD-KIT-140 for 2F-140). For details, see the Spare Parts, Kits and Accessories section. Fig. 5-14: Flat Rubber (NBR) Overmolded Fingertip for 2F-85 Fig.
- Page 78 The figure below represents the available grooved fingertip AGC-TIP-205-085 (2-Finger 85) and AGC-TIP-421-140 (2-Finger 140); please refer to the Spare Parts, Kits and Accessories section. This fingertip inner surface has vertical grooves, making ideal for picking cylindrical parts. Fig. 5-16: Grooved fingertip AGC-TIP-205-085 Fig. 5-17: Grooved fingertip AGC-TIP-421-140 2F-85 & 2F-140 - Instruction Manual...
-
Page 79: Mechanical Specifications
Grasp force resolution Maximum force calculation below; refer to the Force Control section Table 5-1: Mechanical specifications of the Robotiq 2-Finger 85 and 140 Adaptive Grippers fitted with coupling GRP-CPL-062 and fingertip AGC-TIP-MLD-KIT-85 (2-Finger 85) or AGC-TIP-MLD-KIT-140 (2-finger 140) Repeatability is defined as the positional deviation resulting from the average displacement determined when picking an object with a parallel grasp using standard NBR overmolded fingertips. - Page 80 The biggest factor in such calculations will always be the friction coefficient, we recommend testing the coefficient. Warning In payload calculations, take robot acceleration into account Robot emergency stops will lead to major deceleration velocities. 2F-85 & 2F-140 - Instruction Manual...
- Page 81 Friction grasp and form-fit grasp Maximum payload by grasp type Grasp Type 2F-85 2F-140 Friction grasp 5 kg 2.5 kg Form-fit grasp 5 kg 2.5 kg 2F-85 & 2F-140 - Instruction Manual...
- Page 82 D is the distance between the bottom of the fingertips and the equilibrium line as seen on the Z axis in Fig. 1-5. Fig. 5-19: Position of the Gripper equilibrium line according to the opening angle for 2-Finger 85 and 2-Finger 140 options. 2F-85 & 2F-140 - Instruction Manual...
- Page 83 2F-140 75.5 244.0 1013 Info For TCP and center of mass of the 2F-85 or the 2F-140 used in combination with other Robotiq products, please consult the specific table provided on our support website. Info The angle to calculate the TCP for grippers mounted on a dual gripper assembly is as follows: Rx = 0 Ry+/Ry- = 0.7854...
- Page 84 50 N can damage the gripper or result in payload loss. A gripper can pick up a screwdriver and apply 3 Nm of torque to screw ( such moment would be applied in the Z axis). 2F-85 & 2F-140 - Instruction Manual...
-
Page 85: Electrical Specifications
5.3. Electrical specifications SPECIFICATION VALUE Operating supply voltage 24 V DC ±10% Absolute maximum supply voltage 28 V DC Quiescent power (minimum power consumption) < 1 W Peak current 2F-85 & 2F-140 - Instruction Manual... -
Page 86: Maintenance
Table 6-1: Maintenance intervals for the 2-Finger Grippers Replace fingertip before if wear is visible. Overhaul is recommended after 2M cycles and is done by Robotiq at the user's expense, please contact Robotiq support. Caution Always turn off the robot and the gripper power supply before performing any maintenance operations. - Page 87 Maintenance operations are for the average normal usage of the gripper, the maintenance intervals must be adjusted according to environmental conditions such as: Operating temperature Humidity Presence of chemicals Presence of physical parts (debris, scraps, dust, grease etc.) Interaction with operated parts (sharp or rough) Dynamics of the operation (accelerations) 2F-85 & 2F-140 - Instruction Manual...
-
Page 88: Gripper Cleaning
Caution The Robotiq 2-Finger Adaptive Gripper is not waterproof or water resistant without additional protection, only clean the gripper with a dry towel. Remove the gripper from its coupling using the 4 mm hex key to unscrew the four (4) M5-0.8 x 25mm screws. Note that each screw uses a tooth lock washer, do not lose them. -
Page 89: Periodic Inspection
Fingertip wear must not affect gripping, if wear is visible and affects movement, change accordingly (refer to the Gripper cleaning section). Check for any collision damage, if damage is visible, contact support@robotiq.com. Check for any sign of wear on the gripper chassis, if wear is present and may affect the gripper, contact sup- port@robotiq.com. -
Page 90: Fingertip Replacement
(overmolded or V-grooved). Low strength thread locker Refer to the Spare Parts, Kits and Accessories section to order Robotiq 2-Finger Adaptive Gripper replacement parts. Caution Always turn off the robot and the gripper power supply before performing any maintenance operations. -
Page 91: Overhaul
2 Million cycles or at warranty expiration None None Gripper overhaul is necessary when the gripper reaches 2 Million cycles or when warranty expires. Overhaul is done by Robotiq, please contact Robotiq support service. Gripper overhaul includes, but is not limited to :... -
Page 92: Spare Parts, Kits And Accessories
2 x Replacement finger Finger Kit AGC-FIN-KIT-85-V4 AGC-FIN-KIT-140-V4 2 x Hardware kit 1 x hex key 10 m Robotiq device cable for power and communication. Straight M12 5-pins 10m Device cable CBL-COM-2065-10-HF female on one side, single ended on the other, shielded... - Page 93 Finger protector AGC-PRO-KIT-V4 AGC-PRO-KIT-140 8 x M3 screws 2 x parallel locking shafts Parallel locking shaft AGC-PARA-KIT 4 x M3-0.5 x 5 mm LHCS 2 x Fingertip adapters Fingertip conversion AGC-TIP-CONV-KIT 1 x Screw Kit 2F-85 & 2F-140 - Instruction Manual...
- Page 94 Wrist adapter plate for use with AGC-CPL-064-002. Interface to 80 mm AGC-APL-153-002 80-6M8-2D82D8 with (6) M8 screws and (2) M8 dowel pins Pitch Circle Diameter For legacy part replacement visit the documentation archives and the appropriate manual or consult your Robotiq distributor. 2F-85 & 2F-140 - Instruction Manual...
-
Page 95: Troubleshooting
1. Install the Robotiq User Interface on a computer. 2. Connect your gripper to a computer USB port. 3. Send instructions to your gripper via the Robotiq User Interface. If this fails, check that all cables are connected to your grip- per and to your computer. -
Page 96: Warranty And Patent
Cycle count: One (1) cycle is defined as an object picking attempt, successful or not (open or closing onto an object, or closing on itself). It is calculated in the internal memory of the 2-Finger Adaptive Gripper and can been seen with the Robotiq User Interface. - Page 97 Robotiq reserves the right to make changes in the design or construction of any of its products at any time without incurring any obligation to make any changes whatsoever on units already purchased.
-
Page 98: Harmonized Standards, Declarations And Certificates
10. Harmonized Standards, Declarations and Certificates 10.1. Translation of original EC declaration of incorporation 2F-85 & 2F-140 - Instruction Manual... -
Page 99: Applied Standards
10.2. Applied standards This section describes all applied harmonized standards for the design and production of the Robotiq 2-Finger Adaptive Gripper. Standards are applied were applicable, some points may not be applied if not applicable to this specific product. Conformity is not enforced by any laws, it is self-applied and the aim is to define normal safety and performance requirements for similar products.
Need help?
Do you have a question about the 2F-85 and is the answer not in the manual?
Questions and answers