Table of Contents
Advertisement
Quick Links
Advertisement
Table of Contents

Related Manuals for Car Solutions MB2019-NTG6.0-TC2


Summary of Contents for Car Solutions MB2019-NTG6.0-TC2
- Page 1 MB2019-NTG6.0-TC2 User Manual support@car-solutions.com car-solutions.com...
- Page 2 Index Index 1. Main Spec 2. Block Diagram 3. Dimension 4. External Appearance 5. Connector Pin Assignment 6. Product Composition 7. DIP S/W Setting 8. Mode change 9. Touch Control 10. OSD(On Screen Display) Control 11. Install Manual 12. Q & A car-solutions.com support@car-solutions.com...
- Page 3 1. Main Spec. 1. Main Spec. 1. Input Spec. (MULTI VIDEO INTERFACE) - 1 x Digital RGB Input (Navigation System output) - 2 x A/V Input (External video source). - 1 x CVBS(REAR CAMERA) Input. (Rear camera source) - 1 x CVBS(FRONT CAMERA) Input. (Front camera source) - 1 x Analog RGB Input (Navigation System output) - 1 x LVDS Input.
-
Page 4: Block Diagram
2. Block Diagram 2. Block Diagram INTERFACE COMMAND EEPROM SYSTEM RECEIVER LVDS LVDS TFT-LCD LVDS Scaler NAVIGATION LVDS RELAY (PIP) SYSTEM FRONT CAMERA REAR CAMERA REAR CAMERA POWER car-solutions.com support@car-solutions.com... - Page 5 3. Dimension 3. Dimension 138mm * 83mm * 24mm 138mm 24mm 83mm * This can change under manufacturer’s circumstance car-solutions.com support@car-solutions.com...
-
Page 6: External Appearance
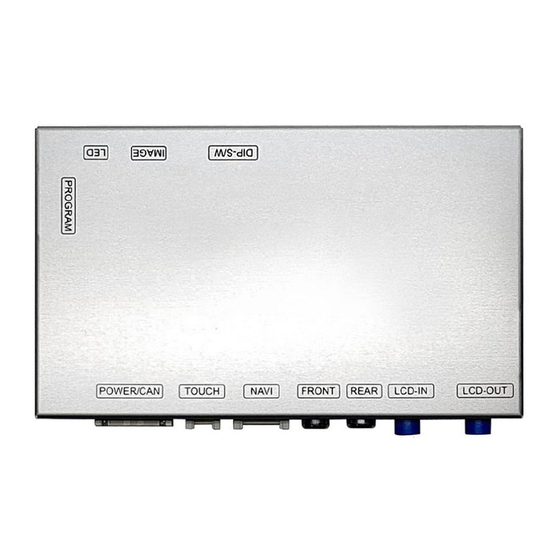
4. External Appearance 4. External Appearance IMAGE DIP S/W LVDS-IN Front R-TOUCH Camera Rear POWER/CAN Analog LVDS-OUT Camera car-solutions.com support@car-solutions.com... - Page 7 4. External Appearance 4. External Appearance DIP S/W IMAGE Front LVDS-IN R-TOUCH Camera Rear POWER/CAN Analog LVDS-OUT Camera car-solutions.com support@car-solutions.com...
-
Page 8: Connector Pin Assignment
5. Connector Pin Assignment 5. Connector Pin Assignment *Touch Connect *NAVI Connect *POWER Connect ① ② ③ ④ ① ② ③ ④ ⑤ ⑥ ⑦ ① ② ③ ④ ⑤ ⑥ ⑦ ⑧ ① Y- ① R DATA (Red) ① ACC(Yellow) ②... -
Page 9: Product Composition
6. Product Composition 6. Product Composition OSD Board 1 EA RGB Navi Cable 1 EA Interface 1 EA SPRINTER 8” / 12.3” / A-class 8” car-solutions.com support@car-solutions.com... - Page 10 6. Product Composition 6. Product Composition * Cable Sales(option) car-solutions.com support@car-solutions.com...
-
Page 11: Dip S/W Setting
7. DIP S/W Setting 7. DIP S/W Setting * ON : DOWN , OFF : UP * DIP S/W Example FUNCTION DIP S/W Selection ON : Not Used NAVI OFF : Used ON : Not used A class 8.0”Model SPRINTER 8.0”Model DVB-T OFF : used ON : Not used... -
Page 12: Mode Change
8. Mode Change 8. Mode Change A-CLASS 12.3” A-CLASS 8.0” car-solutions.com support@car-solutions.com... - Page 13 8. Mode Change 8. Mode Change SPRINTER 12.3”/ 8.0” car-solutions.com support@car-solutions.com...
-
Page 14: Touch Control
9. Touch Control 9. Touch Control Touch control - Calibration Press and hold for more than 11 seconds on NAVI, DVB-T, DVD screen. (Note that it only works the first time after switching screens) + Touch according to the shape coordinates. OSD menu ->... - Page 15 9. 9. Touch Control Touch Control DVB-T/DVD Control DVB-T Press Touch(Anywhere) Press Icon car-solutions.com support@car-solutions.com...
- Page 16 10. OSD(On Screen Display) 10. OSD(On Screen Display) Control Control OSD Control Board MENU When there is no OSD screen, pressing OSD ON When OSD screen is displayed, press OSD EXITT Item Selection, Value Selection MENU DOWN Item up Increase selected value DOWN Item down Decrease selected value...
- Page 17 10. OSD(On Screen Display) 10. OSD(On Screen Display) Control Control OSD Config First Menu Second Menu Third Menu Description DIGTAL-INAVI NAVI-RGB Setting the Connected NAVI Model ELT_DVBT20 Setting the Connected DVB-T DVB-T(DMB) Model Config ELT_980XU Slim Setting the Connected DVD Model Reset to default value of Config Reset Execute...
- Page 18 10. OSD(On Screen Display) 10. OSD(On Screen Display) Control Control OSD Option First Third Second Menu Description Menu Menu Original Camera RearCam-Type Equipped with external ExtDevice camera + 12V continuous supply + 12V supply only in Rear RearCam-Power AUTO camera mode + 12V off GEAR Detected by CAN...
- Page 19 10. OSD(On Screen Display) 10. OSD(On Screen Display) Control Control OSD Option First Third Second Menu Description Menu Menu After RearCam shows FrontCam and returns to FrontCam-RcvOpt previous state Disable feature Select to use the “RETURN” button. SteeringWheelBtn Disable feature Option Set up manufacturer of FINE...
- Page 20 10. OSD(On Screen Display) 10. OSD(On Screen Display) Control Control OSD Option -> FrontCam-RcvOpt Front Camera Auto Mode 0 second = FrontCam-RcvOpt menu OFF 1~30 second = FrontCam-RcvOpt menu ON & time control NAVI NAVI REAR FRONT AV1(DVB-T) AV1(DVB-T) AV2(DVD) AV2(DVD) Select time of display 1~30 second...
- Page 21 10. OSD(On Screen Display) 10. OSD(On Screen Display) Control Control OSD – Screen Menu First Third Second Menu Description Menu Menu Output screen horizontal Horizontal movement Output screen vertical Vertical movement Scale X Up Reduce / increase output screen width Screen Scale X Down Scale Y Up...
- Page 22 10. OSD(On Screen Display) 10. OSD(On Screen Display) Control Control OSD – Parking Menu First Third Second Menu Description Menu Menu Show parking line Line Display Do not show parking lines Warnings Lang Set warning text language Moving a parking line Horizontal Parking horizontally...
- Page 23 10. OSD(On Screen Display) 10. OSD(On Screen Display) Control Control OSD – OSD Menu First Third Second Menu Description Menu Menu value Horizontal OSD Menu Horizontal Shift value Vertical OSD menu vertical Shift OSD Menu Display Time (in value Display Time seconds) value Transparency...
- Page 24 10. OSD(On Screen Display) 10. OSD(On Screen Display) Control Control OSD Utility First Third Second Menu Description Menu Menu Factory Reset Execute Initialize all settings Calibration Execute Run Calibration mode Utility FDS302KRX-171004 Version (Check for future upgrades) Last Source : FDS302KRX-171004 Software Version Software Month Software Year...
- Page 25 11. Install Manual 11. Install Manual 1. Installation Diagram Monitor MB2019-NTG 6.0-TC2 Comander INTERFACE LVDS POWER/CAN R-TOUCH LCD-IN LCD-OUT car-solutions.com support@car-solutions.com...
- Page 26 11. Install Manual 11. Install Manual 2. Power / LVDS connection SPRINTER 12.3” car-solutions.com support@car-solutions.com...
- Page 27 11. Install Manual 11. Install Manual 2. Power / LVDS connection SPRINTER 8.0” car-solutions.com support@car-solutions.com...
- Page 28 11. Install Manual 11. Install Manual 2. Power / LVDS connection A-class 12.3” car-solutions.com support@car-solutions.com...
- Page 29 11. Install Manual 11. Install Manual 2. Power / LVDS connection A-class 8.0” car-solutions.com support@car-solutions.com...
- Page 30 12. Q & A 12. Q & A 1. Not possible to switch mode - Check connection of OSD Key pad wire - Check CAN connection 2. Display wrong size of picture - Check Dip s/w setting 3. Display black screen in OEM mode - Check connection of LVDS/LCD cable 4.
Need help?
Do you have a question about the MB2019-NTG6.0-TC2 and is the answer not in the manual?
Questions and answers