
Related Manuals for Car Solutions MB2019-NTG6.0-TC2


Summary of Contents for Car Solutions MB2019-NTG6.0-TC2
- Page 1 Instruction Manual MB2019-NTG6.0-TC2 with PAS for Mercedes Benz car-solutions.com support@car-solutions.com...
-
Page 2: Table Of Contents
INDEX Specifications Main Spec. ---------------------------------- Diagram ------------------------------------- Components -------------------------------- Exterior -------------------------------------- Settings Dip Switch ---------------------------------- Touch Control ----------------------------- Original button ---------------------------- OSD Menu --------------------------------- Installation Diagram ------------------------------------ Classification of LVDS/Power--------------- Cautions ------------------------------------- car-solutions.com support@car-solutions.com... -
Page 3: Specifications
Specification 1. Main spec. 1. Input Spec. (MULTI VIDEO INTERFACE) - 1 x Digital RGB Input (Navigation System output) - 2 x A/V Input (External video source). - 1 x CVBS(REAR CAMERA) Input. (Rear camera source) - 1 x CVBS(FRONT CAMERA) Input. (Front camera source) - 1 x Analog RGB Input (Navigation System output) - 1 x LVDS Input. -
Page 4: Diagram
Specification 2. Diagram LVDS COMMAND SYSTEM LVDS EEPROM RECEIVER NAVI System Scaler LVDS RELAY (PIP) FRONT CAMERA REAR CAMERA REAR CAMERA POWER TFT-LCD LVDS car-solutions.com support@car-solutions.com... -
Page 5: Components
Specification 3. Components Power Cable 1 EA LVDS Cable 1 EA [SPRINTER 8” / 12.3” / A-class 8”] RGB Navi Cable 1 EA OSD Board 1 EA car-solutions.com support@car-solutions.com... -
Page 6: Exterior
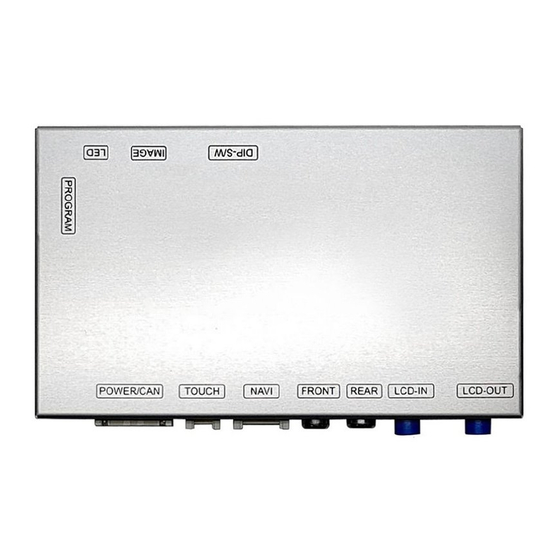
Specification 4. Exterior 138mm 24mm 83mm *NAVI Connect *Touch Connect *POWER Connect ① ② ③ ④ ⑤ ⑥ ⑦ ① ② ③ ④ ① ② ③ ④ ⑤ ⑥ ⑦ ⑧ ① R DATA (Red) ① Y- ① ACC(Yellow) ② G DATA (Green) ②... -
Page 7: Settings
Settings 1. Dip Switch * ON : DOWN , OFF : UP Function Selection NAVI ON : Skipping NAVI OFF : Display DVB-T ON : Skipping Video OFF : Display ON : Skipping Video OFF : Display ON : A-Class, Sprinter 8” OFF : A-Class, Sprinter 12.3”... -
Page 8: Touch Control
Settings 2. Touch Control - Touch calibration Touch OEM screen in any mode more than Touch the “+” correctly 7sec. For calibration (This function can be activated only one time after switching mode) - DVB-T/DVD Control Press Touch (Anywhere) Press Icon DVB-T car-solutions.com support@car-solutions.com... -
Page 9: Original Button
Settings 3. Original button - Switching mode <Steering wheel> <Command> <Steering wheel> <Command> / NAVI : 1. Long Press: Switching mode 2. Short Press: Switching to OEM directly car-solutions.com support@car-solutions.com... - Page 10 Settings 4. OSD Key board ① MENU : Activating OSD Menu ① ③ ④ ② ② SEL : Selection MENU DOWN ③ Up : Moving upward / increasing value ④ Down : Moving downward / decreasing value 5. OSD Menu ※...
-
Page 11: Osd Menu
Settings 5. OSD Menu ※ Control the menu below by Original button Option RearCam- Type : Setup for rear camera • ExtDevice : External rear camera OEM : Original camera RearCam- Power : Setup for Rear VCC wire in power cable •... - Page 12 Settings 5. OSD Menu ※ Control the menu below by Original button SteeringwheelBtn NAVI COM Reset Option RearCam-RcvOpt : Selecting time of displaying Front camera before • switching to RGB, DVD, OEM from Rear NAVI NAVI REAR FRONT AV1(DVB-T) AV1(DVB-T) Select time of display AV2(DVD) AV2(DVD)
- Page 13 Settings 5. OSD Menu ※ Control the menu below by Original button - NAVI(RGB) Image / Screen MENU IMAGE NAVI Config Brightness Option Contrast Image Color- RED Screen Color- GREEN Parking Color- BLUE MENU Screen NAVI Config Horizontal Vertical Option Scale X Up Image Scale X Down...
- Page 14 Settings 5. OSD Menu - Parking mode ※ Control the menu below by Original button -PDC display ON/OFF -Parking guide line ON/OFF Selecting a use of OPS(PDC) picture Selecting a use of packing guide line (OSD Menu – Parking – OSD Display – (OSD Menu –...
- Page 15 Settings 5. OSD Menu - Parking mode ※ Control the menu below by Original button -Adjusting the position of guide line Left Right Down : Original mode : PAS on/off : Adjustment of brightness * Can be adjusted by the Jog shuttle car-solutions.com support@car-solutions.com...
-
Page 16: Installation Diagram
Installation 1. Installation Diagram TOUCH LCD - IN POWER/CAN LCD-OUT Command OEM Monitor car-solutions.com support@car-solutions.com... -
Page 17: Classification Of Lvds/Power
Installation 2. Classification of Power / LVDS cable - Sprinter 12.3” [Power connector] [LVDS connector] - Sprinter 8” [Power connector] [LVDS connector] car-solutions.com support@car-solutions.com... - Page 18 Installation 2. Classification of Power / LVDS cable - A-Clss 12.3” [Power connector] [LVDS connector] - A-Class 8” [Power connector] [LVDS connector] car-solutions.com support@car-solutions.com...
-
Page 19: Cautions
Cautions 1. FQA Not possible to switch mode • - Check connection of OSD Key pad wire - Check CAN connection Display wrong size of picture • - Check Dip s/w setting Display black screen in OEM mode • - Check connection of LVDS/LCD cable Not possible to switch to rear screen •...
Need help?
Do you have a question about the MB2019-NTG6.0-TC2 and is the answer not in the manual?
Questions and answers