Pace MBT 250 Operation & Maintenance Instructions Manual
Hide thumbs
Also See for MBT 250:
- Operation & maintenance manual (58 pages) ,
- Operation, maintenance & instruction manual (9 pages) ,
- Installation, operation & maintenance manual (58 pages)
Advertisement
Quick Links
MBT 250/220 CALIBRATION KIT
PACE P/N 6993-0133
OPERATION & MAINTENANCE
INSTRUCTIONS
MANUAL NUMBER 5050-0288
REV. A
For any questions regarding the following instructions, contact your local authorized
PACE dealer or contact PACE directly at:
Telephone (301) 490-9860, Fax (301) 604-9215
PACE Incorporated
9893 Brewers Court
Laurel MD 20723-1990
1
Advertisement

Related Manuals for Pace MBT 250


Summary of Contents for Pace MBT 250
- Page 1 OPERATION & MAINTENANCE INSTRUCTIONS MANUAL NUMBER 5050-0288 REV. A For any questions regarding the following instructions, contact your local authorized PACE dealer or contact PACE directly at: Telephone (301) 490-9860, Fax (301) 604-9215 PACE Incorporated 9893 Brewers Court Laurel MD 20723-1990...
- Page 2 AdapTip, Arm-Evac, DEXITEST, EKO, HandiPik,PIK-VAC, Pro-Evac, Redi-Rak, SNAP-VAC, SR-3, SR-4, ST, Tip-Evac. PACE Incorporated has provided training on all of its products since 1958 as well as advanced technology training in all aspects of hand soldering, rework and repair.
-
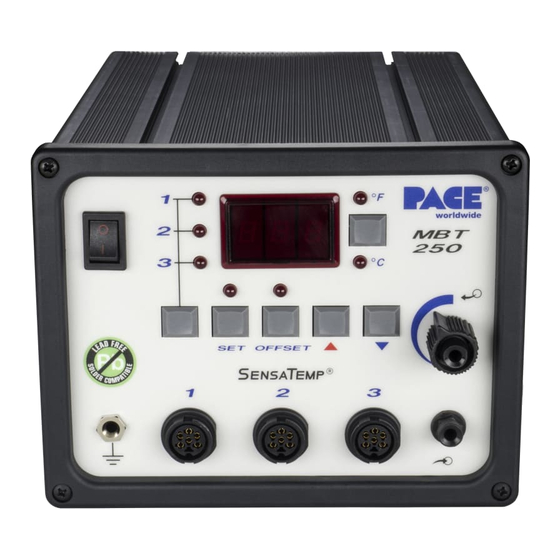
Page 3: Entering Calibration Mode
INTRODUCTION The following procedure will allow you to effectively calibrate your MBT 250/220 system to insure accuracy and maintain peak performance. Perform the following procedure step by step, in sequence, to: 1. Alter Tip Temperature values. 2. Alter Tip Temperature Offset values. - Page 4 2. Place POWER Switch in the “OFF” (0) position. 3. Press and hold the Tip Temperature Set and Scroll Down Keys. 4. Place POWER Switch in the “ON” (1) position. All of the system LEDs will light. The Temperature Display will read “888” and change to read “1-X”.
- Page 5 Key. The Digital Readout will display “S-X” (X = 1-9). Either the °F or °C will be on. This is the default readout (e.g., if the °C LED is on the Digital Readout will display temperature readings in °C). 7. Press and release the °F/°C Key to change the default.
-
Page 6: Automatic Shutdown
AUTOMATIC SHUTDOWN 10. The system enables the Automatic Shutdown feature only when the Automatic Setback feature is enabled. No additional steps are necessary. CHANNEL SELECTION 11. The Channel 1 LED is now lit signifying that Channel 1 is ready for calibration. - Page 7 now display “L-X” (X = 1-9). This is the stored value of the Lower Temperature Limit in increments of 100°F. For example, if the “L-5” is displayed, the lower limit is 500°F. 13. Press Scroll Keys as necessary to increase (Scroll Up Key) or decrease (Scroll Down Key) the Lower Temperature Limit value.
- Page 8 Temperature Limit readout (see step 12). 16. Press Scroll Keys as necessary to increase (Scroll Up Key) or decrease (Scroll Down Key) the Upper Temperature Limit value. 17. Press and release the Tip Temperature Set Key to store the displayed value into memory.
- Page 9 19. Press and release the Tip Temperature Set Key. The Digital Readout will flash “- - -” to indicate that the system microprocessor controlled circuitry is recalibrating one aspect of the system circuity. “C-2” will now be displayed. 20. Unplug the #1 Calibration Assembly and plug in the #2 Calibration Assembly.
- Page 10 microprocessor controlled circuitry is recalibrating another aspect of the system circuitry. “CAL” will now be displayed indicating that calibration of this channel is complete. 22. Press and release the Tip Temperature Offset Key two times to exit calibration. All values, features and defaults entered during the calibration are now stored in memory and all channel tip temperature settings are turned “OFF”.
- Page 11 DISPLAY DISPLAY DISPLAY DISPLAY DESCRIPTION DESCRIPTION DESCRIPTION DESCRIPTION MESSAGE MESSAGE MESSAGE MESSAGE Indicates system is ready to process Digital Readout accuracy C-1 OR C-2 calibration for a particular channel using the appropriate calibration module. Indicates that system is in the Calibration Mode. Input to control circuitry unstable.
Need help?
Do you have a question about the MBT 250 and is the answer not in the manual?
Questions and answers