Table of Contents
Advertisement
Quick Links
Advertisement
Chapters
Table of Contents

Subscribe to Our Youtube Channel
Related Manuals for IKEA NUTID HGA4K


Summary of Contents for IKEA NUTID HGA4K
- Page 1 NUTID HGA4K...
- Page 3 ENGLISH ITALIANO PORTUGUÊS ESPAÑOL ΕΛΛΗΝΙΚΑ Language, Lingua, Idioma, Idioma, Γλώσσα Country, Paese, País, País, Χώρα...
-
Page 4: Table Of Contents
ENGLISH Table of contents Safety information Injector table Product description Technical Data Daily use Installation Helpful hints and tips Environmental concerns Maintenance and cleaning IKEA GUARANTEE What to do if Safety Information Your safety and the safety of others are very damage or injury. important. - Do not store or use gasoline or other This manual and the appliance itself provide flammable vapors and liquids in the important safety messages, to be read and vicinity of this appliance. observed at all times. What to do if you smell gas: This is the safety alert symbol, - Do not try to light any appliance. pertaining to safety, which alerts users - Do not touch any electrical switch. to potential hazards to themselves and - Do not use any phone in your building. others. - Immediately call your gas supplier from All safety messages will follow the safety a neighbor’s phone. Follow the gas alert symbol and either the terms: supplier’s instructions. - Page 5 ENGLISH or H05RR-F). This operation must be capabilities, or with lack of experience performed by a qualified electrician. and knowledge of the appliance, unless - The manufacturer cannot be held supervised or previously instructed in its responsible for any injury to persons use by those responsible for their safety. or animals or damage to property - Young children should be kept away arising from failure to comply with these from the appliance and supervised to requirements. ensure that they do not play with it. - Do not use multiple plug adapters or - The use of a gas appliance produces extension cords. heat and humidity in the room. Make - Do not pull the power supply cord in sure the room is well-ventilated, or install order to unplug the appliance. an extractor hood with exhaust duct. - The electrical components must not be - In case of prolonged use, additional accessible to the user after installation. ventilation may be necessary (by - Do not touch the appliance with any wet opening a window or increasing the part of the body and do not operate it hood extraction speed). when barefoot. - After use, make sure the knobs are in off - This hob (class 3) is designed solely position and close the main gas supply...
-
Page 6: Product Description
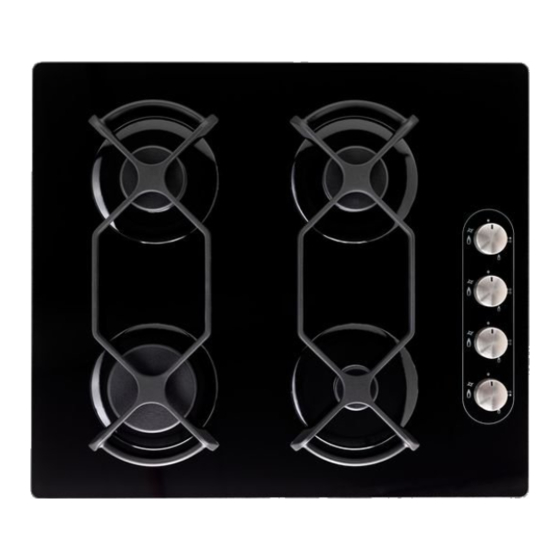
ENGLISH Product description Symbols Solid disc Tap closed Maximum flame Large flame Minimum flame Small flame Removable grates Rapid burner Auxiliary burner Semi-rapid burners Rear right semi-rapid burner control knob Rear left semi-rapid burner control knob Front left rapid burner control knob Front right auxiliary burner control knob Daily use Do not let the burner flame extend - The knob must not be pressed for beyond the edge of the pan. more than 15 sec. If, after that time has Important: when the hob is in use, the entire elapsed, the burner does not remain lit, hob area may become hot. wait at least one minute before trying to - To ignite one of the burners, turn the light it again. relative knob anti-clockwise to the NOTE: should particular local conditions maximum flame setting. - Press the knob against the control panel of the delivered gas make the ignition of to ignite the burner. burner difficult, it is advisable to repeat - After the burner has ignited, keep the the operation with the knob turned to small knob pressed for about 5-10 seconds to flame setting. -
Page 7: Helpful Hints And Tips
ENGLISH Helpful hints and tips This hob has burners of different diameters. protrude beyond the edge of the hob. IMPORTANT: improper use of the grids can For better burner performance, please stick to the following rules: result in damage to the hob: do not position - Use pots and pans with bottoms the the grids upside down or slide them across same width as that of the burners or the hob. Do not use: slightly larger (see table on the right). - Cast iron griddles, ollar stones, - Only use flat-bottomed pots and pans. terracotta pots and pans. - Use the correct amount of water - Heat diffusers such as metal mesh, or for cooking foods and keep the pot any other types. covered. - Two burners simultaneously for one - Make sure pots on the grates do not receptacle (e.g. fish kettle). Burner Pot Ø Rapid from 24 to 26 cm Semi-rapid from 16 to 22 cm Auxiliary from 8 to 14 cm Maintenance and cleaning - Do not leave acid or alkaline substances, Disconnect power before servicing. -
Page 8: What To Do If
ENGLISH necessary, clean them with a damp cloth. NOTE: to avoid damaging the electric Any baked-on food should be removed ignition device, do not use it when the with a toothpick or needle. burners are not in their housing. What to do if ... Problem Possible cause Solution The electric ignition does not There is no electrical Check the unit is plugged in work supply and the electrical supply is switched on. The burner fails to ignite The gas tap could be Check that the gas tap is closed open The gas ring burns unevenly Burner crown may Clean the burner crown be occluded by food according to cleaning residues instructions to make sure that the burner crown is clear of food residues. Before calling the After-Sales Service: • your full address; 1. Check “Troubleshooting guide” to see if • your telephone number. you can eliminate the problem yourself If any repairs are required, contact an 2. Turn the hob on again to check if correct authorised service centre, indicated in the... -
Page 9: Injector Table
ENGLISH Injector table Category II2H3+ Type of gas used Type of Injector Nominal Nominal Reduced Gas pressure burner marking heating consum- heat (mbar) capacity ption capacity min. nom. max. NATURAL GAS rapid 129 B 3,00 286 l/h 0,60 (Methane) semi-rapid 104 B 1,90 181 l/h 0,35 auxiliary 74 B 1,00 95 l/h 0,30 LIQUEFIED rapid 3,00 218 g/h... -
Page 10: Technical Data
ENGLISH Technical data Dimensions Width (mm) Height (mm) Length (mm) Voltage (V) The technical information are situated in the rating plate on the bottom side of the appliance and in the energy label. Installation After unpacking the hob, make sure that it resistant according to local regulations; has not been damaged during transport. In - This appliance is not connected to a the event of problems, contact the dealer or fume exhaust device. It shall be installed your nearest After-sales Service. in accordance with current installation regulations. Particular attention shall Technical information for the installer be given to the relevant requirement - This product can be embedded in a regarding ventilation. worktop 20 to 60 mm thick. - Combustion products are discharged - If there is no oven beneath the hob, outdoors through specific hoods or wall insert a separator panel that has a and/or window mounted electrical fans. surface at least equal to the opening in the work surface. This panel must be Gas connection positioned at a maximum distance of This operation must be performed by a 150 mm below the upper surface of the qualified technician. - Page 11 ENGLISH - The connection of the hob to the gas for all other destinations. pipe network or gas cylinder must be - IMPORTANT: if a stainless steel hose made by means of a rigid copper or is used, it must be installed so as not to steel pipe with fittings complying with touch any mobile part of the furniture. local regulations, or by means of a It must pass through an area where continuous-surface stainless steel hose there are no obstructions and where it is complying with local regulations. The possible to inspect it on all its length. maximum length of the hose is 2 linear - After connection to the gas supply, check metres. for leaks with soapy water. Light up the burners and turn the knobs from max position to minimum position to check flame stability Electrical connection WARNING - This operation must be performed by a qualified technician. - The electrical connections must comply with local regulations. - The earthing of this appliance is compulsory by law. Earth (yellow/green) - Do not use an extension cord.
- Page 12 ENGLISH Make sure that the outlet is near the product the injectors in such a way that it covers to install. So, if the cable that came with the the existing information relating to gas product is not long enough, you will need to calibration. replace it with another one having the same features but with the right length. Adjustment to different type of gas WARNING - This operation must be performed by a qualified technician. If the appliance is intended to operate with a different gas from the gas type stated on the rating plate and information label on the top of the hob, change the injectors. Remove the information label and keep it with the instructions booklet. Use pressure regulators suitable for the gas pressure indicated in the Instruction. - The gas nozzles must be changed by After Sales Service or a qualified technician. - Nozzles not supplied with the appliance must be ordered from After Sales Adjusting minimum gas setting of taps Service. - Adjust the minimum setting of the taps. NOTE: when liquid petroleum gas is used (G30/G31), the minimum gas setting screw must be tightened as far as it will go. IMPORTANT: should you experience difficulty in turning the burners knobs, please contact the After Sales Service for the replacement of the burner tap if found to be faulty.
- Page 13 ENGLISH - loosen screw to increase the flame height If the appliance is installed in a cellar or (+). basement, it is advisable to provide an The adjustment must be performed with the air vent of 65 cm, irrespective of the room tap in minimum gas setting position (small volume. flame ) . Gas Safety Regulations - The primary air of the burners does not need to be adjusted. The law requires that all gas appliances - At this stage, light up the burners and are installed by competent persons in accordance with the current gas safety turn the knobs from max position to regulations. Failure to install appliances correctly may lead to prosecution. minimum position to check flame It is in your own interest, and that of safety, stability. to ensure that the law is complied with. Upon completion of adjustment, reseal The hob should be installed in accordance the work surface using sealing wax or an with the Gas Safety (Installation and Use) equivalent material. Regulations, the Building Regulations issued by the Department of the Environment REFERENCE TO LOCAL and the Building Standard (Scotland) REGULATIONS (Consolidation) Regulations, issued by the Provision for ventilation Scottish Development Department.
-
Page 14: Environmental Concerns
ENGLISH Environmental concerns Packing Declaration of Conformity - The packing materials are 100% recyclable and marked with the - This cooking hob has been designed, recycling symbol ( constructed and put on the market in conformity with: Products - safety requirements of “Gas” This appliance is marked in compliance with Directive 2009/142/EEC; European Directive 2002/96/EC on Waste - safety objectives of “Low Voltage” Electrical and Electronic Directive 2006/95/EC (which Equipment (WEEE). By ensuring that this replaces 73/23/EEC as amended). appliance is correctly scrapped, the user - protection requirements of “EMC” can help prevent potentially harmful Directive 2004/108/EEC; consequences for the environment and the - This hob is suitable for contact with health of people. foodstuffs and complies with (EC) Regulation no. 1935/2004. - This cooking hob (Class 3) has been The symbol on the product or designed only for cooking food. Any accompanying documentation indicates other use (such as heating a room) is that this product should not be treated as... -
Page 15: Ikea Guarantee
ENGLISH Ikea guarantee How long is the IKEA guarantee valid? What is not covered under this guarantee? This guarantee is valid for five (5) years • Normal wear and tear. from the original date of purchase of your • Deliberate or negligent damage, damage appliance at IKEA, unless the appliance is caused by failure to observe operating named LAGAN in which case two (2) years of instructions, incorrect installation or by guarantee apply. The original sales receipt, connection to the wrong voltage, damage is required as proof of purchase. If service caused by chemical or electrochemical work is carried out under guarantee, this reaction, rust, corrosion or water damage will not extend the guarantee period for the including but not limited to damage appliance. caused by excessive lime in the water supply, damage caused by abnormal Which appliances are not covered by the environmental conditions. IKEA five (5) years guarantee? • Consumable parts including batteries and The range of appliances named LAGAN and lamps. all appliances purchased in IKEA before 1st of • Non-functional and decorative parts which August 2007. do not affect normal use of the appliance, including any scratches and possible color Who will execute the service? differences. - Page 16 ENGLISH • Cost for carrying out the initial installation of • ask for clarifications on installation of the the IKEA appliance. IKEA appliance in the dedicated IKEA However, if an IKEA appointed Service kitchen furniture; Provider or its authorized service partner • ask for clarification on functions of IKEA repairs or replaces the appliance under appliances. the terms of this guarantee, the appointed To ensure that we provide you with the best Service Provider or its authorized service assistance, please read carefully the Assembly partner will reinstall the repaired appliance Instructions and/or the User Manual before or install the replacement, if necessary. This contacting us. does not apply within Ireland, customer How to reach us if you need our service should contact the local IKEA dedicated after sales line or the appointed Service Provider for further information. Please refer to the last page These restrictions do not apply to fault-free of this manual for the full list work carried out by a qualified specialist of IKEA appointed After Sales using our original parts in order to adapt the Service Provider and relative appliance to the technical safety specifications national phone numbers. of another EU country. How country law applies In order to provide you a quicker The IKEA guarantee gives you specific legal...
-
Page 17: Istruzioni Per La Sicurezza
ITALIANO Sommario Istruzioni per la sicurezza Tabella iniettori Descrizione del prodotto Dati tecnici Utilizzo quotidiano Installazione Suggerimenti utili Consigli per la salvaguardia dell' Manutenzione e pulizia ambiente Cosa fare, se... GARANZIA IKEA Istruzioni per la sicurezza La sicurezza vostra e degli altri è molto AVVERTENZA La mancata osservanza importante. delle indicazioni fornite in questo Nel presente manuale e nell'apparecchio manuale può provocare un incendio o stesso sono fornite importanti avvertenze di un'esplosione con conseguenti danni sicurezza, da leggere e osservare sempre. materiali o lesioni personali. Questo è il simbolo di pericolo, relativo - Non conservare o usare benzina o altri alla sicurezza, il quale avverte dei gas e liquidi infiammabili nelle vicinanze potenziali rischi per l'utilizzatore e per gli dell'apparecchio. altri. Cosa fare in caso si avverta odore di gas: Tutti i messaggi relativi alla sicurezza - Non mettere in funzione nessun saranno preceduti dal simbolo di pericolo apparecchio. per la sicurezza e dai termini: - Non toccare interruttori di corrente. - Page 18 ITALIANO - La messa a terra dell'apparecchio è mentali o con esperienza e conoscenza obbligatoria a termini di legge. inadeguate, se non dietro supervisione - Il cavo di alimentazione deve essere o istruzione iniziale sull'utilizzo sufficientemente lungo da collegare dell'apparecchio da parte di chi è l'apparecchio, una volta posizionato responsabile della loro sicurezza. nell'ubicazione definitiva, alla presa di - I bambini devono essere mantenuti corrente. a distanza e sorvegliati affinché non - Per l'allacciamento del gas, utilizzare giochino con l'apparecchio. solo un tubo di metallo flessibile o rigido. - L'uso di un apparecchio a gas produce - Se necessario, il cavo di alimentazione calore ed umidità nel locale. Assicurare deve essere sostituito esclusivamente una buona aerazione o installare una con un cavo di alimentazione avente cappa di aspirazione con condotto di caratteristiche identiche a quello scarico. originale fornito dal produttore (tipo - In caso di utilizzo prolungato, può H05V2V2-F 90°C o H05RR-F). Questa rendersi necessaria una ventilazione operazione deve essere eseguita da un supplementare (aprendo una finestra tecnico qualificato.
-
Page 19: Descrizione Del Prodotto
ITALIANO Descrizione del prodotto Simboli Cerchio pieno Rubinetto chiuso Fiamma massima Fiamma grande Fiamma minima Fiamma piccola Griglie rimovibili Bruciatore rapido Bruciatore ausiliario Bruciatori semirapidi Manopola comando bruciatore semirapido destro posteriore Manopola comando bruciatore semirapido posteriore sinistro Manopola comando bruciatore rapido anteriore sinistro Manopola comando bruciatore ausiliario anteriore destro Utilizzo quotidiano Non lasciare che la fiamma del bruciatore si d'aria, mancanza momentanea di erogazione, estenda oltre il bordo della pentola. traboccamenti di liquidi, ecc.). Attenzione: quando il piano di cottura è in La manopola non deve essere tenuta premuta funzione, tutta la superficie del piano può diventare per più di 15 secondi. Se, trascorso tale tempo, calda. il bruciatore non rimane acceso, attendere Per accendere uno dei bruciatori, ruotare la almeno un minuto prima di tentare un'ulteriore manopola corrispondente in senso anti-orario accensione. fino a far coincidere l'indice con il simbolo di NOTA: qualora particolari condizioni del gas fiamma massima. Premere la manopola contro la mascherina dei erogato localmente rendessero difficoltosa comandi per accendere il bruciatore. l'accensione del bruciatore, si consiglia di ripetere Una volta acceso il bruciatore, è necessario l'operazione con la manopola ruotata sulla continuare a tenere premuta la manopola per posizione rappresentante la fiamma piccola. -
Page 20: Suggerimenti Utili
ITALIANO Suggerimenti utili Questo piano di cottura è dotato di bruciatori di cottura. AVVERTENZA: un uso scorretto delle griglie può con diametri diversi. Al fine di ottenere il massimo rendimento, è utile attenersi alle seguenti regole: danneggiare il piano di cottura: non posizionare Utilizzare pentole e tegami di diametro pari le griglie capovolte e non farle scorrere sul piano. o leggermente superiore al diametro dei È fortemente sconsigliato l'uso di: bruciatori (vedere la tabella a destra). bistecchiere in ghisa, supporti in pietra Utilizzare soltanto pentole e tegami con fondo naturale, tegami o pentole in terracotta piatto. dissipatori di rete metallica o di altro tipo Utilizzare la giusta quantità d'acqua per la due bruciatori simultaneamente per la cottura cottura dei cibi e usare il coperchio. con un solo recipiente (ad es. una pesciera). Evitare che le pentole, posizionate sulle griglie, fuoriescano dal perimetro del piano Bruciatore Ø recipienti Rapido da 24 a 26 cm Semirapido da 16 a 22 cm Ausiliario da 8 a 14 cm Manutenzione e pulizia corrosivi, prodotti a base di cloro o Prima di qualsiasi intervento di pagliette. - Non utilizzare pulitori a vapore. manutenzione, scollegare l'apparecchio - Non utilizzare prodotti infiammabili. dall'alimentazione elettrica.
Need help?
Do you have a question about the NUTID HGA4K and is the answer not in the manual?
Questions and answers