Table of Contents
Advertisement
Advertisement
Table of Contents

Subscribe to Our Youtube Channel
Related Manuals for Everlast PowerTig Series


Summary of Contents for Everlast PowerTig Series
- Page 1 EVERLAST POWER TIG ® SERIES TIG (GTAW) AND MMA (SMAW) WELDERS...
- Page 2 Thank you for purchasing an everlast product. We ap- preciate your patronage and hope that you will enjoy years of use from our product. Please go directly to the Everlast website to register your unit and receive your warranty information.
- Page 3 Serial number: __________________________ Model number: ____________________________ Date of Purchase___________________________ EVERLAST NOTES:...
-
Page 4: Table Of Contents
TABLE OF CONTENTS Section……………………………………………….Page General ...…………………………………………… Safety Precautions..………………………………. Introduction and Specifications………………… Know Your Machine……………………………….. 2.1 Panel Face and Functions…………………… 2.2 Lower Panel and functions….……………… Getting Started…………………………………….. 3.1 General Guidelines…………………………… 3.2 Shielding Gas Selection……………………… 3.3 Regulator/Flow meter Selection…………… 3.4 Regulator Connection………………………... 3.5 Regulator Adjustment……………………….. -
Page 5: General
Safe operation and proper maintenance is your responsibility. We have compiled this operator’s manual, to instruct you in basic safety, op- eration and maintenance of your Everlast product to give you the best possible experience. Much of welding and cutting is based upon experience and com- mon sense. -
Page 6: Safety Precautions
SAFETY PRECAUTIONS These safety precautions are for protection of safety and health. Failure to follow these guidelines may result in serious injury or death. Be careful to read and follow all cautions and warnings. Protect yourself and others. Welding and cutting processes produce high levels of ultraviolet (UV) radiation that can cause severe skin burn and damage. - Page 7 SAFETY PRECAUTIONS continued WARNING! Persons with pacemakers should not weld, cut or be in the welding area until they consult with their physician. Some pacemakers are sensitive to EMF radiation and could severely malfunction while welding or while being in the vicinity of someone welding.
- Page 8 SAFETY PRECAUTIONS continued WARNING! Electrical shock can kill. Make sure all electrical equipment is properly grounded. Do not use frayed, cut or otherwise damaged cables and leads. Do not stand, lean or rest on ground clamp. Do not stand in water or damp areas while weld- ing or cutting.
-
Page 9: Introduction And Specifications
SECTION 1 INTRODUCTION AND SPECIFICATIONS Product Feature Comparison @35% Duty Cycle (OCV 60-80V) GTAW-P... - Page 10 SECTION 1 INTRODUCTION AND SPECIFICATIONS PowerTig DX, LX and EX Models, I-Tig Models PowerTig LX Series PowerTig DX Series PowerTig EX Series Power I-Tig Series...
- Page 11 SECTION 1 INTRODUCTION AND SPECIFICATIONS PowerTig TIG (GTAW) WP 26 Torch Assembly PowerTig 315 Industrial PowerTig TIG (GTAW) Foot Pedal Assembly PowerTig Deluxe Stick (SMAW, MMA) Electrode Holder And Ground Clamp PowerTig TIG (GTAW) For TIG and STICK Torch Accessory Pack Operation...
- Page 12 GTAW amps is @ 35% DX series and 60% I- Tig, LX, and EX series. For SMAW operation 1.2 To ensure that your Everlast product is duty cycle is rated @ 35% for all units. in top condition, carefully inspect unit for damage upon opening the box, looking for 1.5 The unit should be stored in a dry...
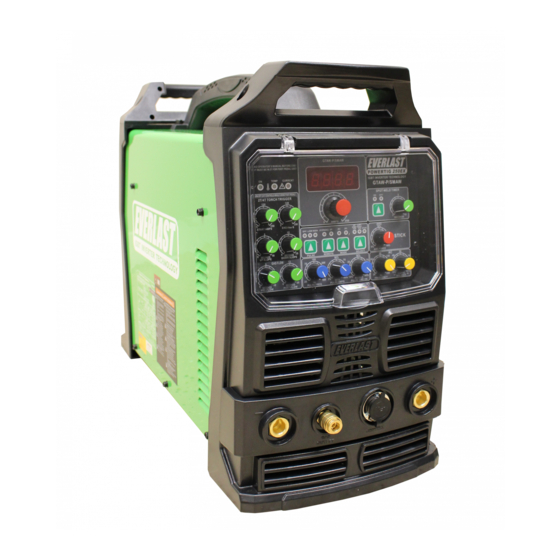
- Page 13 If frequent or continuous over- only the base amps to select amperage. heating is encountered, contact Everlast. 5. Pulse Frequency. The pulse frequency con- 3. Digital Display. The display posts the trols the number of pulse cycles per second welding amps within ±...
-
Page 14: Know Your Machine
SECTION 2 KNOW YOUR MACHINE 6. Pulse Amps. This gives proportional arc situation. This is an exceptionally help- control of the Pulse Amps. Example: If the ful feature in SMAW/Stick operation. It Amperage is set for 100 amps, and the helps hold the molten metal in place in out- Pulse Amps control knob is set for 95% (.9), of-position welds by providing a crisp,... - Page 15 SECTION 2 KNOW YOUR MACHINE the arc. Do not use this for Aluminum. 16. Pre Gas Flow. This timer allows the appropriate amount of shielding gas to flow to purge the gas lines and to provide adequate shielding gas coverage over the weld before the weld arc initiates.
- Page 16 SECTION 2 KNOW YOUR MACHINE 2.2 Lower Panel. The lower front panel is de- 2.3 Rear Panel. The following depiction is a picted below. Each terminal or lug should be typical rear panel view. Yours may vary. kept free of dirt or obstructions. 1.
-
Page 17: Getting Started
SECTION 3 GETTING STARTED 3.1 These are general guidelines for use Always be sure to select the correct and maintenance for your PowerTig unit. flow meter for the type of shielding Take into account all safety rules and rec- gas that is in use. Never substitute oxygen ommendations first before operation and or acetylene regulators! service. -
Page 18: Machine Setup
The remaining black and white wires are cles is possible. Although it is suited for your 110V “hot” wires. Attach the two re- welding use in an Everlast machine, many maining wires to the remaining two people choose not to risk their health. Red prongs. - Page 19 SECTION 3 GETTING STARTED The following table supplies basic information about Tungsten selection and suitability. Table 3.7.1 Recommended Note: Use only recommended sizes in Tig torches unless you purchase additional col- lets to fit the electrodes snugly. Loose fitting electrodes quickly ruin TIG torch parts.
-
Page 20: Tig Torch
Refer to the following a good welder. Only practice and skill can do PowerTig Torch image for a typical TIG torch that. Everlast provides this basic information Assembly breakdown. as a general guideline to assist the operator in learning basic principles and techniques. - Page 21 2.5 X’s of its diameter is generally recommended holding and maintaining an arc. Starting an arc with your High Frequency Everlast Image 3.9b Tungsten Sharpening welder is quite simple. Select the machine for TIG operation. Then, select the desired amperage.
- Page 22 SECTION 3 GETTING STARTED weld. A “skeleton” keyhole will begin to form in front of the weld. The keyhole is 3.13 Machine operation. MMA/Stick evidence that you are ready to add filler (SMAW) material and move forward. Introduce the Select switch for Stick operation. filler rod into the key hole area underneath the arc.
- Page 23 SECTION 3 GETTING STARTED 4. Use the Arc force and Amp adjustment Be sure to observe the manufacturer rec- to change arc qualities. Adjust the amper- ommendations regarding polarity. If the age according to the recommendations of weld appears lumpy, porous or otherwise the electrode (welding rod) manufacturer malformed, change the polarity of the for the type and size of the electrode used.
-
Page 24: Mma (Stick Welding)
Machine welds, but displays will not illuminate. Check for loose internal wire or machine fuse. Contact Everlast Support for further remedy. Tungsten is rapidly consumed. Inadequate gas flow. Wrong size tungsten. In- crease size. -
Page 25: Addendum
However, considerable duty cycle will be lost when operated with air cooling only with the water cooled torch. Operation of the torch over 200 amps is forbidden without the use of a water cooler. Melting and destruction of the torch will result. The Everlast PowerKool...
Need help?
Do you have a question about the PowerTig Series and is the answer not in the manual?
Questions and answers