Advertisement
AUTOMOTIVE PRODUCTS, INC.
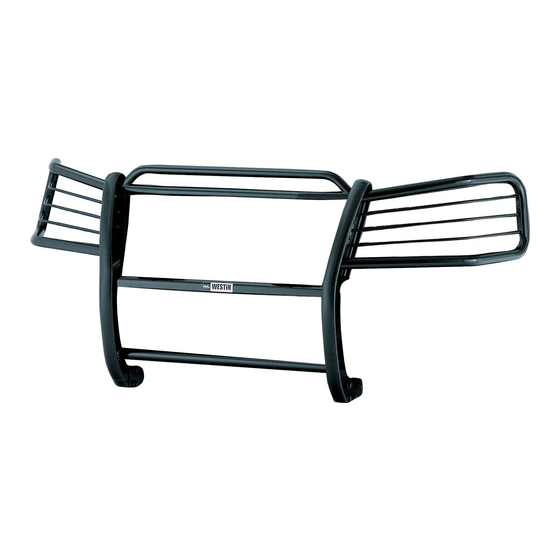
SPORTSMAN
ASSEMBLY
40-1205
43-1200
ITEM QTY
DESCRIPTION
1
1
SPORTSMAN ASSEMBLY
2,3
2
LIGHT GUARD ASSEMBLY
4,5
2
TOP BRACKET, PASSENGER(4) AND DRIVER(5)
6,7
2
BOTTOM BRACKET, PASSENGER(6) AND DRIVER(7)
8
2
M8-1.25 X 25MM HEX HEAD BOLT
9
2
8MM FLAT WASHER
10
2
8MM LOCK WASHER
9/16" SOCKET
9/16" WRENCH
RATCHET
SOCKET EXTENSION
STEP 1.
Remove the contents from box and check for damage. Verify all parts are present. Read instructions completely
before beginning.
STEP 2.
Attach light guard assemblies as shown.
STEP 3.
Determine passenger and driver mount brackets.
STEP 4.
The center bumper filler must be removed so brackets can be mounted to frame surface. From the backside of
bumper, use a small screwdriver to push out the center of plastic rivet. Once the center is pushed out, push out
the main body of the rivet. Remove all rivets and remove filler panel.
1500 MODELS:
STEP 5.
SEE FIGURE 2.
shown.
NOTE:
On 1500 models with one piece tow hook bar, install brackets behind tow hook bar and use existing
bolts with (1) 3/8-16 x 1.25" hex head bolt, (2) 3/8" flat washers, (1) 3/8" lock washer and (1) 3/8-16" hex nut
per side to attach mount bracket.
2500/3500 MODELS:
frame face using 3/8" fasteners as shown.
STEP 6.
Open vehicle hood, on frame cross member remove factory 8mm bolt on each end. Fasten top bracket on each
side using the metric fasteners as shown. Leave fasteners loose.
STEP 7.
Place Sportsman up to vehicle and align slots. Fasten together using remaining 3/8" hardware. Leave loose.
STEP 8.
Center and level Sportsman on vehicle. Make sure vehicle hood will clear unit and top braces when opening
and closing. Torque 3/8" fasteners to 30 Ft. Lbs., and 8mm fasteners to 26 Ft. Lbs.
STEP 9.
For chrome assemblies. If light glare is being experienced off the wings of the Sportsman, anti-reflective tape
has been supplied to reduce glare. With headlighs on, note where the reflection is concentrated on the wing.
Clean the wing well with a non-abrasive cleaner (rubbing alcohol works the best.) Trim the anti-reflective tape
to the appropriate size where the glare was located and apply tape.
I N S TA L L AT I O N I N S T R U C T I O N S
APPLICATION: 2002-UP DODGE RAM 1500
2
1
PARTS KIT CONTENTS
, PASSENGER(2) AND DRIVER(3)
TOOLS REQUIRED
7/16" WRENCH
TORQUE WRENCH
SEE FIGURE 1.
Align bracket on front frame face's outside holes and attach to vehicle using 3/8" fasteners as
Align bracket to use three of the four front frame face holes. Attach the brackets to the
2003-UP DODGE RAM 2500/3500HD
4
3
5
ITEM QTY DESCRIPTION
11
12
13
14
15
16
5/32" HEX WRENCH
FLAT TIP SCREWDRIVER
SEE FIGURE 3.
SEE FIGURE 2.
6
7
6
3/8-16 X 1.25" HEX HEAD BOLT
6
3/8-16 X 1.25" BUTTON HEAD BOLT
24
3/8" FLAT WASHER
12
3/8" LOCK WASHER
12
3/8-16 HEX NUT
2
ANTI-REFLECTIVE TAPE
(FOR CHROME ASSEMBLIES ONLY.)
13MM SOCKET
SEE FIGURE 1.
WO:
143295
75-0362 Revision C 6/9/06
Advertisement
Table of Contents

Subscribe to Our Youtube Channel
Related Manuals for Westin SPORTSMAN 40-1205


Summary of Contents for Westin SPORTSMAN 40-1205
- Page 1 I N S TA L L AT I O N I N S T R U C T I O N S APPLICATION: 2002-UP DODGE RAM 1500 2003-UP DODGE RAM 2500/3500HD AUTOMOTIVE PRODUCTS, INC. SPORTSMAN ASSEMBLY 40-1205 43-1200 PARTS KIT CONTENTS ITEM QTY DESCRIPTION ITEM QTY DESCRIPTION...
- Page 2 , a s t h e c o m p o u n d s s c r a t c h t h e f i n i s h a n d o p e n i t t o c o r r o s i o n . Thank You for choosing Westin products Westin Automotive Products, Inc.
Need help?
Do you have a question about the SPORTSMAN 40-1205 and is the answer not in the manual?
Questions and answers