Stanley SST1800 Original Instructions Manual
Hide thumbs
Also See for SST1800:
- Original instructions manual (156 pages) ,
- Manual (39 pages) ,
- Original instructions manual (88 pages)
Table of Contents
Advertisement
Available languages
Available languages
Quick Links
Advertisement
Table of Contents

Related Manuals for Stanley SST1800


Summary of Contents for Stanley SST1800
- Page 1 English Page French Page SST1800 ﺍﻟﻌﺮﺑﻴﺔ Page...
- Page 2 ENGLISH (Original instructions)
-
Page 3: Safety Instructions
Note: The term “residual current device (RCD)” may be replaced by the term “ground fault circuit Your STANLEY SST1800 Table Saw is designed for the slitting interrupter (GFCI)” or “earth leakage circuit breaker and cross-cutting of all types of timber commensurate with the (ELCB)”. - Page 4 ENGLISH (Original instructions) e. Maintain power tools. Check for misalignment or NOT use a fence or fence system for cross-cutting. binding of moving parts, breakage of parts and any Instead, use a miter gauge. USE PUSH STICK(S) for other condition that may affect the power tools ripping a narrow workpiece.
- Page 5 If the supply cord is damaged, it must be replaced (including children) with reduced physical, sensory or by the manufacturer or an authorised STANLEY mental capabilities, or lack of experience and knowledge, Service Centre in order to avoid a hazard.
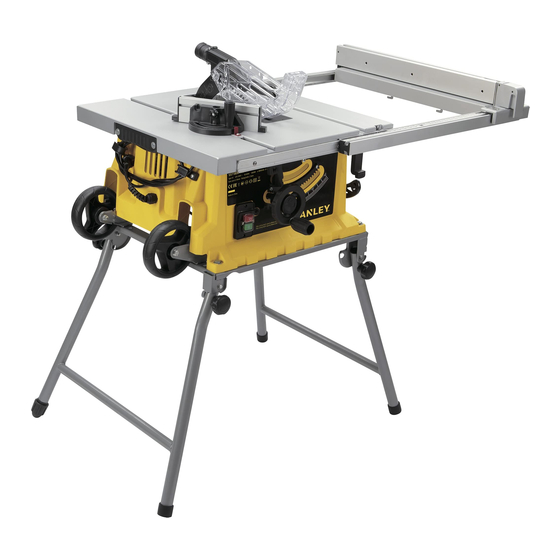
- Page 6 ENGLISH (Original instructions) 6. Mitre guage 7. Transportation wheels 8. On/Off switch 9. Leg stand 10. Bevel adjustment locking knob 11. Blade elevation handle 12. Leg stand locking knob 13. Blade tilting wheel 14. Locking handle for extension table 15. Locking handle for rip fence 16.
- Page 7 ENGLISH (Original instructions) Folding instructions (Fig. B1, B2, B3, B4) Hold and support the table edge, unlock the legs at the wheel end (B1).Lower the wheels to the ground, allowing the legs to swing under (B2).Stand the table on end, fold up and lock the lower legs, unlock the upper legs (B3).
- Page 8 ENGLISH (Original instructions) 4. The gap between the saw blade (4) teeth and the riving knife should be around 3mm to 5mm (Fig.G) max. 3-5 mm Riving knife set-up (Fig. E, F, G) Warning! Disconnect the mains cable! The setup 5.
- Page 9 ENGLISH (Original instructions) Setting the angle (Fig. J) Set the required bevel angle from 0 to 45 degree Before cutting, ensure the saw blade (4) and mitre gauge (6) no collision Loose the Bevel adjustment locking knob (10). Set up the desired angle then lock the knob again Working with the rip fence Setting the fence height (Fig.
-
Page 10: Operation
ENGLISH (Original instructions) Setting the cutting width (Fig. M) The rip fence (5) is used for lengthwise cutting of wood. Place the rip fence (5) on the guide rail (18) to the right or left of the saw blade. 2 scales (k/l) on the guide rail (18) to show the gap between fence rail (i) and saw blade (4) Set the rip fence (5) to the required specification on the sight-glass (m) and secure it with the locking handle for... - Page 11 ENGLISH (Original instructions) Proceed as for cross cutting Caution: (Fig. Q) Always use the push stick (19) when ripping small Cutting particle boards workpieces (fig. Q) To prevent the cutting edges from cracking when working with Do not cut excessively small workpieces. particle boards, the saw blade must be higher than the workpiece height.
-
Page 12: Protecting The Environment
Protecting the Environment Separate collection. This product must not be disposed of with normal household waste. Should you find one day that your STANLEY product needs APPLICATIONS replacement, or if it is of no further use to you, do not dispose 1. -
Page 13: Technical Data
Service Information at the address indicated in this manual. A list of authorised STANLEY repair agents and full details of our after sales STANLEY offers a full network of company-owned and/ or service is available on the internet at: www.2helpU.com authorized service agents throughout your country. -
Page 14: Français (Traduction Des Instructions Initiales)
Ne malmenez pas le cordon d’alimentation. N’utilisez jamais le câble pour transporter, tirer ou débrancher Votre scie sur table SST1800 de STANLEY est conçue pour le l’outil électrique. Veillez à garder le câble éloigné des découpage et le tronçonnage de tous les types de bois sources de chaleur, des huiles, des rebords coupants adaptés à... - Page 15 FRANÇAIS (Traduction des instructions initiales) g. Si des dispositifs destinés au raccordement • N’UTILISEZ PAS CETTE MACHINE tant qu’elle n’a pas d’installations d’extraction et de recueil de la été complètement assemblée et installée selon les poussière sont fournis, assurez-vous qu’ils sont instructions.
-
Page 16: Branchements D'alimentation
FRANÇAIS (Traduction des instructions initiales) endommagé. Par conséquent, s’il n’est pas possible de • N’EFFECTUEZ JAMAIS DE TRAVAIL d’assemblage ou de préparation sur la table ou la zone de travail quand la vérifier la tension secteur, il est impératif de ne pas brancher l’appareil sur une prise secteur. -
Page 17: Contenu De L'ensemble
Basculez les pieds CONTENU DE L’ENSEMBLE et verrouillez-les (A2) puis déverrouillez les pieds • 1 scie sur table SST1800 inférieurs. • 1 lame de scie 60T 2. Soulevez la table à partir de l’extrémité (A3), ce qui •... - Page 18 FRANÇAIS (Traduction des instructions initiales) INSTRUCTIONS DE PLIAGE (FIG. B1, B2, B3, B4) Tenez et soutenez le bord de la table, déverrouillez les pieds du côté des roues (B1). Posez les roues au sol, ce qui permet de pivoter les pieds sous (B2). La table est debout sur une extrémité, repliez et verrouillez les pieds inférieurs, déverrouillez les pieds supérieurs (B3).
- Page 19 FRANÇAIS (Traduction des instructions initiales) Réglage du couteau diviseur (fig. E, F, G) Avertissement! Débranchez câble POUR TRANSPORTER LA SCIE SUR TABLE d’alimentation! Le réglage du couteau diviseur (3) (FIG. C1, C2) doit être vérifié avant chaque utilisation. Les pieds supérieurs peuvent être verrouillés en position 1.
- Page 20 FRANÇAIS (Traduction des instructions initiales) 4. L’écart entre les dents de lame de scie (4) et le couteau diviseur devrait être de 3 à 5 mm (fig. G) environ. max. 3-5 mm 5. Avertissement ! Tournez l’écrou dans le sens de rotation de la lame de scie.
- Page 21 FRANÇAIS (Traduction des instructions initiales) Après chaque nouveau réglage, il est recommandé de procéder à une coupe d’essai afin de vérifier les réglages. Réglage de l’angle (fig. J) Réglez l’inclinaison de la lame à la valeur nécessaire entre 0 et 45 degrés. Avant de faire une coupe, assurez-vous que la lame de scie (4) et le guide à...
-
Page 22: Instructions De Travail
FRANÇAIS (Traduction des instructions initiales) La partie découpée reste sur la table de scie (1) jusqu’à ce que la lame (4) soit à l’arrêt complet. Assurez-vous que les pièces longues ne tombent pas en fin de coupe (par exemple avec une servante à rouleau, etc.). - Page 23 FRANÇAIS (Traduction des instructions initiales) Poussez le guide et la pièce vers la lame afin d’effectuer la coupe. Important : Ne poussez ou ne tenez jamais le morceau de pièce découpé. Coupes angulaires (fig. R) Les coupes angulaires doivent toujours être effectuées à l’aide du guide de refente (5).
-
Page 24: Caractéristiques Techniques
Si vous deviez un jour remplacer votre produit STANLEY ou si d’usine d’origine, contactez le centre de service STANLEY le vous ne l'utilisez plus, ne le jetez pas avec les ordures plus proche de vous. - Page 25 FRANÇAIS (Traduction des instructions initiales) Garantie 2 an Si votre appareil STANLEY s’avère défectueux en raison d’un vice de matériau ou de fabrication dans les 24 mois à compter de sa date d’achat , STANLEY garantit le remplacement gratuit de toute pièce défectueuse ou – à notre discrétion – le remplacement gratuit de l’appareil, à...
- Page 26 ﻟﻠﺸﺮﻛﺔ ﻭ/ﺃﻭ ﻭﻛﻼﺀ ﺍﳋﺪﻣﺔ ﺍﳌﻌﺘﻤﺪﺓ ﻓﻲ ﻓﻲ ﺟﻤﻴﻊ ﺃﻧﺤﺎﺀ ﺑﻠﺪﻙ. ﻟﺪﻯ ﻛﻞ ﻓﺮﻕ ﻋﻤﻞ ﻣﺪﺭﺑﺔ ﻹﻣﺪﺍﺩ ﺍﻟﻌﻤﻼﺀ ﺑﺨﺪﻣﺔSTANLEY ﻣﺮﺍﻛﺰ ﺻﻴﺎﻧﺔ ﻓﻌﺎﻟﺔ ﻭﻣﻌﺘﻤﺪﺓ ﻟﻸﺩﻭﺍﺕ ﺍﻟﻜﻬﺮﺑﺎﺋﻴﺔ. ﺇﺫﺍ ﻣﺎ ﺍﺣﺘﺠﺖ ﺇﻟﻰ ﻣﺸﻮﺭﺓ ﻓﻨﻴﺔ ﺃﻭ STANLEY ﺇﺻﻼﺡ ﺃﻭ ﻗﻄﻊ ﻏﻴﺎﺭ ﺍﳌﺼﻨﻊ ﺍﻷﺻﻠﻴﺔ، ﺍﺗﺼﻞ ﺑﺄﻗﺮﺏ ﻓﺮﻉ .ﻟﺪﻳﻚ ¿ÉæKG áæ°S ¿Éª°V øe k G ô¡°T 24 ¿ƒ°†Z ‘...
- Page 27 äɶMÓe .Ió«∏H IôØ°ûH ™£b á«∏ªY Ék ≤ ∏£e ºK øeh ,ÉæJÉéàæŸ ôªà°ùŸG Ú°ùëàdG ≈∏Y STANLEY ácöT á°SÉ«°S óªà©J .Ék ≤ ∏£e …öù≤dG ™£≤dG Ωóîà°ùJ ’h .âHÉK §¨°V Ωóîà°SG ,™£≤dG ò«ØæJ óæY .8 .≥Ñ°ùe QÉ©°TE G ¿hóH èàæŸG ¢üFÉ°üN ≈∏Y äÓjó©J …C G AGôLE G ≥ëH ßØàëf ÉæfE É a .ꃩe hC G πàÑe Ö°ûN ™£≤J ’...
- Page 28 á«Hô©dG (á«°ù«FôdG äɪ«∏©àdG) .áHƒ∏£ŸG ájhGõdG ≈∏Y (4) IôØ°ûdG §Ñ°VG - »°Vô©dG ™£≤dG ‘ ɪc á«∏ª©dG πªµà°SG - (¢S πµ°ûdG) :¬«ÑæJ (¢S πµ°ûdG) IÒ¨°U πªY ™£b ≥°T óæY (19) ™aódG É°üY É k ª FGO Ωóîà°SG - IÒ¨°üdG πª©dG ™£b •GôaE É H ™£≤J ’ - •ƒ¨°†ŸG Ö°ûÿG ™£b ¿ƒµJ ¿C G Öéj ,á≤«bO ìGƒdC G ™e πª©dG óæY ¥É≤°ûf’G øe ™£≤dG ±GƒM ™æŸ...
- Page 29 á«Hô©dG (á«°ù«FôdG äɪ«∏©àdG) (Ω πµ°ûdG) ™£≤dG ¢VôY §Ñ°V .Ö°ûî∏d ‹ƒ£dG ™£≤dG ‘ (5) ≥°ûdG õLÉM Ωóîà°ù o j - IôØ°T QÉ°ùj hC G ÚÁ ≈∏Y (18) »∏«dódG Ö«°†≤dG ≈∏Y (5) ≥°ûdG õLÉM ™°V - .QÉ°ûæŸG ÚH IƒéØdG QÉ¡XE ’ (18) »∏«dódG Ö«°†≤dG ‘ (k/l) ¿É°SÉ«≤e óLƒj - (4) QÉ°ûæŸG IôØ°Th (•) õLÉ◊G Ö«°†b (Ω) ∞°ûµdG êÉLR ‘...
- Page 30 á«Hô©dG (á«°ù«FôdG äɪ«∏©àdG) (… πµ°ûdG) ájhGõdG §Ñ°V áLQO 45 ¤E G 0 øe áHƒ∏£ŸG Ö£°ûdG ájhGR ÚY ød (6) Ö£°ûdG ¢SÉ«≤eh (4) QÉ°ûæŸG IôØ°T ¿C G ócC É J ,™£≤dG πÑb Éeó£°üj .(10) Ö£°ûdG §Ñ°V πØb ¢†Ñ≤e p ñQC G - .G k O ó›...
- Page 31 á«Hô©dG (á«°ù«FôdG äɪ«∏©àdG) ≠∏Ñj ≥°ûdG Úµ°Sh (4) QÉ°ûæŸG IôØ°T ¿Éæ°SC G ÚH ÆGôØdG ¿ƒµj ¿C G Öéj .4 (R πµ°ûdG) º∏e 5 É k Ñ jô≤J max. 3-5 mm (R/h/`g πµ°ûdG) ≥°ûdG Úµ°S â«ÑãJ (3) ≥°ûdG Úµ°S â«ÑãJ ¢üëa Öéj !»°ù«FôdG πHɵdG π°üaG !ôjò– .ΩGóîà°SG πc πÑb (20) ádhÉ£dG áëàa âÑKh (h) â«ÑãàdG Ödƒd §HQ óYC G .5 .5 ádB ’...
- Page 32 á«Hô©dG (á«°ù«FôdG äɪ«∏©àdG) (4Ü ,3Ü ,2Ü ,1Ü πµ°ûdG) »£dG äɪ«∏©J ¢†ØNG .(1Ü) á∏é©dG ájÉ¡f ‘ πLQC ’ G πØb íàaG ,ádhÉ£dG áaÉM ºYOGh ∂°ùeG ádhÉ£dG ∞bhC G .(2Ü) πØ°SC Ó d ∑ôëàdÉH πLQC Ó d íª°SGh ,¢VQC ’ G á«LÉf πLQC ’ G πLQC ’...
- Page 33 á«Hô©dG (á«°ù«FôdG äɪ«∏©àdG) ≥°ûdG õLÉM .5 Ö£°T ¢SÉ«≤e .6 π≤æàdG äÓéY .7 ±É≤jE ’ G/𫨰ûàdG ìÉàØe .8 πeÉ◊G πLQ .9 Ö£°ûdG §Ñ°V πØb ¢†Ñ≤e .10 IôØ°ûdG ™aQ ´GQP .11 πeÉ◊G πLQ π≤a ¢†Ñ≤e .12 IôØ°ûdG ádÉeE G á∏éY .13 ádÉWE ’ G ádhÉ£d πØ≤dG ´GQP .14 ≥°ûdG õLÉëH ¢UÉÿG πØ≤dG ´GQP .15 ádÉWE G ádhÉW .16 §HQ ìÉàØe .17...
- Page 34 …C G hC G ™æ°ü o Ÿ G πÑb øe ¬dGóÑà°SG Öéj ,AÉHô¡µdG ∂∏°S ∞∏J ádÉM ‘ .º¡àeÓ°S øY ∫hD ƒ °ùŸG ¢üî°ûdG πÑb øe RÉ¡÷G ΩGóîà°SÉH .ôWÉîŸG Öæéàd STANLEY øe óªà©e áeóN õcôe .RÉ¡÷ÉH º¡ãÑY ΩóY ¿Éª°†d ∫ÉØWC ’ G ≈∏Y ±GöTE ’ G Öéj •...
- Page 35 á«Hô©dG (á«°ù«FôdG äɪ«∏©àdG) .»°Vô©dG ™£≤∏d õLÉM Ωɶf hC G õLÉM Ωóîà°ùJ ’ .‹ƒ£dG ™£≤∏d õLÉM ’h ∫ÉØWC ’ G ∫hÉæàe øY G k ó «©H áeóîà°ùŸG ÒZ á«FÉHô¡µdG äGhOC ’ G ¿õN .d ‘ ™aO (»°üY) É°üY Ωóîà°SG .܃£°ûe ¢SÉ«≤e Ωóîà°SG ,∂dP øe k ’óH äɪ«∏©àdG √òg hC G á«FÉHô¡µdG IGOC ’...
- Page 36 ΩGóîà°S’G øe ¢Vô¨dG .á«FÉHô¡µdG äÉeó°ü∏d ¢Vô©àdG ôWÉfl øe π∏≤j »LQÉÿG ‹ƒ£dG ™£≤∏d ∂H ¢UÉÿG STANLEY SST1800 ádhÉ£dG QÉ°ûæe ºª o °U ó© o e RÉ¡÷G Gòg .ádB ’ G ºéM ™e Ö°SÉæàŸG Ö°ûÿG ´GƒfC G πµd »°Vô©dGh ,áÑWQ á≤£æe ‘ á«FÉHô¡µdG IGOC ’ G 𫨰ûJ øe ôØe ∑Éæg øµj ⁄ GPE G .f π∏≤J .(RCD) »≤ÑàŸG QÉ«àdG IGOC É...
Need help?
Do you have a question about the SST1800 and is the answer not in the manual?
Questions and answers