Table of Contents
Advertisement
Quick Links
Advertisement
Table of Contents

Subscribe to Our Youtube Channel
Related Manuals for Stanley STSM1525


Summary of Contents for Stanley STSM1525
- Page 1 ENGLISH STSM1525 简体中文...
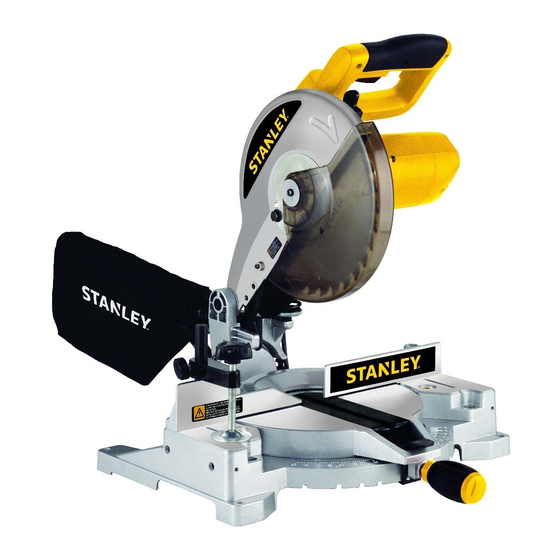
- Page 2 Mô tả các bộ phận (FIG.1) Parts Description (Fig. 1 ) FIG. 1 FIG. 1 1. Operating Handle FIG. 1 1. Cần điều khiển 图 1 Parts Description (Fig. 1 ) 2. Guard 2. Vành chắn FIG. 1 1. Operating Handle 3.
- Page 3 FIG. 3 FIG. 4 FIG. 5 FIG. 6 FIG. 7 FIG. 8...
- Page 4 FIG. 9 FIG. 10 FIG. 11 FIG. 12...
- Page 5 ENGLISH Safety Instructions: Polarized Plugs STSM1525 To reduce the risk of electric shock, this 254mm Mitre Saw equipment has a polarized plug (one blade is TECHNICAL DATA wider than the other). This plug will fit in a polarized outlet only one way. If the plug does not fit fully...
-
Page 6: Additional Safety Rules For Mitre Saws
• DON’T OVERREACH. Keep proper footing and Conductor size (mm Cable rating (Amperes) balance at all times. 0.75 • MAINTAIN TOOLS WITH CARE. Keep tools sharp 1.00 and clean for best and safest performance. Follow 1.50 2.50 instructions for lubricating and changing accessories. 4.00 •... - Page 7 • DON’T-Use blades larger or smaller than those which For your convenience and safety, the following are recommended. warning labels are on your mitre saw. • DON’T-Wedge anything against fan to hold motor shaft. ON MOTOR HOUSING: • DON’T-Force cutting action. (Stalling or partial stalling WARNING: FOR YOUR OWN SAFETY, READ INSTRUC- of motor can cause major damage.
-
Page 8: Specifications
CAUTION: To prevent binding and inaccuracy, Familiarization be sure the mounting surface is not warped or Place the saw on a smooth, flat surface such as a work- otherwise uneven. If the saw rocks on the surface, bench or strong table. Examine Figures 1 & 2 and refer place a thin piece of material under one saw foot to the parts description to become familiar with the saw until the saw sits firmly on the mounting surface. -
Page 9: Operation
Attaching Dust Bag Switch A zippered cloth dust bag is included with your saw. To To turn the saw on, depress the trigger switch (16). To attach the bag, fit the plastic opening firmly over the turn the tool off, release the switch. There is no provision dust spout (9). - Page 10 scrap wood until you develop a “FEEL” for your saw. desired. Once the desired bevel angle has been set, Your saw is the perfect tool for mitring corners like the tighten the bevel clamp knob firmly. ones shown in Figure 8, which shows a joint made by Bevel angles can be set up to 45 degrees left and can setting the mitre arm at 45 degrees to to mitre the two be cut with the mitre arm set between zero and 47...
-
Page 11: Special Cuts
Pretesting with scrap material is extremely important! chips from adhering to the blade. Place the bottom side (the side that will be against the Be sure to properly secure work. Certain workpieces, due wall) against the Mitre SAW FENCE. Place the top (that to their size, shape or surface finish, may require the use of part that will be against the ceiling) against the saw a clamp, jig or fixture to prevent movement during the cut. -
Page 12: Service Information
NOTE 3. Damaged saw blade 3. Replace blade • Stanley's policy is one of continuous improvement to our products and, as such, we reserve the right to change product specifications without prior notice. TROUBLE! DOES NOT MAKE ACCURATE MITRE CUTS •... - Page 13 简体中文 所有工具的安全说明 STSM1525 • 请让护罩始终处于正确的位置与正常工作状态。 • 取下调整键与扳手。请始终在启动工具前查看是否 254mm 斜切锯 已从主轴上取下调整键和扳手。 技术参数 • 保持工作场地整洁。杂乱的场地及操作台会引发事 STSM1525 规格 故。 1500 功率 • 请勿在危险的环境中使用。请勿在潮湿的地方使用 /分 5500 空载转速 电动工具,或将其暴露于雨中。保持工作场地明 140x70 最大 直径 亮。 12.5 重量 千克 • 请勿让儿童靠近工作场地。所有来访者都应与工作 场地保持安全距离。 • 请让儿童远离工作场地,可以使用挂锁、主开关或 取下启动键实现此目的。 您应了解的重要信息: • 请勿强行使用工具。按设计速率使用本工具将更有...
- Page 14 • 请勿在易燃液体、气体或易爆环境附近操作电动工 • 如果工件较长,请务必使用外部的工具托架支撑。 • 请务必使用只有 10 ”长的直径锯片。 具。这些工具中的电机可能会产生火花,并点燃气 • 请勿尝试在任何非指定电压下进行操作。 体。 • 除非所有夹具手柄都已拧紧,否则请勿操作。 • 请使用正确的延长线。请确保您的延长线状况良 • 请勿使用大于或小于建议大小的锯片。 • 请勿在风扇中楔入任何物品来支撑电机轴。 好。使用延长线时,确保使用电阻够小的延长线来 • 请勿强行执行切割动作。(电机停滞或部分停滞会 传送产品所需的电流。延长线的尺寸过小会引起线 路电压下降,从而导致功率损失和过热。下表显示 导致严重伤害。在切割之前,请等待电机抵达全 了要使用的正确的尺寸大小,具体尺寸视延长线的 速。) • 请勿切割含铁金属(含铁或钢成分的金属)或任何 长度和标牌上的安培标称值而定。如有疑问,请使 用尺度更大一级的延长线。尺度号码越小,延长线 石砖。 • 请勿使用砂轮。砂轮产生的过多热量与研磨颗粒将 的电阻越小。 损坏斜切锯。 导体尺寸 (mm2) 线缆标称值(安培) •...
- Page 15 工作台安装 在挡板上: 为方便安装工作台,四个支脚上均提供了工作台安装 请先夹紧小型物件,再进行切割。 孔 (8),如图 1 所示。(为配合不同型号的螺丝,各支 请参阅本手册。 脚均提供了两种不同大小的安装孔。请使用其中一种 安装孔即可,无需同时使用两种大小的安装孔。)请 在护罩上: 务必将您的斜切锯稳固地安装,以防止移动。如果要 让工具更方便地携带,可将其安装在 1/2 ”或更厚的 危险 - 请远离锯片。 胶合板上,再使用夹具将其固定在工件支架上,或将 其移到其他工作场所再夹紧。 在护罩定位板上: “在使用之前,请使用两个螺丝正确 注:如果将您的斜切锯安装到胶合板上,请确保安装 固定支架。” 螺丝不会伸出木板的底部。胶合板的位置必须与工作 支架齐平。在将斜切锯夹紧到任何工作面上时,请只 在工作台上: (2 个位置) 将安装螺丝孔所在的夹具凸台作为固定点。在任何其 他点上固定本工具将影响斜切锯的正常操作。 警示:为避免出现夹锯和不精确的状况, 请确保安装面不存在弯曲或不平的状态。如 果斜切锯在安装面上摇动,请在斜切锯的一 个支脚下垫一片较薄的材料,直到斜切锯安 在使用之前,请务必拧紧调整旋钮。请将手与锯片运 装稳固。 转路径的距离保持在 6" 之外。切勿徒手执行任何操 作。切勿在锯片前方交叉双手。请三思!您可以避免...
- Page 16 身体和手的位置(请参阅图 7) 组装与调整您的斜切锯 请在拔下插头的状况下进行斜切锯的所有组装。 在操作斜切锯时,如果身体与手放置在正确的位置, 则可以更轻松、更准确的进行切割。切勿使双手靠近 安装斜切夾具手柄 切割区域。双手与锯片的距离不得小于 6"。 从塑料部件袋中取出斜切夹具手柄 (4),再将其仔细装 切割时请将工件紧固在锯台与挡板上。 入斜切锯前部的支架。 在开关断开且锯片完全停止前,请将双手保持在正确 安装集尘袋 位置。请务必在进行切割操作前进行不带电演练, 本斜切锯已随附一个拉链的布质集尘袋。 以检查锯片的路径。请勿交叉双手,如图 7 所示。 如果要安装该集尘袋,请将塑料开口牢固地套在喷尘 使用您的斜切锯切割 口 (9)。 注:尽管本斜切锯可切割木材及许多有色金属材料, 注:本斜切锯也可以使用真空吸尘管连接到喷尘口, 但本手册只讨论木材切割,不过这些指引也同样适用 或不使用任何除尘配件。 于其它材料。请勿使用本斜切锯切割含铁(钢和铁) 调整 材料或石砖。请勿使用任何研磨锯片。 请在拔下插头的状况下进行斜切锯的所有调整。 横切 注:您的斜切锯在工厂制造时已经过充分准确的调整。 注:不建议同时切割多个工件,但在确保各工件均紧 如果由于运输、搬运或其他原因需要重新调整,请按 固在锯台和挡板上后,即可安全进行此操作。 照下列步骤进行调整。 横切指的是在任何角度穿过木材的纹理进行切割。 斜切刻度调整 直角横切可在斜切臂在零位置时进行。将斜切臂设置...
- Page 17 夹紧工件 切割冠状模塑 关闭电源并拔下斜切锯插头 为准确接合,冠状模塑必须通过极为精确的斜切。 如果您无法用手将工件固定在工作台上并紧靠挡板 指定冠状模塑上方的两个平面各局角度,加在一起后 形状不规则等)或您的手距离锯片太近(于 6" 内) 准且构成 90 度。多数(但并非全部)的状况下,冠状 模塑的上后角(与天花板平贴的部分)为 52 度,下后 则请使用夹具或老虎钳。 您还可以使用弹簧夹、杆夹及 C 形夹等其他一样方便 角(与墙壁平贴的部分)则为 38 度。 的夹具来固定特定大小和形状的工件。请小心选择和 使用废料进行试切极为重要!使下方(将贴墙的一边) 放置这些夹具,并在切割操作前进行不带电演练。 紧靠斜切锯挡板。使上方(将贴天花板的一边)紧靠 斜切锯平台与冠状模塑挡板。 长材料的支撑 所有在挡板与斜切锯底座间成角的冠状模塑切割操作 关闭电源并拔下斜切锯插头 指南: 请务必为长材料提供支撑。 为实现最佳效果,请使用延长工件支架扩展斜切锯锯 1. 设模塑角度为模塑底部(安装时此部分紧靠墙面) 台的宽度。请使用任何方便的方法(比如锯木架或类 紧靠挡板,顶部依靠在锯台上。 似设备)支撑长工件,以防止其两端掉落。 2. 模塑背部的成角“平面”必须在挡板与锯台上呈直 切割相框与其他四边物体...
- Page 18 弓形材料 故障问题!锯片无法达到全速 切割弓形材料时,请务必按照图 11 中所示放置材料, 解决方法… 什么问题? 切勿像图 12 所示放置。 1. 使用适当的电线尺寸进 1. 延长线过轻或过长 错误放置材料将导致其在切割完成之际挤压锯片。 2. 电流过小 行替换 塑料管与其他圆形横截面材料切割 2. 联络您的电气公司 使用本斜切锯可轻松切割塑料管。其切割方式与木材 相同,且应在切割时夹紧或固定到挡板上,以防止其 滚动(尤其在进行斜角切入时)。 故障问题!机器过度震动 什么问题? 解决方法… 1. 斜切锯安装不牢固 1. 拧紧所有的安装件 维护 2. 支架或工作台所在地 2. 重新放置在水平的工 不平 作面上 (请在拔下斜切锯插头的状况下进行的所有维护。) 3. 锯片已损坏 3.
- Page 19 服务信息 史丹利提供覆盖整个亚洲的公司隶属和授权服务地点。 所有史丹利服务中心都具有训练有素的人员,为客户 提供高效可靠的电动工具服务。 不论您是需要技术建议、维修还是原厂替换部件, 都可以联系最靠近您的史丹利服务中心。 注 • 史丹利的政策是持续改进我们的产品,因此,我们 保留随时更改产品规格的权利,恕不另行通知。 • 标准设备和附件可能会因国家(地区)而异。 • 不同国家(地区)的产品规格也可能会有所不同。 • 并非所有的国家(地区)都可提供完整的产品系 列。有关各产品系列的供货状况,请联系您当地的 史丹利代理商。 制造商:史丹利五金工具(上海)有限公司 地 址:上海市外高桥保税区泰谷路88号 丰谷大楼六层676A室 产 地:浙江金华...
Need help?
Do you have a question about the STSM1525 and is the answer not in the manual?
Questions and answers