Stanley SST1800 Manual
Hide thumbs
Also See for SST1800:
- Original instructions manual (156 pages) ,
- Original instructions manual (88 pages) ,
- Original instructions manual (36 pages)
Advertisement
Quick Links
Advertisement

Related Manuals for Stanley SST1800


Summary of Contents for Stanley SST1800
- Page 1 English 简体中文 SST1800 한국어...
-
Page 3: Intended Use
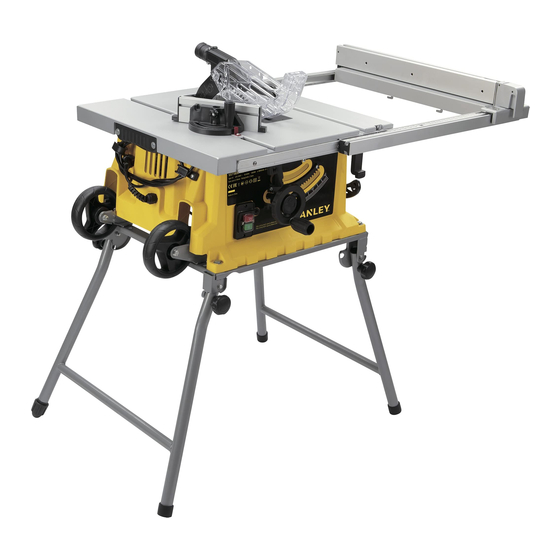
Use personal protective equipment. Always wear eye INTENDED USE protection. Protective equipment such as a dust mask, Your STANLEY SST1800 Table Saw is designed for the slitting non-skid safety shoes, hard hat, or hearing protection and cross-cutting of all types of timber commensurate with the used for appropriate conditions will reduce personal machine’s size. -
Page 4: Safety Instructions For Table Saws
ENGLISH h. Keep handles and grasping surfaces dry, clean and d. When ripping, always apply the workpiece feeding free from oil and grease. Slippery handles and grasping force between the fence and the saw blade. Use a push stick when the distance between the fence and surfaces do not allow for safe handling and control of the the saw blade is less than 150 mm, and use a push tool in unexpected situations. - Page 5 ENGLISH c. Never hold and press the workpiece that is being cut h. Never use damaged or incorrect saw blade mounting off against the rotating saw blade. Pressing the means such as flanges, saw blade washers, bolts or nuts. These mounting means were specially designed for workpiece being cut off against the saw blade will create a binding condition and kickback.
-
Page 6: Safety Of Others
STANLEY Service Center or an equally qualified • The saw blade diameter must be in accordance with the person in order to avoid damage or injury. - Page 7 instruction concerning use of the appliance by a person instruction concerning use of the appliance by a person instruction concerning use of the appliance by a person responsible for their safety. cause responsible for their safety. cause ♦ Children should be supervised to ensure that they do responsible for their safety.
- Page 8 ENGLISH Folding instructions (Fig B1, B2, B3, B4) Folding instructions (Fig B1, B2, B3, B4) Hold and support the table edge, unlock the legs at the wheel Hold and support the table edge, unlock the legs at the wheel end (B1).Lower the wheels to the ground, allowing the legs to end (B1).Lower the wheels to the ground, allowing the legs to swing under (B2).Stand the table on end, fold up and lock the swing under (B2).Stand the table on end, fold up and lock the...
- Page 9 ENGLISH Riving knife set-up (Fig E, F, G) To Transport The Table Saw (Fig C1, C2) Riving knife set-up (Fig E, F, G) Riving knife set-up (Fig E, F, G) Riving knife set-up (Fig E, F, G) To Transport The Table Saw (Fig C1, C2) Riving knife set-up (Fig E, F, G) To Transport The Table Saw (Fig C1, C2) WARNING! Disconnect the mains cable! The...
- Page 10 ENGLISH Saw blade assembly/replacement (Fig E, H, I) Saw blade assembly/replacement (Fig E, H, I) Saw blade assembly/replacement (Fig E, H, I) Saw blade assembly/replacement (Fig E, H, I) Saw blade assembly/replacement (Fig E, H, I) Saw blade assembly/replacement (Fig E, H, I) 1.
- Page 11 ENGLISH Turn anti-clockwise; to increase the cutting depth Turn anti-clockwise; to increase the cutting depth Setting the cutting width (Fig. M) Setting the cutting width (Fig. M) Turn anti-clockwise; to increase the cutting depth Setting the cutting width (Fig. M) Turn anti-clockwise;...
- Page 12 ENGLISH Cross stop (Fig O) Cross stop (Fig O) Cross stop (Fig O) Cross stop (Fig O) Push the miter gauge (6) into a slot (21 a/b) on the saw Push the miter gauge (6) into a slot (21 a/b) on the saw Push the miter gauge (6) into a slot (21 a/b) on the saw Push the miter gauge (6) into a slot (21 a/b) on the saw table.
-
Page 13: Maintenance
ENGLISH Bevel cuts (Fig R) Blade jamming handling (Fig U) Blade jamming handling (Fig U) Bevel cuts (Fig R) Bevel cuts (Fig R) Bevel cuts (Fig R) Blade jamming handling (Fig U) Blade jamming handling (Fig U) Ensure the machine is disconnected from the power Bevel cuts must always be made using the rip fence (5). - Page 14 • Ensure that the dust extraction hose in use is suitable for Should you find one day that your STANLEY product needs the application and material being cut. Ensure proper replacement, or if it is of no further use to you, do not dispose hose management.
-
Page 15: Service Information
STANLEY catalogue or contact your local STANLEY office Voltage at the address indicated in this manual. A list of authorised Frequency STANLEY repair agents and full details of our after sales service is available on the internet at: www.2helpU.com Power input 1800... - Page 16 简体中文 简体中文 防止意外起动。 在连接电源和 / 或电池包、 拿起或搬运工具 设计用途 前确保开关处于关断位置。 手指放在开关上搬运工具或开 您的 圆锯机设计用于根据机器尺寸对所有 关处于接通时通电会导致危险。 STANLEY SST1800 类型的木材进行纵切和横切。 本工具可供专业使用。 在电动工具接通之前, 拿掉所有调节钥匙或扳手。 遗留在 警告! 使用电动工具时, 请务必遵守下列基本安 电动工具旋转零件上的扳手或钥匙会导致人身伤害。 全预防措施, 降低火灾、 触电和人身伤害风险。 手不要过分伸展。 时刻注意立足点和身体平衡。 这样能在 意外情况下能更好地控制住电动工具。 使用本工具前, 请仔细阅读本手册所有说明, 并保管好本手册。 着装适当。 不要穿宽松衣服或佩戴饰品。 让你的头发和衣 安全说明 服远离运动部件。 宽松衣服、 佩饰或长发可能会卷入运动...
- Page 17 简体中文 简体中文 反冲原因和相关警告 圆锯机的安全说明 反冲是指由于锯片被挤压, 卡住或工件未对准锯片的切割线或工 防护相关警告 件的一部分粘在锯片与纵切挡板或其他固定物体之间而引起的 保持防护罩就位。 防护罩必须处于正常工作状态并正确安装。 工件突然反应。 松动, 损坏或无法正常工作的防护罩必须进行修理或更换。 在反冲过程中, 最常见的是, 工件由锯片的后部从锯台上抬起并 每次进行直切操作时, 均应使用锯片防护罩和分料刀。 对于直 被推向操作员。 反冲是由于使用不当和 或不正确的操作程序或条 切操作, 锯片将完全切穿工件的整个厚度, 安装防护罩和其他 件造成的。 适当采取下列预防措施, 可避免反冲现象: 安全装置将有助于降低受伤的风险。 切勿站在与锯片对齐的位置。 始终将身体置于挡板和锯片的 完成需要移除防护罩或分料刀的操作 (例如嵌接或重新锯割 同一侧。 反冲可将工件高速推向站在前面并与锯片成一直线 切口) 后, 请立即重新连接防护系统。 防护罩和分料刀有助于 的任何人。 降低受伤风险。...
- Page 18 请勿在锯片运转时往上涂抹润滑剂。 • 电气安全 未使用推杆时, 务必将其固定到位。 • 请勿使用护罩进行装卸或搬运。 • 您的工具需要接地线。 请务必检查电源电压是否与铭牌一致。 切勿对锯片施加侧压力。 • 警告! 如电源线损坏, 必须由制造商、 授权服 切勿切割轻合金。 机器不适合此应用。 STANLEY • 务中心或具备同等资格的人士进行更换, 以避免事故 请勿使用砂轮或金刚切割轮。 • 或人身伤亡。 如电源线由具备同等资格但未经 不允许嵌接, 开槽或切槽。 • 授权的人士更换, 则产品质保将无效。 如果发生机器故障, 请立即关闭机器并从电源上拔下插头。 发 STANLEY • 送故障报告, 并以适当形式标记机器, 以防其他人使用该故障 使用延长线...
- Page 19 instruction concerning use of the appliance by a person responsible for their safety. cause responsible for their safety. cause ♦ Children should be supervised to ensure that they do ause responsible for their safety. cause responsible for their safety. responsible for their safety. tool.
- Page 20 Folding instructions (Fig B1, B2, B3, B4) 简体中文 简体中文 Hold and support the table edge, unlock the legs at the wheel 折叠说明 (图 , , , ) end (B1).Lower the wheels to the ground, allowing the legs to 握住并支撑锯台的边缘, 将轮子末端的支腿 ( swing under (B2).Stand the table on end, fold up and lock the ) 解锁。...
- Page 21 简体中文 简体中文 Riving knife set-up (Fig E, F, G) To Transport The Table Saw (Fig C1, C2) WARNING! Disconnect the mains cable! The Riving knife set-up (Fig E, F, G) 分料刀设置 (图 , , ) The upper legs could be locked in the vertical position for To Transport The Table Saw (Fig C1, C2) Riving knife set-up (Fig E, F, G) Riving knife set-up (Fig E, F, G)
- Page 22 saw blade. 4. The gap between the saw blade (4) teeth and the riving 6. Remove the outer flange and take out the saw blade from 简体中文 简体中文 the inner flange, with diagonally downwards movement. knife should be around 3mm to 5mm (Fig.G) 7.
- Page 23 fence (5) and push the Narrow Material Fence (i) on the guide, depending on the required position. 简体中文 简体中文 Extension table (Fig N) Tighten the bolts again. The extension table (16) could be used for particularly 扩展台 (图 ) wide workpieces. 扩展台...
- Page 24 简体中文 简体中文 Bevel cuts (Fig R) 斜面切割 (图 ) 将您的手 (手指合拢) 平放在工件上, 然后沿着这一方向将工 Bevel cuts (Fig R) Blad 件推入锯片 ( )。 Bevel cuts must always be made using the rip fence (5). 斜角切割必须始终使用纵切挡板 ( ) 进行。 Bevel cuts must always be made using the rip fence (5). 用左手或右手...
- Page 25 简体中文 简体中文 Blade jamming handling (Fig U) ade jamming handling (Fig U) 锯片卡住处理 (图 ) 集尘 de jamming handling (Fig U) Ensure the machine is disconnected from the power Ensure the machine is disconnected from the power 确保机器断开电源。 source. Ensure the machine is disconnected from the power 来自诸如含铅涂层和某些木材类型材料的粉尘可能会危害人体...
- Page 26 服务信息 提供覆盖范围广泛的公司隶属和授权服务地点。 所有 STANLEY 服务中心都具有训练有素的人员, 为客户提供高效和 STANLEY 可靠的电动工具服务。 有关授权服务中心的详情, 或若您需要技术 建议、 维修或原厂替换部件, 请联系最靠近您的 地点。 STANLEY 有关授权服务中心的详情, 或若您需要技术建议、 维修或原厂替 换部件, 请联系最靠近您的 地点。 STANLEY 技术参数 圆锯机 SST1800 类型 电压 伏特 交流 频率 赫兹 输入功率 瓦 1800 空载转速 转 分 4800 锯片直径 毫米...
- Page 27 한국어 신체 보호 장비를 착용하십시오 항상 보안경을 착용하십시오 용도 적합한 상황에서 방진 마스크, 미끄럼 방지 안전화, 안전모 STANLEY SST1800 테이블 톱은 기계 크기에 적합한 모든 유형의 또는 청력 보호 기구 등의 보호 장비를 사용하면 신체 부상 목재를 슬리팅하고 교차 절단하는 용도로 설계되었습니다 본 공구는 위험이 줄어듭니다...
- Page 28 한국어 한국어 핸들과 잡는 표면은 건조하고 깨끗한 상태를 유지하고 오일 제조업체에서 제공한 푸시 스틱 또는 지침에 따라 제작된 푸시 기름이 묻지 않도록 하십시오 미끄러운 핸들과 잡는 면은 스틱만 사용하십시오 이 푸시 스틱은 톱날과 손 사이에 충분한 예기치 못한 상황에서 안전한 취급과 공구 관리를 보장하지 거리를 제공합니다 않습니다 손상되었거나 잘린 푸시 스틱을 절대 사용하지 마십시오 손상된 푸시 스틱은 손이 톱날 속으로 미끄러져 들어가게 해서 정비 부서질 수 있습니다 자격을 갖춘 기술자가 동일 교체 부품을 사용하여 정비 작업을...
- Page 29 한국어 한국어 톱 테이블이 적절한 방향으로 회전하도록 설치되었는지 조립한 작업물의 사각지대를 절단할 때는 각별히 주의하시기 확인하십시오 테이블 톱에 연마 휠, 와이어 브러시 또는 연삭 튀어 나온 톱날이 반동을 야기할 수 있는 물체를 벨 바랍니다 휠을 사용하지 마십시오 톱날 설치가 잘못되거나 권장되지 수 있습니다 않은 액세서리를 사용하면 심각한 부상으로 이어질 수 큰 판을 지지하여 톱날이 끼고 반동되는 위험을 최소화하십시오 있습니다 큰 판은 자체 무게로 인해 휘는 경향이 있습니다 테이블 상단 위로 돌출되어 있는 판의 모든 부분 아래에 지지대를 놓아야 톱 벤치에 적용되는 추가 안전 규칙...
- Page 30 “live” and WARNING! To reduce the risk of injury, the user 설명서를 주의 깊게 읽어야 합니다 STANLEY make exposed metal parts of the power tool “live” and WARNING! To reduce the risk of injury, the user could give the operator an electric shock.
- Page 31 한국어 한국어 데이터 코드 위치 립 펜스용 잠금 핸들 날짜 코드에는 제조년도도 포함되며 케이스에 인쇄되어 있습니다 연장 테이블 예: 스패너 렌치 2017 XX JN 가이드 레일 제조년도 푸시 스틱 포장 내용물 테이블 인서트 포장에는 다음 내용물이 들어 있습니다 홈( 테이블 톱 개 홈( 톱날...
- Page 32 Folding instructions (Fig B1, B2, B3, B4) 한국어 한국어 Hold and support the table edge, unlock the legs at the wheel 접기 지침(그림 end (B1).Lower the wheels to the ground, allowing the legs to 테이블 가장자리를 잡고 지지해서, 휠 끝( )에서 레그의 잠금을 swing under (B2).Stand the table on end, fold up and lock the 풉니다...
- Page 33 한국어 한국어 Riving knife set-up (Fig E, F, G) To Transport The Table Saw (Fig C1, C2) Riving knife set-up (Fig E, F, G) To Transport The Table Saw (Fig C1, C2) Riving knife set-up (Fig E, F, G) 둥근톱 분할날 설치(그림 WARNING! Disconnect the mains cable! The Riving knife set-up (Fig E, F, G) To Transport The Table Saw (Fig C1, C2)
- Page 34 한국어 한국어 Saw blade assembly/replacement (Fig E, H, I) Saw blade assembly/replacement (Fig E, H, I) Saw blade assembly/replacement (Fig E, H, I) Saw blade assembly/replacement (Fig E, H, I) Saw blade assembly/replacement (Fig E, H, I) 1. WARNING: Ensure the machine is disconnected from the 톱날 조립...
- Page 35 Turn anti-clockwise; to increase the cutting depth Setting the cutting width (Fig. M) 한국어 한국어 Turn anti-clockwise; to increase the cutting depth Setting the cutting width (Fig. M) Turn Clockwise; to reduce the cutting depth The rip fence (5) is used for lengthwise cutting of wood. 절삭...
- Page 36 한국어 한국어 Cross stop (Fig O) 마이터 게이지(그림 Cross stop (Fig O) Cross stop (Fig O) 21 a/b 마이터 게이지( )를 톱 테이블의 슬롯( )에 밀어 Push the miter gauge (6) into a slot (21 a/b) on the saw Push the miter gauge (6) into a slot (21 a/b) on the saw Push the miter gauge (6) into a slot (21 a/b) on the saw table.
- Page 37 한국어 한국어 Bevel cuts (Fig R) Blade jamming handling (Fig U) Bevel cuts (Fig R) Blade jamming handling (Fig U) 날 걸림 해결(그림 베벨 절단(그림 Bevel cuts (Fig R) Blade jamming handling (Fig U) Ensure the machine is disconnected from the power Bevel cuts must always be made using the rip fence (5). 기계의...
- Page 38 모든 작업을 하는 동안, 먼지 배출에 관한 관련 규정에 따라 안됩니다 설계된 먼지 배출 장치를 연결하십시오 • STANLEY 사용 중인 집진 호스가 절단되고 있는 용도 및 재료에 제품을 교체해야 하거나 더 이상 쓸모가 없어졌다고 판단될 때는 본 제품을 가정용 쓰레기와 함께 처리하지 마십시오...
- Page 39 교체 부품이 필요한 모든 경우에 가까운 스탠리로 연락하십시오 • 구매 증명서가 제시되었고, 기술 데이터 • STANLEY 제품은 원래의 모든 부품들과 함께 반환되었으며, • SST1800 고용 목적을 위해 제품을 사용한 적이 없습니다 테이블 톱 STANLEY 유형 서비스를 청구하려면 판매점에 연락하거나 STANLEY 카탈로그에서 가까운 공인...
Need help?
Do you have a question about the SST1800 and is the answer not in the manual?
Questions and answers