Advertisement
Quick Links
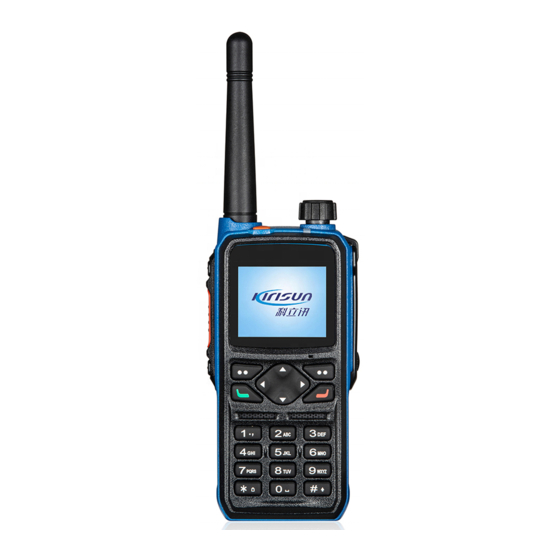
Appearance
Antenna
Programmable
top key
Programmable
side key 1
PTT key
Programmable
Menu/OK
side key 2
key
Pick-up key
Speaker
Numeric
keypad
PoC Trunked Two-way Radio
GP700
Quick Guide
Accessory
Belt clip
interface
Battery
Battery
latch
Please read carefully the Safety Information before using the product.
Icons
Icon
Description
Received signal strength indication
2G,3G,4G
2G/3G/4G network
Wi-Fi received signal strength indication
Searching GPS satellite signals
GPS signals acquired and locked up
In group call
In individual call
In all call
Under dispatching
Remaining battery capacity
Short message
Bluetooth on
Bluetooth device paired
In emergency alarm
Alarm message
Version:V1.0
167W06000213
Charging the Battery
Take the following steps to charge the battery.
To install the antenna, plug the threaded end into the antenna interface, and
1. Plug the power adapter into an AC power socket of the required specifications.
rotate the antenna clockwise until it is tight.
Power/volume knob
2. Connect the power adapter to the charger, and green power indicator
To uninstall the antenna, rotate it counterclockwise.
light will be on.
3. Put a battery solely or attached to the device into the charger.
LED
indicator
4. Ensure the battery contacts well with the charging terminals.
Red charging indicator light is on.
5. After charging for about 6 hours, the charging indicator will turn green.
LCD
The battery is fully charged.
screen
Navigation keys
6. After the indicator light turns green, wait 1 to 2 hours before taking
Micro-
out the battery, so as to achieve the best battery performance.
phone
7. Disconnect the power adapter from the socket.
Back
key
Hang-
To install the belt clip, align the two screw holes on the belt clip with the two at
up key
the back of the device, and fasten the screws.
To uninstall the belt clip, loosen the screws, and then take off the belt clip.
Installing the Battery
1. Press the upper part of the belt clip gently so that it goes up. (Figure ①)
2. Align the battery with the battery holder at the back of the device, and insert
the battery. (Figure ②)
3. Push the battery in the direction indicated until the latch is in position. (Figure ③)
4. Press the lower part of the battery until it is latched. (Figure ④)
Stop block at the edge of the battery
To use an audio accessory or the programming cable, screw down the screw
on the earphone cover, take down the accessory cover, plug the accessory or
cable into the interface, and screw up the screw.
①
②
Aluminum-shelled battery holder
③
④
Basic Operation
1.Powering On/Off
9.Bluetooth
To power on/off the device, hold down the Power/Volume knob and
To enable/disable Bluetooth, in the standby interface press the
release after 2 seconds.
Menu/OK key, and select Setting – Bluetooth.
The screen and green LED indicator light will be on, and the message
After enabling Bluetooth, you can scan for and pair with a BT
"initializing" will be displayed.
earphone that is in pairing mode.
Note: If no SIM card is installed or the card is unregistered or invalid,
10.Short Message
you will hear the voice prompt "No SIM card"
To send the message, in the standby interface press the Menu/OK
2.Adjusting the Volume
key, select Message – Short Message, write a message, select a
After power-on, rotate the Power/Volume knob clockwise to increase
contact, and send the message.
the volume or counterclockwise to decrease it.
To view the short messages received/sent, press the Menu/Ok key,
and select Inbox/Outbox.
3.Initiating a Call
11.Advanced Functions
Hold down the PTT key to initiate a call on the selected channel.
Via dispatcher software, you can revive, stun or kill the device, play
back voice, or perform background monitoring on another device.
4.Receiving a Call
When a call is received, green indicator light will be on.
12. Others
5.Network Type
【*】key: Press it to turn off the screen and enter Power Saver mode;
hold it down for seconds to lock/unlock the keypad.
To choose a network type, in the standby interface, press the Menu/OK
Programmable side key 1: By default, press it to announce the
key to enter the menu, select Setting – Network Type.
selected channel; hold it down for seconds to announce remaining
battery capacity.
6.Low-Power Alert
Programmable side key 2: By default, press it to announce the user
To choose a network type, in the standby interface, press the Menu/OK
name; hold it down for seconds to enter individual-call mode.
key to enter the menu, select Setting – Network Type.
7.Positioning
To enable/disable positioning, in the standby interface press the
Menu/OK key to enter the menu, and select Setting – GPS.
The built-in GPS module locates the device and reports position
information to the network management system. The real-time location
and movement track of the device can be displayed on a GIS map on
the network management system or dispatcher software.
8.Wi-Fi
To enable/disable Wi-Fi, in the standby interface press the Menu/OK
key to enter the menu, and select Setting – Wi-Fi.
After enabling Wi-Fi, you can search and connect to a nearby Wi-Fi
network in real time and set a password.
成型 尺寸:165*95mm
Installing/Uninstalling the Battery
Installing a SIM Card
Note: Please use a standard Nano-SIM card.
1. Unscrew the screw on the TF card cover using the supplied screwdriver,
open the cover, and take out the instructions card.
2. Insert a SIM card into the slot of the card holder (Figure ①), and close the
card holder cover. (Figure ②)
3. Lock the card holder cover by sliding it in the indicated direction. (Figure ③)
4. Close the TF card cover and screw up the screw (Figure ④)
2
1
Installing/Uninstalling Belt Clip
LED Indicator
Indicator state
Device State
A. No SIM card is installed, or it is installed
improperly. There is a voice prompt "No SIM card".
Red light on
B. Fail to unlock the PIN code of the SIM card.
A. During a call (i.e. individual/group/all call).
Installing an Accessory
Green light on
B. A voice record is being downloaded/played.
A. The device is in individual-call standby state.
B. The device is in call setup state.
Yellow light on
C. The device is unregistered or expired, so that it
is not deployed on the server.
Network registration fails because the SIM card is
Red light flashing fast
inactivated or a bill is unpaid.
Device registration fails because of poor wireless
network connection.
The device is registered to a network successfully
Green light flashing slow
and enters standby state.
The device is idle or powered off.
Idle
Troubleshooting
No.
Problem
Solution
1. The battery is out. Charge or replace
the battery.
2. The volume knob is faulty, or there is
Power-on failed
another problem. Get the device repaired
at an authorized service station.
1. Speak too far from the microphone.
Please keep a distance of 3 ~ 10cm.
Low voice during
2. Inappropriate volume setting. Increase
a call
the volume by rotating the volume knob
clockwise.
1. The SIM card is expired. Refill or
replace it.
PTT service
2. Incorrect group setting. Choose a
unavailable
correct group and try again.
3. The device is expired. Renew it.
Attachments
No.
Name
Main unit
Battery
Antenna
Power adapter
User manual
Safety Information
Strap
Desktop charger
This document is only for reference, and actual product prevails.
Kirisun reserves the right to the final interpretation of this document.
4
Advertisement

Subscribe to Our Youtube Channel
Related Manuals for Kirisun GP700


Summary of Contents for Kirisun GP700
- Page 1 After enabling Wi-Fi, you can search and connect to a nearby Wi-Fi 167W06000213 network in real time and set a password. This document is only for reference, and actual product prevails. Kirisun reserves the right to the final interpretation of this document. 成型 尺寸:165*95mm...
- Page 2 7. The band 5150-5350MHz indoor use only. Hereby, Kirisun Communication Co.,Ltd. declares that this product is in compliance with essential requirements and other relevant provisions of Directive 2014/53/EU. This product is allowed to be used in all EU member states.
Need help?
Do you have a question about the GP700 and is the answer not in the manual?
Questions and answers