Table of Contents
Advertisement
Quick Links
Advertisement
Table of Contents

Related Manuals for RGBlink Q16


Summary of Contents for RGBlink Q16
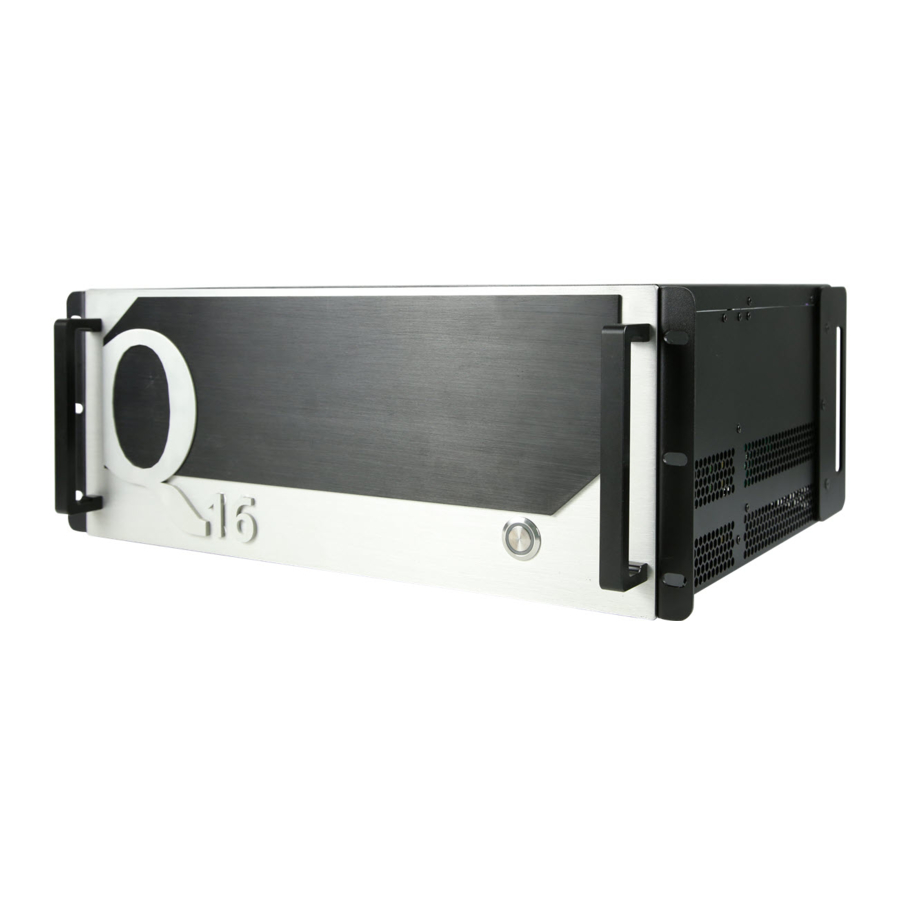
- Page 1 Quick Start ● Single port support up to 24 layers ● Each layer support for scaling, moving, crossing and overlying ● Support for 16 In 16 Out ● Up to 128 IP inputs via H.265 decoding , resolution up to 1080P ●...
-
Page 2: Table Of Contents
Output| Input|Overview..........................15 Connect the Device........................... 15 Output Setting ............................16 Input Setting..............................17 Device Overview............................20 Display System..............................21 Layer Management............................24 Preset Management............................30 CONTACT INFORMATION...........................33 © Xiamen RGBlink Science & Technology Co., Ltd. 1 / 34 Ph: +86 592 5771197 | support@rgblink.com www.rgblink.com... -
Page 3: Overview
Overview Q16 adopt modular design, supporting 24 layers on each output.Each layer support for scaling, moving, crossing and overlying. It support for 16 In 16 Out. Up to 128 IP inputs via H.265 decoding , resolution up to 1080P. It also support preview inputs, realtime streaming back, background picture import and OSD. -
Page 4: Packing Configuration
HDMI Cable Network Cable DVI Cable AC Power Cord Anti-Static Bag Note: AC Power Cable supplied as standard according to destination market. © Xiamen RGBlink Science & Technology Co., Ltd. 3 / 34 Ph: +86 592 5771197 | support@rgblink.com www.rgblink.com... -
Page 5: Hardware Orientation
Hardware Orientation Front Panel Button Instruction Power Rear Panel © Xiamen RGBlink Science & Technology Co., Ltd. 4 / 34 Ph: +86 592 5771197 | support@rgblink.com www.rgblink.com... - Page 6 RS232 serial port for Open API COMM to connect router or computer to command realize software control Dual power switch Ground wire screw © Xiamen RGBlink Science & Technology Co., Ltd. 5 / 34 Ph: +86 592 5771197 | support@rgblink.com www.rgblink.com...
-
Page 7: Use Your Product
,it will pop-up the installer language box, select the language, for example, select “English”, and click “OK” to confirm. Click “Next” to install © Xiamen RGBlink Science & Technology Co., Ltd. 6 / 34 Ph: +86 592 5771197 | support@rgblink.com www.rgblink.com... - Page 8 During installation, it will pop up the window of Install Shield Wizard for Virtual Com port If user install the XPOSE software for the first time, click “Next © Xiamen RGBlink Science & Technology Co., Ltd. 7 / 34 Ph: +86 592 5771197 | support@rgblink.com www.rgblink.com...
- Page 9 Then click “Install", as shown in the figure below Click “Finish” complete installation, as shown in the figure below © Xiamen RGBlink Science & Technology Co., Ltd. 8 / 34 Ph: +86 592 5771197 | support@rgblink.com www.rgblink.com...
- Page 10 Click “Finish” and is ready to run the XPOSE © Xiamen RGBlink Science & Technology Co., Ltd. 9 / 34 Ph: +86 592 5771197 | support@rgblink.com www.rgblink.com...
-
Page 11: Login In Xpose
After login, users can find the management including:Topology Diagram,Search,Display System, Layer Management, Preset Management, Keyboard Settings. The details of each hierarchy will be described hereafter. © Xiamen RGBlink Science & Technology Co., Ltd. 10 / 34 Ph: +86 592 5771197 | support@rgblink.com... - Page 12 In the following text, we are going to show how to use XPOSE 2.0 to control Q16. © Xiamen RGBlink Science & Technology Co., Ltd. 11 / 34 Ph: +86 592 5771197 | support@rgblink.com www.rgblink.com...
-
Page 13: System Setting
Q16 in Find Device. Before system setting make sure physical connection of Q16 and XPOSE 2.0 is done, either by connecting Q16 to the PC which run XPOSE 2.0, or connect Q16 to router which offer same network as the PC in. -
Page 14: Authorization Setting
Clear all: is to remove all already set short cut keys. Authorization Setting to open up the authorization entry. Click © Xiamen RGBlink Science & Technology Co., Ltd. 13 / 34 Ph: +86 592 5771197 | support@rgblink.com www.rgblink.com... -
Page 15: Slave Unit
Choose the IP address of the other device from drop down list, e.g IP192.168.0.45 and Slide to ON, the red dot behind turns to green indicating that the device has been connected © Xiamen RGBlink Science & Technology Co., Ltd. 14 / 34 Ph: +86 592 5771197 | support@rgblink.com... -
Page 16: Topology Diagram
XPOSE 2.0 offers the feature of making topology diagram which can assist users to import the actual input and output connection into XPOSE control. Q16 has not been imported to Topology Diagram yet but to unlock following settings dragging any device from the device list to the window can do. -
Page 17: Output Setting
Color:click the square behind to choose color Scrolling Speed:Static, Slower, Slow, Fast,Faster Direction:Left Scroll On Top, Left Scrool On Bottom Roll Up Input Text OSD text. © Xiamen RGBlink Science & Technology Co., Ltd. 16 / 34 Ph: +86 592 5771197 | support@rgblink.com www.rgblink.com... -
Page 18: Input Setting
A red rectangle flashes around the chosen port when it is clicked. Different input modules port could have different input setting on Q16 subject to their features but generally there are such input settings as: Property Setting, EDID Setting. - Page 19 Width:default 1920 for 2K, 3840 for 4K Height:default 1080 for 2K, 2160 for 4K Video Format Specifiy Format: turn on and there is a resolution list to choose. © Xiamen RGBlink Science & Technology Co., Ltd. 18 / 34 Ph: +86 592 5771197 | support@rgblink.com www.rgblink.com...
- Page 20 H.265 Setting When there is H.265 input module installed on Q16, through the module, Q16 is able to search and take the video signal from webcam in the same local network. To make sure H.265 module take effect, IP setting is required.
-
Page 21: Device Overview
Input modules info and output module info IP:Show IP Address, Netmask, Gateway Fan Control Auto adjustment is not supported,Fan speed 0-99 Factory setting © Xiamen RGBlink Science & Technology Co., Ltd. 20 / 34 Ph: +86 592 5771197 | support@rgblink.com www.rgblink.com... -
Page 22: Display System
Mode XPOSE 2.0 allows multiple modes running on one same interface, to differentiate each mode, different color is given to each mode based on different devices. At present, In Q16 support only Presentation Mode. Monitor Resolution Choose the output resolution for monitors ©... - Page 23 There will be a simulated display area showing up at the bottom of the column. After fill in the H,V total and Row Column, drag the available monitor to the display area. © Xiamen RGBlink Science & Technology Co., Ltd. 22 / 34 Ph: +86 592 5771197 | support@rgblink.com...
- Page 24 Screen Group Q16 support to manage 4 screen groups at most on XPOSE. It allows users to edit the name of the Screen group that has been created just click...
-
Page 25: Layer Management
Display System shall be dragged from the Group. Signal Signal list, showing all input signals currently. Drag the signal to the display. © Xiamen RGBlink Science & Technology Co., Ltd. 24 / 34 Ph: +86 592 5771197 | support@rgblink.com www.rgblink.com... - Page 26 Net Video If there is H.265 input module installed on Q16 and connecting to local network where there are webcam source availalbe. Click “Search”, there is Authenticafication Method required. Choose Anonymous Access, the webcams without user name and passoword could be found. Choose...
- Page 27 © Xiamen RGBlink Science & Technology Co., Ltd. 26 / 34 Ph: +86 592 5771197 | support@rgblink.com...
- Page 28 Equal 4 Equal,8 Equal,9 Equal,16 Equal, 24Equal。 Equal here means Equal sized layer I.e.:Monitor-ALL,Source-Signal,Drop Area- 2,3,4,9, Equal-8,as following: © Xiamen RGBlink Science & Technology Co., Ltd. 27 / 34 Ph: +86 592 5771197 | support@rgblink.com www.rgblink.com...
- Page 29 Background can be adjusted in sceen group window. After Background adjustment is done, click Set. Hotkey short cut keys on keyboard to do layer management. © Xiamen RGBlink Science & Technology Co., Ltd. 28 / 34 Ph: +86 592 5771197 | support@rgblink.com...
- Page 30 Use the tools bar on top of window to do such operations Layer Layer to Top Paste Selected Backward Layer Select All Cancel Forward Selected Layer to Copy Selected Delete Bottom Selected © Xiamen RGBlink Science & Technology Co., Ltd. 29 / 34 Ph: +86 592 5771197 | support@rgblink.com www.rgblink.com...
-
Page 31: Preset Management
Switch Manual Mode or Schedule Module by the bar in the left bottom corner of the window. Cut, switch from PST to PGM immediately © Xiamen RGBlink Science & Technology Co., Ltd. 30 / 34 Ph: +86 592 5771197 | support@rgblink.com... - Page 32 Click the color block after Color Selection and choose a new color for the boarder of chosen bank. Schedule Mode This mode is designed to set auto bank (scene/preset) switch. © Xiamen RGBlink Science & Technology Co., Ltd. 31 / 34 Ph: +86 592 5771197 | support@rgblink.com...
- Page 33 Start Time and End Time if needed. Click this icon to delete this preset if it is not needed. Turn on Daily Loop and Loop Switch. © Xiamen RGBlink Science & Technology Co., Ltd. 32 / 34 Ph: +86 592 5771197 | support@rgblink.com...
-
Page 34: Contact Information
All video products are designed and tested to the highest quality standard and backed by full 3 years parts and labor warranty. Warranties are effective upon delivery date to customer and are non-transferable. RGBlink warranties are only valid to the original purchase/owner. Warranty related repairs include parts and labor, but do not include faults resulting from user negligence, special modification, lighting strikes, abuse(drop/crush), and/or other unusual damages.
Need help?
Do you have a question about the Q16 and is the answer not in the manual?
Questions and answers