Hayward HydroRite UVO3 Troubleshooting Manual
Uv ozone system
Hide thumbs
Also See for HydroRite UVO3:
- Owner's manual (16 pages) ,
- Troubleshooting manual (55 pages)

Related Manuals for Hayward HydroRite UVO3


Summary of Contents for Hayward HydroRite UVO3
- Page 1 HydroRite UVO Troubleshooting Guide Residential TSG-UVO158a Copyright 2015 Hayward Industries Inc.
- Page 2 Safety Precautions Warning • When installing and using this electrical equipment, basic safety precautions should always be followed, including the following: – READ AND FOLLOW ALL INSTRUCTIONS • This product should be installed by a professional service technician or similar person who is qualified in electrical equipment installation.
- Page 3 Safety Precautions (cont.) • CAUTION - To prevent possible fire or electrical shock, use only replacement lamp specified by the manufacturer. • A bonding lug is provided on the external surface. To reduce the risk of electric shock, connect the local common bonding grid in the area of the swimming pool, spa, or hot tub to these terminals with an insulated or bare copper conductor not smaller than 8 AWG US / 6 AWG Canada.
-
Page 4: Table Of Contents
Table of Contents How HydroRite Works & Specifications Pg. 5-6 Installation: Pg. 7-15 Installation Overview & Parts Description Venturi & Lamp Installation 10-11 Vessel top & Connecting Control Box to Vessel 12-13 PCB Overview & LED Indicators 14-15 Maintenance: Pg. 16-24 UV Lamp Removal &... -
Page 5: How Hydrorite Works & Specifications
HydroRite: How It Works The Hayward HydroRite contains a high intensity electrically operated Ultraviolet (UV) lamp which is located inside the unit’s wet chamber. The UV lamp emits light at two separate wavelengths within the UV spectrum; 254 nm and 185 nm. - Page 6 Specifications & Head Loss HYD-UVO: Plumbing diameter: 2 inch Input Power: 120VAC, 60Hz Power Consumption: 0.8A Maximum Operating Pressure: 50 psi Operating Flow Range: 10-75 gpm Maximum Flow Rate: 75 gpm Number of Bulbs: 1 Volume of Vessel: .75 gallon...
- Page 7 HydroRite UVO Installation and Overview...
-
Page 8: Installation Overview & Parts Description
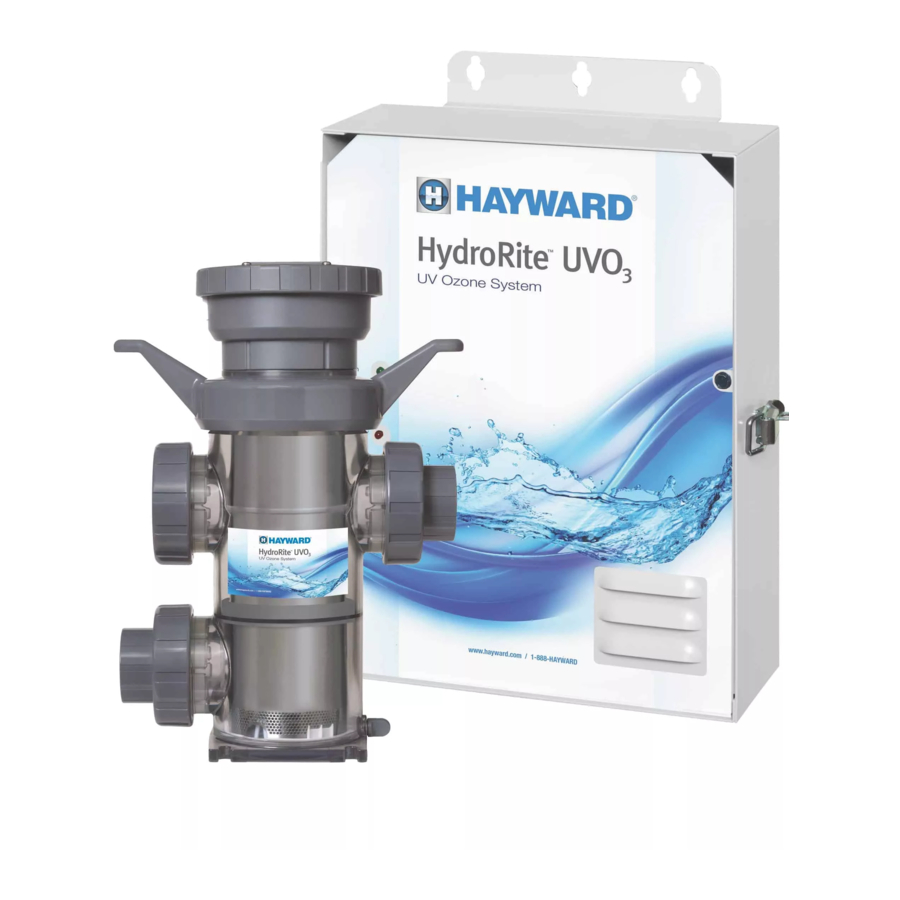
HydroRite: Installation Overview... - Page 9 HydroRite: Part Description 1 Transformer 2 Fan 3 Ballast: Green LED = Ok LED = Error 4 PCB 5 Vessel 6 Inlet Union 7 Outlet Union 8 Vessel lock nut Fig. 1 Fig. 2...
-
Page 10: Venturi & Lamp Installation
HydroRite: Venturi Ozone that accumulates in the UV lamp sleeve is introduced into the water stream using the venturi. -
Page 11: Installation
Vessel: Lamp Installation Fig. 3... -
Page 12: Vessel Top & Connecting Control Box To Vessel
HydroRite: Vessel Top Fig. 4... - Page 13 HydroRite: Connecting Control Box to Vessel 2. Lower lamp into vessel Note: 7a represents the 1. Lamp and corresponding interlock cable AND 7b (Fig. 6). socket connector has a 3. Socket fitting twists into shows the interlock unique design (Fig.5). switch.
-
Page 14: Pcb Overview & Led Indicators
HydroRite: PCB Overview Transformer Input (120VAC) 2X (1.25A) PCB Fuses PCB Input Power (120VAC) Transformer Output (240VAC) Input from Ballast (Operation Status) Output to Ballast Fan (12VDC) Output to LED Display (12VDC) Output to Ballast (240 VAC) Flow & Interlock Sensors (interchangeable) - Page 15 HydroRite: LED Indicators Power On LED This green LED will be on under normal operation. Even when the pool pump is not running and HydroRite shuts off its lamp, the Power On LED will be lit. Lamp/Ballast LED This red LED indicator implies an issue with the lamp or ballast, or a problem with the connection from the ballast cable to the lamp.
-
Page 16: Maintenance
HydroRite UVO Maintenance... -
Page 17: Uv Lamp Removal & Replacement
UV Lamp Removal & Replacement 1. Unplug the device from the power outlet (Fig 8 & 9). 2. Shut off the circulation pump and make sure there is no pressure in the system. Fig. 8 Then close the inlet and outlet valves on Fig. - Page 18 UV Lamp Removal & Replacement (cont.) 6. Remove the lamp by grasping the lamp connector and rotating counter- clockwise to unlock the lamp from the nut (Fig. 14). 7. Once unlocked, slowly pull the lamp straight up and away from the quartz sleeve until it clears the vessel (Fig.
- Page 19 UV Lamp Removal & Replacement (cont.) 8. Slowly lower the new lamp(s) down into the quartz sleeve (Fig.16). Once you have verified that the lamp(s) are secured, reconnect the 4- Pin Connector (Fig. 17 & 18) to the pins on top Fig.
-
Page 20: Cleaning The Quartz Sleeve
Cleaning The Quartz Sleeve: Automatic When using an automatic cleaner, the HydroRite’s quartz sleeve can be cleaned with no need to disassemble the Cell Vessel. When the user initiates a cleaning, an acid bath will clean the quartz sleeve. The cleaner will be permanently plumbed into the system; connected to the inlet and outlet ports located on the top and bottom sides of the vessel. - Page 21 Cleaning The Quartz Sleeve: Manually Cleaning Procedure: 1. Unplug the device from the power outlet (Fig. 21 & 22). 2. Shut off the circulation pump and make sure there is no pressure in the system. Fig. 21 Fig. 22 Then close the inlet and outlet valves on either side of HydroRite.
- Page 22 Cleaning The Quartz Sleeve: Manually (cont.) 6. Use a soft clean cotton cloth (or cotton gloves) to remove the lamp(s) by grasping the lamp connector and rotating counter-clockwise to unlock the lamp from the nut (Fig. 27). 7. Once unlocked, slowly pull the lamp straight up and away from the quartz sleeve until it clears the vessel (Fig.
- Page 23 Cleaning The Quartz Sleeve: Manually (cont.) 8. Remove the stainless steel sleeve from the top seal plate before moving on (Fig. 29 & 30). 9. Remove quartz sleeve by turning the locknut counter clockwise and removing (Fig. 31 & 32). Carefully clean both the inside and the outside of the quartz sleeve using NON-ABRASIVE CLEANERS, as they can scratch the high quality glass.
- Page 24 Cleaning The Quartz Sleeve: Manually (cont.) 11. Slowly lower the lamp down into the quartz sleeve (Fig. 33). Once sleeve is secured (Fig. 34), reconnect the 4-Pin Connector to the pins on top of the lamp. NOTE: DO NOT touch the lamp with bare hands (Use included gloves). The ceramic 4-Pin Connector is designed to fit onto the end of the lamp in ONLY ONE ORIENTATION.
-
Page 25: Troubleshooting
HydroRite UVO Troubleshooting... -
Page 26: Uv Lamp Not Lit
1. UV Lamp Not Lit UV Lamp Power LED Green ballast Are any LEDs Replace lamp LED On? Not Lit lit on ballast Jump to: Verify lamp Jump to Check ballast “Power LED Connection Section B input power. Not Lit” pg. 29 192-288VAC Replace Replace PCB... - Page 27 1. UV Lamp Not Lit Power LED status Verify ballast LED Step 1A Step 1B If the power LED is lit proceed to 1B. If NOT, go to If NO LEDs are lit on the ballast proceed to 1C. If lit, Step 2A, “Power LED Not Lit”.
- Page 28 1. UV Lamp Not Lit (cont.) Verify lamp connection Replace lamp Step 1E Step 1F Inspect lamp connections & cable for damage, if Power off, inspect quartz sleeve & replace lamp damaged, replace cable (HYXSLACA). If not (GLX-HYD-LAMPUV). If this did not correct the damaged, go to 1F.
-
Page 29: Power Led Not Lit
2. Power LED Not Lit Verify source 10-12VDC Contact Tech Power LED present at LED power. 108- Support: Not Lit connection? 132VAC present? (908) 355.7995 Transformer Resolve source Check Fuses, output shows power issue Are fuses OK? 192-288VAC? Replace Replace bad Jump to Fuse(s) Section B... - Page 30 2. Power LED Not Lit Verify source power Verify LED power Step 2A Step 2B Verify source power (108-132VAC). If NO/LOW Test for 10 - 12VDC on LED input. If NO/LOW go to resolve incoming power. If correct go to 2B. step 2C, if OK contact support: 908.355.7995.
- Page 31 2. Power LED Not Lit (cont.) CAUTION: Transformer output is 240VAC! Transformer output Transformer input Step 2D Step 2E Verify Transformer output is 192-288VAC. If OK Verify Transformer input is 108-132VAC between replace PCB (GLX-HYDPCB). If NO/LOW go to 2E. pins 1-3 &...
-
Page 32: Lamp/Ballast Led Is Red
3. Lamp/Ballast LED is Red Lamp/Ballast Connection Lamp cable Replace lamp correct? damaged? cable LED is Red Problem Replace lamp Fix lamp Lamp lit? solved & restart connection Replace ballast... - Page 33 3. Lamp/Ballast LED is Red Verify lamp connection Verify lamp cable Step 3A Step 3B Remove & reconnect lamp cable. If problem not Inspect lamp cable for damage. If damaged replace solved go to step 3B. cable (HYXSLACA). If not go to step 3C. Replace lamp Replace ballast Step 3C...
-
Page 34: Flow/Over Temp/Interlock Led
4. Flow/Over Temp/Interlock LED Flow, Water passing Pump Over Temp, through vessel? Filter clean? running? (min 15gpm) Interlock LED Turn pump Resolve flow Clean filter issue Jump to Unplug & Section B Section B inspect sensors Replace damaged Damaged? switch(s) Contact Tech Replace flow Support:... - Page 35 4. Flow/Over Temp/Interlock LED Verify pump is on Inspect HydroRite vessel Step 4A Step 4B 15GPM (MIN) Verify the pump is running. If it is not, turn the Verify water is passing through the vessel (15GPM pump on and recheck. If ON go to step 4B. MIN).
- Page 36 4. Flow/Over Temp/Interlock LED (cont.) Flow switch Interlock switch Step 4E Step 4F If interlock switch was not already changed, If flow switch was not already swapped, replace replace (GLX-HYDMAN). If LED still ON go to 4G. flow switch (GLX-FLO-RP). If LED still ON go to 4F. Contact support Step 4G The LED is still on due to a temperature related...
-
Page 37: Vessel Makes Noise Or Leaking
5. Vessel Makes Noise or Leaking Vessel Makes Vessel secured Quartz sleeve Top vessel o-ring Noise or Leaking to pad? intact? intact? Secure vessel Replace Replace to pad o-ring quartz sleeve Jump to Section B Inspect drain Section B plug Replace Drain plug or drain plug... - Page 38 5. Vessel Makes Noise or Leaking Verify vessel mounting Inspect top vessel o-ring Step 5A Step 5B Turn off pump, and inspect top vessel o-ring. If Verify whether vessel is secured to pad. If not, damaged, replace (SB2KIT). If Ok go to step 5C. secure vessel to pad.
-
Page 39: Frequently Asked Questions (Faq)
HydroRite UVO Frequently Asked Questions (FAQs) - Page 40 75% over typical levels. Q. Is the HydroRite system designed for salt water use? A. YES, all plastic components are compatible with pools equipped with Hayward Salt Chlorine Generator Systems. The stainless steel insert sleeve (if used) will slowly deteriorate in salt water.
- Page 41 A. YES, you can add any number of HydroRite units to a manifold system to allow for larger outputs and flow rates beyond the capacity of a single HydroRite unit. Contact Hayward to obtain a drawing showing the proper method of plumbing multiple HydroRites for larger applications.
Need help?
Do you have a question about the HydroRite UVO3 and is the answer not in the manual?
Questions and answers