Table of Contents
Advertisement
Quick Links
Advertisement
Table of Contents

Related Manuals for Schuchmann freddy


Summary of Contents for Schuchmann freddy
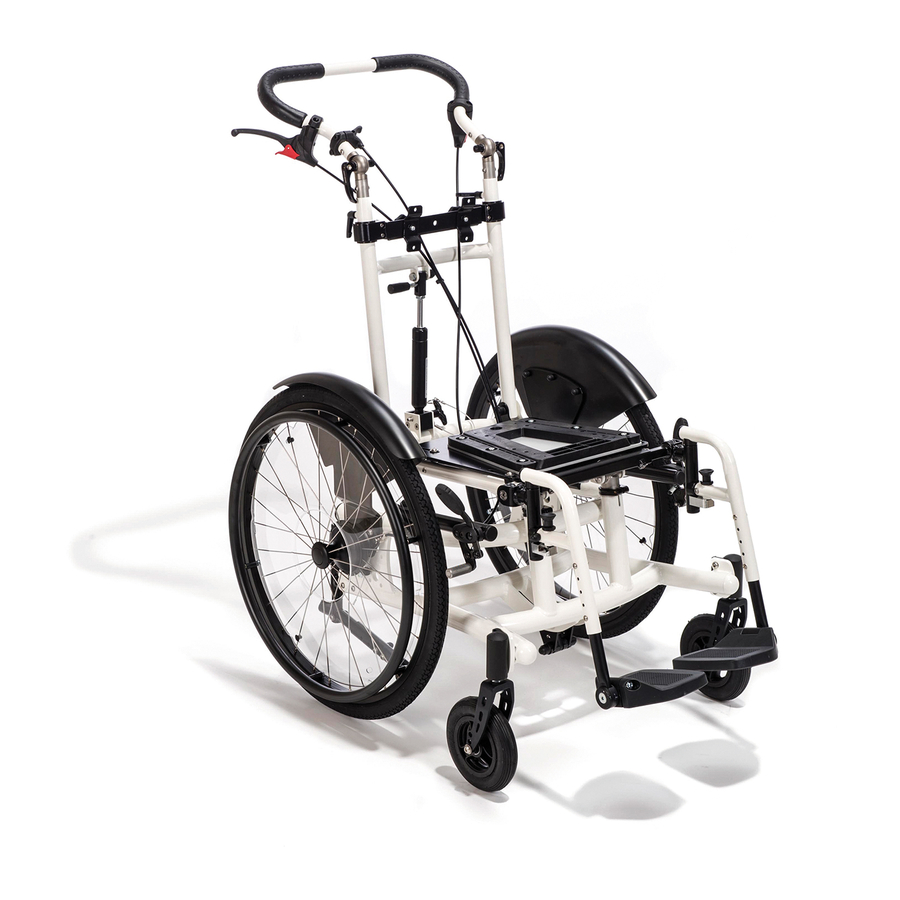
- Page 1 Instructions for use. freddy. The compact seat pan sub-frame.
- Page 2 Instructions for use may deviate from your product due to differing equipment. We reserve the right to make technical modifications. Important information! Ensure that these Instructions for use remain with the product. Your schuchmann Team...
-
Page 3: Table Of Contents
Contents. 1. Preparation................. 05 1.1 Delivery ..........................05 1.2 Safety measures prior to use ................05 1.3 Safe disposal .......................05 1.3.1 Packaging ......................05 1.3.2 Product ........................05 1.4 Where to store the Instructions for use ............05 2. Product description..............06 2.1 Material information ....................06 2.2 Handling and transport ..................06 2.3 Application areas, use according to the intended purpose .....06 2.3.1 Indication ......................06... - Page 4 Contents. 6. Adapter systems................. 18 6.1 Seat pan adapter, standard ................18 6.2 Seat pan adapter, trapezoidal shape ............18 6.3 Seat plate assembly ....................19 7. Cleaning and servicing..............20 7.1 Cleaning and disinfecting ..................20 7.1.1 Cleaning .......................20 7.1.2 Disinfection ......................20 7.2 Servicing ........................20 7.3 Maintenance .......................20...
-
Page 5: Preparation
1.4 Where to store the Instructions for use Please store these Instructions for use carefully and ensure that these Instructions for use remain with the product in case of re-use. Should you lose the instructions, you can always download an updated version at www.schuchmann.de . -
Page 6: Product Description
(fold up foot support, remove rear wheels etc.). 2.3 Application areas, use according to the intended purpose The freddy. seat pan sub-frame is a medical products of risk class 1 and is suited for use indoors and outdoors. The sub-frame is designed as subst- ructure to accommodate seating systems or seat pans. -
Page 7: Use Not In Accordance With The Intended Purpose / Warning Gui
• Practice handling freddy. on a level surface. Here, you must also explore the effects of shifts in the centre of gravity on the behaviour of freddy. . Try tilting and shiftingthe centre of gravity at first without occupants. -
Page 8: Equipment For Basic Model
2. Product description. 2.5 Equipment for basic model • Tilt adjustment of the seat pan via gas pressure spring 300N • Depth adjustable back unit • Back and push bars, angle and height adjustable • including adapter head for seat pans, adjustable in height and seat depth •... -
Page 9: General Setting Instructions
They also press the chassis into the steps parallel to the floor. Never carry the freddy. seat pan sub-frame while the user sits in it - risk of accident! When lowering, the bottom helper brakes by pressing the chassis in stages. -
Page 10: Settings
3.1 Seat tilt The seat of freddy. can be tilted up to 30° backwards and 5° forwards in the basic setting using gas pressure springs. You must press the trigger... -
Page 11: Back Angle Adjustment With Central Quick Adjustment
3. Settings. 3.3 Back angle adjustment with central quick adjustment The back can be adjusted via the central fast adjustment at an angle of 90° to 120° to the seat frame. For versions with a gas pressure spring, the adjustment is made by pressing the lever on the gas pressure spring (A) and by releasing the clamp lever (B) for the mechanical version. -
Page 12: Seat Height Adjustment
3. Settings. 3.4 Seat height adjustment The height of the seat adapter can be adjusted by loosening the clamps (A) on the horizontal tubes. A scale is applied to the inner tube. The scale shows steps of 2 cm. Max. height adjustment 10 cm! The height of the gas pressure spring or the two gas pressure springs for sizes 2 and 3 must then be adjusted. -
Page 13: Back Unit Adjustment
The seat pan / seat unit must be placed centrally on the subframe. 3.7 Push handles The push handles of your freddy. can be adjusted individually in height. This takes place after loosening the two clamp levers (B) on the rear tubes. -
Page 14: Handling Of Wheels
4. Handling of wheels. The following are general rules: High air pressure: Low rolling resistance / less suspension comfort Lower air pressure: Higher rolling resistance / more suspension comfort See point 7.5 for sizes and air pressure for the guide and rear wheels. 4.1 Rear wheels with drum brake The drum brake allows safe braking, which is independent of the tyre pres- sure. -
Page 15: Quick Release Axle
4. Handling of wheels. 4.2 Quick release axle The quick-release axles of the rear wheels 16“, 20“ and 22“ make transporting your freddy. significantly easier. You only need to press the button (A) in the centre of the wheel hub, and the wheel can be easily removed or reinser- ted. -
Page 16: Clothing Guard - Removable
4. Handling of wheels. 4.5 Clothing guard – removable Alongside the fixed clothing guard, the clothing gu- ard can also be supplied as a removable guard to achieve a more compact transport size. This is done by loosening the two knurled screws (A). Pay atten- tion to a tight fit when mounting the clothing guard! 5. -
Page 17: Knee Lever Brake
(A). Firmly tighten the screws again. 5.4 Footrests There are different footrest variants for freddy., which are fixed to the seat frame at the base plate for external adapters. After inserting the knee angle in the footboard adapter under the base plate and setting the depth, the foot- rest is tightened with the two wind screws (B). -
Page 18: Adapter Systems
6. Adapter systems. freddy. is prepared to accommodate a seat unit or seat pan. The seat adapter represents the connection point. 6.1 Seat pan adapter, standard 1. Insert the adapter into the rear tube of the seat pan support. 2. Fold down the adapter until it meets the front tube. -
Page 19: Seat Plate Assembly
6. Adapter systems. 6.3 Seat plate assembly Transfer the hole pattern of the tra- pezoidal adapter onto the seal pan body and mount the seat plate with four M6 countersunk screws (strength class 8.8) onto the trapezoidal ad- apter. Please use M6 self-locking nuts (min. -
Page 20: Cleaning And Servicing
Please also pay attention to our general clea- 100% Polyester ning and hygiene advice. This can be found at www.schuchmann.de/mediathek 7.1.2 Disinfection Various products can be used for surface disinfection of metal and plastic parts. Liquid disinfectants are available as ready-to-use solutions that are spray- ed on and evenly applied with a soft cloth. -
Page 21: Maintenance Specifications
7. Cleaning and servicing. 7.3.1 Maintenance specifications • Basic cleaning according to the manufacturer's specifications • Disinfect according to the manufacturer's specifications as required • Damages to the frame, mounting parts and accessories (cracks, breaks, corrosion, bent or missing parts) •... -
Page 22: Mounting / Repairing The Tyres
7. Cleaning and servicing. 7.4 Mounting / repairing the tyres The tyres are mounted / repaired like standard bicycle tyres. Before inser- ting the new inner tube, make sure that the rims and inner wall of the tyres are free of foreign particles. After mounting or repairs check the tyre pres- sure. -
Page 23: Technical Data
8. Technical data. Dimensions - basic model Size 0 Size 1 Size 2 Size 3 Min. seat height* 43 cm 43 cm 43 cm 43 cm Short seat depth 23 - 33 cm 27 - 37 cm Standard seat depth 28 - 38 cm 32 - 42 cm 40 - 50 cm... -
Page 24: Guarantee
9. Guarantee. The two-year statutory guarantee period shall apply for all products. This begins with the delivery or handover of the goods. Should a verifiable material or manufacturing fault occur within this time period, we shall, after carriage paid return to us, view the indicated damage and, if applicable, either repair or deliver a new product at our discretion. -
Page 25: Identification
Verantwortung, dass das nachfolgend genannte Produkt der Risikoklasse 1 declares under our sole responsibility that the following product(s) of Class 1 Medical Devices / chassis for outdoor use „freddy.“ Fahrgestell für den Außenbereich Item-No.: Art.-Nr. / 25 00 000, 25 01 000, 25 02 000, 25 03 000... - Page 26 EU Konformitätserklärung EU Declaration of Conformity Firma / Company Schuchmann GmbH & Co. KG Rudolf-Runge-Str. 3 · 49143 Bissendorf · Deutschland / Germany Tel. +49 (0) 5402 / 40 71 00 · Fax +49 (0) 5402 / 40 71 109 Diese Konformitätserklärung gilt nur für Produkte mit den oben genannten Artikelnummern und...
-
Page 27: Serial Number / Date Of Manufacture
• info@schuchmann.de • Fon +49 (0) 5402 / 40 71 00 Product labelling in accordance with MDR 10.3 Product version The freddy. seat pan sub-frame is available in four sizes and can be sup- plemented through a diverse range of accessories (see Point 5). 10.4 Issue of the document Instructions for use freddy. - Page 28 schuchmann.de...
Need help?
Do you have a question about the freddy and is the answer not in the manual?
Questions and answers