OHAUS 7000 Series Service Manual
Hide thumbs
Also See for 7000 Series:
- Instruction manual (134 pages) ,
- Instruction manual (72 pages) ,
- Instruction manual (143 pages)

Related Manuals for OHAUS 7000 Series


Summary of Contents for OHAUS 7000 Series
- Page 1 SERVICE MANUAL 7000 Series T72XW Indicators T72XW Ohaus Corporation 19A Chapin Road, P.O. Box 2033, Pine Brook, NJ 07058-2033 (973) 377-9000...
- Page 3 7000 Series T72XW Indicators: T72XW The information contained in this manual is believed to be accurate at the time of publication, but Ohaus Corporation assumes no liability arising from the use or misuse of this material. Reproduction of this material is strictly prohibited.
-
Page 4: Table Of Contents
1.10.16 DHCP Address ....................1-24 1.10.17 IP Address ..................... 1-24 1.10.18 Gateway Address ..................1-24 1.10.19 Print Client ..................... 1-25 1.10.20 Server IP Address ..................1-25 1.10.21 Server TCP Port .................... 1-25 Ohaus Corporation www.ohaus.com 7000 Series T72XW Indicators Service Manual... - Page 5 PCB Switch Setting ....................3-9 3.4.1 Main PCB Swicthes ..................3-9 SD Card Installation ....................3-10 Securing the Enclosure ..................3-11 CHAPTER 4 PARTS LISTS & DIAGRAMS 7000 Series T72XW Indicator: Housing & Internal Parts ..........4-2 7000 Series T72XW Indicators Service Manual Ohaus Corporation www.ohaus.com...
- Page 6 B.18.3 Individual Variables ................... B-17 B.18.4 Blocks of Variables ................... B-18 B.18.5 Variable List ....................B-19 B.18.5.1 Scale Status (read only) ............... B-19 B.18.5.2 Dl0 and Target Status (read only) ..........B-20 Ohaus Corporation www.ohaus.com 7000 Series T72XW Indicators Service Manual...
- Page 7 B.18.5.6 Setup-Application (read and write) ........B-25 B.18.5.7 Setup-Terminal (read and write) ..........B-29 B.18.5.8 Setup-Communication (read and write) ......... B-31 B.18.5.9 Setup-Maintenance (read and write) ........B34 B.18.5.10 Setup-Target Values (read and write) ........B-35 7000 Series T72XW Indicators Service Manual Ohaus Corporation www.ohaus.com...
-
Page 8: Chapter 1 Getting Started
INTRODUCTION This service manual contains the information needed to perform routine maintenance and service on the Ohaus T72XW Indicators. The contents of this manual are contained in five chapters: Chapter 1 Getting Started – Contains information regarding service facilities, tools and test equipment, specifications, hardware setup or disassembly, operating the Indicator, scale setup and calibration, and configuring the Indicator’s communication and Legal-for-Trade menus. -
Page 9: Tools And Test Equipment Required
2. Digital Voltmeter (DVM), with clip-on probes. Input impedance of at least 10 megohms in the 1 Volt dc position. 3. Soldering Iron, solder and flux remover. Physical Dimensions Adjusting Knobs Mounting Bracket Figure 1-1. Physical Dimensions, T72XW. Ohaus Corporation www.ohaus.com 7000 Series T72XW Indicator Service Manual... -
Page 10: Specifications
Optional Ethernet port: 10/100 TCP/IP port Protocol Serial Inputs: ASCII commands for CTPZ (Clear, Tare, Print, Zero), SICS (most level 0 and level 1 commands) Serial Outputs: Continuous, Extended continuous, Demand (limited formats), 7000 Series T72XW Indicator Service Manual Ohaus Corporation www.ohaus.com... - Page 11 Table 0-2: T72XW Power Consumption Input I (mA) P (W) Voltage 5V/50 Hz 110 V/50 Hz 240 V/50 Hz 264 V/50 Hz 85 V/60 Hz 110 V/60 Hz 240 V/60 Hz 264 V/60 Hz Ohaus Corporation www.ohaus.com 7000 Series T72XW Indicator Service Manual...
-
Page 12: Main Board Wiring Connections
Ensure that the TSR of the load cell network to be connected to the T72XW has a resistance greater than the minimum values listed above before connecting the load cells. If the resistance is below the minimum, the T72XW will not operate properly. 7000 Series T72XW Indicator Service Manual Ohaus Corporation www.ohaus.com... - Page 13 Figure 0-3: Load Cell Termination Note: For the standard four-wire cable: If an increase in load results in a decrease in weight display, reverse the signal wires (+SIG and SIG) Ohaus Corporation www.ohaus.com 7000 Series T72XW Indicator Service Manual...
-
Page 14: Com1 Serial Port Connection
1. USE ONLY SHIELDED CABLE. 2. MAXIMUM CABLE LENGTH: 50 FEET (15 METERS). 3. WIRE SIZE: 18 AWG (.823 mm ) MAXIMUM 24 AWG (0.205 mm ) MINIMUM. Figure 0-5: Sample COM1 Connections 7000 Series T72XW Indicator Service Manual Ohaus Corporation www.ohaus.com... -
Page 15: Pcb Switch Setting
Reset Calibration Works with switch SW1-2 Set in the ON position to reset calibration during a master reset Set in the OFF position to retain current calibration values during a master reset Ohaus Corporation www.ohaus.com 7000 Series T72XW Indicator Service Manual... -
Page 16: Sd Card Installation
SD card into the socket on the edge of the T72XW main board. Figure 0-7: Sliding an SD Card into the SD Socket (left); SD Card Installed (right) 7000 Series T72XW Indicator Service Manual Ohaus Corporation www.ohaus.com... -
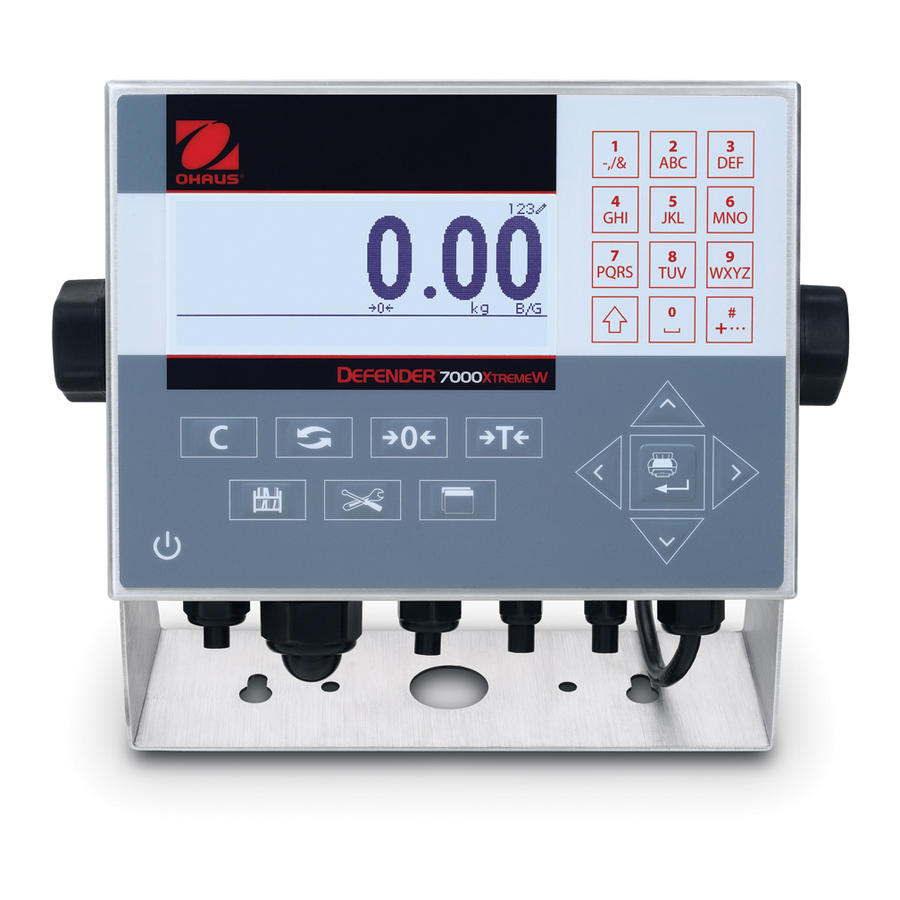
Page 17: Overview Of The Controls
At the bottom of the normal basic weighing display is a line used for data entry. For display operation during setup, refer to Chapter 3, Configuration in the Instruction Manual. Ohaus Corporation www.ohaus.com 1-10 7000 Series T72XW Indicator Service Manual... -
Page 18: Front Panel Key
When in the weighing mode, the display is used for indicating the weight value and other types of information related to the weight. Refer to Figure 1-9. Figure 1-9: Elements of the Display The symbols that may appear on the display are described in Table 1-5. 7000 Series T72XW Indicator Service Manual 1-11 Ohaus Corporation www.ohaus.com... - Page 19 Unit (kg, lb, oz, g, ton, t) Bruto/Gross or Net operating mode Prompt for ID entry and entry field * These elements appear if configured to do so in setup. Ohaus Corporation www.ohaus.com 1-12 7000 Series T72XW Indicator Service Manual...
-
Page 20: Keypad Operation
Lower case alphabetical (abc). Decimal entry (Dec) (This mode is available only when entering template strings.) The current entry mode is indicated at the upper right corner of the display (Figure 1-9,Table 1- 7000 Series T72XW Indicator Service Manual 1-13 Ohaus Corporation www.ohaus.com... - Page 21 SHIFT SHIFT returns input mode to ABC 8 inputs a T SHIFT SHIFT sets the input mode to 123 7 2 inputs 72 SHIFT SHIFT returns input mode to ABC 9 9 inputs an X Ohaus Corporation www.ohaus.com 1-14 7000 Series T72XW Indicator Service Manual...
- Page 22 If a no-motion condition is not detected within the timeout period, the request is cancelled and discarded. 7000 Series T72XW Indicator Service Manual 1-15 Ohaus Corporation www.ohaus.com...
-
Page 23: Language Selection
Details for each of the five major branches in setup are provided in the sections following the overview. Use this information to program the T72XW for the required application. Graphic elements in the structure are shown as follows: Ohaus Corporation www.ohaus.com 1-16 7000 Series T72XW Indicator Service Manual... - Page 24 If the metrology switch is in the approved position (SW1-1 = ON), access to certain parameters in the Scale branch is restricted. These parameters can be viewed but cannot be changed when the scale is “sealed”. 7000 Series T72XW Indicator Service Manual 1-17 Ohaus Corporation www.ohaus.com...
-
Page 25: Calibration
Select if a linearity adjustment will be used during calibration. Selections are as follows: Disabled – Use only zero and one span point Enabled – Use zero, mid span point, and high span point Ohaus Corporation www.ohaus.com 1-18 7000 Series T72XW Indicator Service Manual... -
Page 26: Set Zero
If motion is present during the span capture process, the terminal will average the weight readings then display a message indicating unstable weight values were used. This message must be acknowledged to save the values. 7000 Series T72XW Indicator Service Manual 1-19 Ohaus Corporation www.ohaus.com... -
Page 27: Analogue Saturation Test
Span OK” displays If the capture span operation was not successful, an error message that reads “Calibration Failure” displays. If the calibration fails, repeat the capture span procedures. If the calibration continues to fail, contact a local OHAUS CORPORTATION representative for assistance. -
Page 28: Communication
A detailed view of the Communication branch is shown in Figure 3-1. This view indicates all the parameters in the Communication branch. Each of these setup parameters are described in this section. Figure 3-1: Communication Branch Menu Structure 7000 Series T72XW Indicator Service Manual 1-21 Ohaus Corporation www.ohaus.com... -
Page 29: Serial
After an XOFF command is received on COM1 configured for XON/XOFF handshaking, data remaining in the port’s output buffer will still be sent. The COM1 port buffer contains a maximum of 16 bytes of data. Ohaus Corporation www.ohaus.com 1-22 7000 Series T72XW Indicator Service Manual... -
Page 30: Com2/Usb
1.10.12 Interface Use the Interface selection box to select the serial port interface. Selections for COM2 include either RS-232 or RS-485. This parameter is not shown for the USB option. 7000 Series T72XW Indicator Service Manual 1-23 Ohaus Corporation www.ohaus.com... -
Page 31: Network
ENTER to proceed to the next group. The default value for the gateway is blank. After entry is complete, press the LEFT navigation key to return to the setup menu Ohaus Corporation www.ohaus.com 1-24 7000 Series T72XW Indicator Service Manual... -
Page 32: Print Client
“Reset Successful” displays If the reset was not successful, an error message that reads “Reset Failure” displays. If the reset fails, try to initiate the reset again. If the reset continues to fail, contact a local OHAUS CORPORTATION representative for assistance. - Page 33 GETTING STARTED CHAPTER 1 Ohaus Corporation www.ohaus.com 1-26 7000 Series T72XW Indicator Service Manual...
-
Page 34: Chapter 2 Troubleshooting
Use qualified electricians to test for problems with the AC power source. If a problem that is not listed in Table 2-1 occurs, or if the suggested fix does not resolve the problem, contact an authorized OHAUS CORPORTATION service representative for assistance. 7000 Series T72XW Indicators Service Manual... - Page 35 Maintenance block of setup or the DIO status display on the system line to determine if the problem is internal or external to the terminal. Discrete inputs or outputs don’t operate Contact service representative. Ohaus Corporation www.ohaus.com 7000 Series T72XW Indicators Service Manual...
-
Page 36: Error Codes And Error Message
An example of an error message display is given in Figure 2-1 and the possible error messages are listed in Table 2-3 with a brief description of the error. 7000 Series T72XW Indicators Service Manual Ohaus Corporation www.ohaus.com... -
Page 37: Troubleshooting
A preset tare was attempted while the keypad keypad tare disabled tare function is disabled motion Scale motion inhibited completion of command A print was requested without a demand no demand output connection Ohaus Corporation www.ohaus.com 7000 Series T72XW Indicators Service Manual... -
Page 38: Blank Display
Even with the backlight off or a poor contrast setting, changing weight digits should still be barely visible with a change in weight. 7000 Series T72XW Indicators Service Manual Ohaus Corporation www.ohaus.com... -
Page 39: Power Test
Use qualified electricians to test for problems with the AC power source. If a problem that is not listed in Table 2-1 occurs, or if the suggested fix does not resolve the problem, contact an authorized OHAUS CORPORTATION service representative for assistance. Table 5-4: Symptoms and Suggested Fixes... -
Page 40: Internal Diagnostics
4 seconds. This cycle will repeat continuously until the LEFT navigation key is pressed to exit. Note: All dots are also illuminated on the display during the power up sequence. 7000 Series T72XW Indicators Service Manual Ohaus Corporation www.ohaus.com... -
Page 41: Keyboard Test
2.7 Serial Test This tool tests the transmit and receive functions on the serial (COM) ports. The COM port to be tested must be selected first and then the test can be started. Ohaus Corporation www.ohaus.com 7000 Series T72XW Indicators Service Manual... - Page 42 This jumper can confirm correction operation of both the transmit and receive circuitry of that COM port. Figure 2-4: Jumper Wire Between COM1 Transmit and Receive Terminals 7000 Series T72XW Indicators Service Manual Ohaus Corporation www.ohaus.com...
-
Page 43: Discrete I/O Test
(Figure 2-5). Focus is shown on Output #1 first. Figure 2-5: Discrete I/O Test Screen Ohaus Corporation www.ohaus.com 2-10 7000 Series T72XW Indicators Service Manual... -
Page 44: System Backup And Restore
Maintenance > Backup to SD or Maintenance > Restore from SD blocks. The SD memory card is not hot-swappable. The SD memory media provided by OHAUS CORPORTATION as an option has been fully tested for correct operation. While other SD memory media may work, some may not work correctly. -
Page 45: Backup To Sd Memory Card
Remove power from the terminal and insert the SD memory card if not already installed. Refer to Figure 2-7 for location of SD memory card. Apply power, enter setup and access the restore procedure at Maintenance > Restore from SD. Ohaus Corporation www.ohaus.com 2-12 7000 Series T72XW Indicators Service Manual... -
Page 46: Master Reset
After a firmware upgrade is performed. To initiate a master reset, perform the following steps: Remove AC power. Place switch SW1-2 in the ON position, as shown in Figure 2-8. 7000 Series T72XW Indicators Service Manual 2-13 Ohaus Corporation www.ohaus.com... - Page 47 Return SW1-2 (and, if it was changed, SW1-4) to their original OFF positions. Reapply AC power. 2.13 Upgrading Firmware Contact your local authorized OHAUS CORPORTATION service representative for information on upgrading firmware. Ohaus Corporation www.ohaus.com 2-14 7000 Series T72XW Indicators Service Manual...
- Page 48 1. Remove the SD card from the indicator and insert into a computer. 2. Download T72XW software HEX file from DMX, un-zip it and copy the file to the root folder of the SD card. You can locate the firmware under '7000 Series Indicator-T72XW' 'Service' 'Service Tools'.
- Page 49 Figure 2.11 Under 'Setup' folder select 'Maintenance'. Figure 2.12 Under 'Maintenance' folder select 'Install SW Update'. Figure 2.13 Under 'Install SW Update\File Name' select the Software version you wish to update (T72X001 was selected as example). Ohaus Corporation www.ohaus.com 2-16 7000 Series T72XW Indicators Service Manual...
- Page 50 This ends your software updating process. Figure 2.15 Software version located at the top left when the terminal re-boot. 7000 Series T72XW Indicators Service Manual 2-17 Ohaus Corporation www.ohaus.com...
-
Page 51: Chapter 3 Maintenance Procedures
If, after the replacement of any component, the Indicator is still non functional and no other information on the subject is available in the manual, contact Ohaus Corporation by visiting www.ohaus.com. In the United States call Ohaus Aftermarket toll free, 800-526-0659 between 8:00 a.m. -
Page 52: Opening The Enclosure
(Figure 3-2) to unsnap the top two clips, then lift the cover to clear the two top clips. The cover will swing down, hinged by two wire cables at the bottom. Figure 3-2: Removing the Cover Ohaus Corporation www.ohaus.com 7000 Series T71 Indicators Service Manual... -
Page 53: Closing The Enclosure
2. Open the enclosure as in 3.2.1 and locate the main PCBA. 3. Remove the 4 connections as shown below. Figure 3-3 Location of the connections. 4. Locate and remove 4 screws securing the main PCBA from the top housing. 7000 Series T71 Indicators Service Manual Ohaus Corporation www.ohaus.com... - Page 54 6. Carefully re-position the replacement PCB over the screw holes in the Top Cover. Re- inert and tighten the screws. 7. Reconnect the cables removed in Steps 3. 8. Close the Housing. Ohaus Corporation www.ohaus.com 7000 Series T71 Indicators Service Manual...
-
Page 55: Back Light Lcd Display Replacement
2. After that gently lift the LCD display bracket upward and move the bracket up front so that the LCD display can be remove from the indicator top housing. Figure 3-6 Lift the LCD display bracket upward. 7000 Series T71 Indicators Service Manual Ohaus Corporation www.ohaus.com... -
Page 56: Membrane Switch Replacement
Top Cover, starting at the bottom of the cover. Use a rolling motion to smooth the Membrane Switch into position. 4. Close back the indicator enclosure. (Follow steps 1-3 in Section 3.2.2) Ohaus Corporation www.ohaus.com 7000 Series T71 Indicators Service Manual... -
Page 57: Wiring Connection
To confirm that the load cell load for this installation is within limits, the total scale resistance (TSR) must be calculated. To calculate TSR: Load Cell Input Resistance (Ohms) TSR = Number of Load Cells 7000 Series T71 Indicators Service Manual Ohaus Corporation www.ohaus.com... - Page 58 Excitation and Sense terminals. Figure 3-10: Load Cell Termination Note: For the standard four-wire cable: If an increase in load results in a decrease in weight display, reverse the signal wires (+SIG and SIG) Ohaus Corporation www.ohaus.com 7000 Series T71 Indicators Service Manual...
-
Page 59: Pcb Switch Setting
Set in the OFF position during normal operation. calibration, GEO code, etc. SW1-3 Flash Software Set in the ON position for software download Set in the OFF position during normal operation 7000 Series T71 Indicators Service Manual Ohaus Corporation www.ohaus.com... -
Page 60: Sd Card Installation
Counting applications. Figure shows the installation of an SD card into the socket on the edge of the T72XW main board. Figure 3-12: Sliding an SD Card into the SD Socket (left); SD Card installed (right) Ohaus Corporation www.ohaus.com 3-10 7000 Series T71 Indicators Service Manual... -
Page 61: Securing The Enclosure
Sealing wire threaded through hole and clip Sealing wire threaded through plastic seal Figure 3-13: Seal Threaded and Ready to be Closed 7000 Series T71 Indicators Service Manual 3-11 Ohaus Corporation www.ohaus.com... -
Page 62: Chapter 4 Parts Lists & Diagrams
CHAPTER 4 PARTS LISTS & DIAGRAMS This section of the manual contains exploded views for the 7000 Series T72XW Indicators. The exploded view drawings are designed to identify the parts which can be serviced on the indicator in the field. -
Page 63: 7000 Series T72Xw Indicator: Housing & Internal Parts
CHAPTER 4 PARTS LISTS & DIAGRAMS 7000 SERIES T72XW INDICATOR: HOUSING & INTERNAL PARTS Figure 4-1. Series 7000 T72XW Indicator: Housing & Internal Parts. Ohaus Corporation www.ohaus.com 7000 Series T72XW Indicators Service Manual... - Page 64 CHAPTER 4 PARTS LISTS & DIAGRAMS 7000 SERIES T72XW INDICATOR: HOUSING & INTERNAL PARTS TABLE 4-1. T72XW INDICATOR: HOUSING & INTERNAL PARTS Drawing Part Item Number Description 30132175 SP, Keyboard, T72XW 30132166 SP, Front Cover kit, T72XW 30132169 SP, Display Bracket, T72XW...
- Page 65 CHAPTER 4 PARTS LISTS & DIAGRAMS Ohaus Corporation www.ohaus.com 7000 Series T72XW Indicators Service Manual...
-
Page 66: Appendix A. Geographical Adjustment Values
3200 4260 5330 6400 7460 8530 9600 10660 1060 2130 3200 4260 5330 6400 7460 8530 9600 10660 11730 0° 0'–5° 46' 5° 46'–9° 52' 9° 52'–12° 44' 12° 44'–15° 6' 7000 Series T72XW Indicators Service Manual A-1 Ohaus Corporation www.ohaus.com... - Page 67 17° 10'–19° 2' 19° 2'–20° 45' 20° 45'–22° 22° 22'–23° 23° 54'–25° 25° 21'–26° 26° 45'–28° 6' 28° 6'–29° 25' 29° 25'–30° 30° 41'–31° 31° 56'–33° 9' 33° 9'–34° 21' 34° 21'–35° Ohaus Corporation www.ohaus.com 7000 Series T72XW Indicators Service Manual...
- Page 68 58’ 38° 58’–40° 5’ 15 40° 5’–41° 12’ 16 41° 12’–42° 19’ 42° 19’–43° 26’ 43° 26’–44° 32’ 44° 32’–45° 38’ 45° 38’–46° 45’ 46° 45’–47° 51’ 47° 51’–48° 58’ 7000 Series T72XW Indicators Service Manual A-3 Ohaus Corporation www.ohaus.com...
- Page 69 52° 22’–53° 31’ 53° 31’–54° 41’ 54° 41’–55° 52’ 55° 52’–57° 4’ 23 57° 4’–58° 17’ 23 58° 17'–59° 59° 32'–60° 60° 49'–62° 9' 62° 9'–63° 30' 63° 30'–64° 64° 55'–66° Ohaus Corporation www.ohaus.com 7000 Series T72XW Indicators Service Manual...
- Page 70 1060 2130 3200 4260 5330 6400 7460 8530 9600 10660 11730 66° 24'–67° 67° 57'–69° 69° 5'–71° 21' 71° 21'–73° 73° 16'–75° 75° 24'–77° 77° 52'–80° 80° 56'–85° 85° 45'–90° 7000 Series T72XW Indicators Service Manual A-5 Ohaus Corporation www.ohaus.com...
-
Page 71: Appendix B Communicatios
Demand mode is used typically when sending data to a printer or PC on a transactional basis. NOTE: When the demand output mode is assigned, the port is automatically set up to also receive certain ASCII characters to duplicate keypad functions. 7000 Series T72XW Indicators Service Manual B-1 Ohaus Corporation www.ohaus.com... -
Page 72: Output Template
The detault values for each of the templates follow: Template 1 29.94 kg 10.32 kg 19.62 kg Template 2 Scale Name Time Date 29.94 kg 10.32 kg 19.62 kg Template 3 29.94 kg 10.32 kg 19.62 kg Ohaus Corporation www.ohaus.com 7000 Series T72XW Indicators Service Manual... -
Page 73: Continues Output Mode
Note: The Termination Characters Carriage Return and Line Feed are appended to the printout. B.5 Standard Interface Command Set (SICS) Protocol The T72XW terminal supports the OHAUS CORPORTATION Standard Interface Command Set (MT-SICS), which is divided into four levels (0, 1, 2, 3), depending on the functionality of the device. -
Page 74: Command Formats
Response with weight value Response without weight value Error message B.9 Format of the Response with Weight Value A general description of the response with weight value as follows: Ohaus Corporation www.ohaus.com 7000 Series T72XW Indicators Service Manual... -
Page 75: Format Of The Response Without Weight Value
ID – Response identification. __ – Space (20xh) Status – Status of the terminal. See description of the commands and responses. Parameters – Command-dependent response code. CR – Carriage Return (0Dxh) 7000 Series T72XW Indicators Service Manual B-5 Ohaus Corporation www.ohaus.com... -
Page 76: Format Of The Error Message
B.12 Command and Response Improve the dependability of application software by having the program evaluate the response of the terminal to a command.The response is the acknowledgment that the terminal has received the command. Ohaus Corporation www.ohaus.com 7000 Series T72XW Indicators Service Manual... -
Page 77: Reset
Send stable weight value Send weight value immediately Send weight value immediately and repeat Zero Reset (clear out serial buffer) The following are detailed descriptions of these Level 0 commands: 7000 Series T72XW Indicators Service Manual B-7 Ohaus Corporation www.ohaus.com... - Page 78 Cannot execute command at this time. B.15.2 I1 – INQUIRY OF MT-SICS LEVEL AND MT-SICS VERSIONS Command: I1_A_“ ”_“2.2x”_“2.2x”_“ ”_“ ” Response: “” No Levels fully implemented 2.2x Level 0, version V2.2x Ohaus Corporation www.ohaus.com 7000 Series T72XW Indicators Service Manual...
- Page 79 B.15.4 I3 – INQUIRY OF SW VERSION Command: I3_A_“1.00” Response: 1.00 Firmware version of the terminal Response: I3_I Command understood, not executable at present. Comment The number of characters of “text” depends on the revision level. 7000 Series T72XW Indicators Service Manual B-9 Ohaus Corporation www.ohaus.com...
- Page 80 The terminal will wait for up to 3 seconds after receiving an “S” command for no-motion. If motion does not settle within this time, the command is aborted and the S_I response is sent. Ohaus Corporation www.ohaus.com B-10 7000 Series T72XW Indicators Service Manual...
- Page 81 S_S_ _ _ _ _ 129.09_kg S_S_ _ _ _ _ 129.09_kg S_D_ _ _ _ _ 114.87_kg . . . The scale continues to send stable or dynamic weight values 7000 Series T72XW Indicators Service ManualB-11 Ohaus Corporation www.ohaus.com...
- Page 82 The SIR and SR commands are cancelled. The Reset command is always executed except that a Reset command received by the terminal during the calibration and test procedure cannot be processed. Ohaus Corporation www.ohaus.com B-12 7000 Series T72XW Indicators Service Manual...
-
Page 83: Commands And Responses Mt-Scis Level 1
If no preset value is included, the weight change must be at least 12.5% of the last stable weight value an a minimum of 30d. SR is overwritten and cancelled by the commands S, SI, SIR, @ and hardware break. 7000 Series T72XW Indicators Service ManualB-13 Ohaus Corporation www.ohaus.com... - Page 84 The existing tare will be overwritten and replaced by the new preset tare weight value. The terminal will automatically round the tare value to the current readability. The preset value must be entered in primary units. Ohaus Corporation www.ohaus.com B-14 7000 Series T72XW Indicators Service Manual...
-
Page 85: Report
Samples of the Alibi memory and totalization register reports in a 40 column wide and an 80 column wide print are shown in the following sections. The remaining application specific reports are shown in the detailed Application chapter of this manual. 7000 Series T72XW Indicators Service ManualB-15 Ohaus Corporation www.ohaus.com... -
Page 86: Alibi Memory
B-3 below includes both the subtotal and grand total fields. There is only one report format regardless of the line width selection. Totals Report 14:25:39 20/Jul/2007 Subtotal: n = 6 86.19 kg Grand Total: n = 27 372.76 kg Figure B-3: Totals Report Sample Ohaus Corporation www.ohaus.com B-16 7000 Series T72XW Indicators Service Manual... -
Page 87: Variable Access
The list of index numbers is given in the next section. Read request: R(index#)<CR><LF> Read filter value: R129<CR><LF> Response 1 (valid): R129<SP>1<CR><LF> Read filter value: R179<CR><LF> Response 2 (error): R179<SP> Error: Invalid Request<CR><LF> 7000 Series T72XW Indicators Service ManualB-17 Ohaus Corporation www.ohaus.com... -
Page 88: Blocks Of Variables
The block write example will download a new target (50.00), -tol (0.05), +tol (0.08) and use previous description value. Block write request: W(index#)<SP>xx^xx^xx<CR><LF> Write target value: W610<SP>50.00^0.05^0.08^<CR><LF> Response 1: <ACK><CR><LF> Response 2: <NAK><CR><LF> (if data or variable is invalid) Ohaus Corporation www.ohaus.com B-18 7000 Series T72XW Indicators Service Manual... -
Page 89: Variable List
Format: weight<SP>unit. Weight is always 8 characters (including Weight unit is Tare Weight decimal) with leading spaces and included. unit is always 3 characters. Format: always 7 digits with leading Raw Counts zeroes. 7000 Series T72XW Indicators Service ManualB-19 Ohaus Corporation www.ohaus.com... -
Page 90: Dl0 And Target Status (Read Only
Main Board Type 0 – Not available COM/DIO Option 1 – RS232/RS485 2 – USB 3 – Discrete I/O 4 – RS232/RS485 + Discrete I/O 5 – USB + Discrete I/O Ohaus Corporation www.ohaus.com B-20 7000 Series T72XW Indicators Service Manual... - Page 91 1 – Setup Mode Status 2 – Application Mode 0 – No SD memory detected 1 – Test OK SD I/F Test 10 – Testing in progress Result 255 - Test fail 7000 Series T72XW Indicators Service ManualB-21 Ohaus Corporation www.ohaus.com...
-
Page 92: Terminal Commands (Write Only
0 – exit Ethernet test 1 – enter USB test USB test 0 – exit USB test 1 – Switch to Normal Mode Mode switch 0 – Switch to Application Mode Ohaus Corporation www.ohaus.com B-22 7000 Series T72XW Indicators Service Manual... -
Page 93: Setup-Scale (Read And Write
Range 2 capacity Manual entry 0 – 19 [Refer to values for 107] Range 2 increment size 0 – 37 manual entry GEO code 0 – Disabled Linearity 1 – Enabled 7000 Series T72XW Indicators Service ManualB-23 Ohaus Corporation www.ohaus.com... - Page 94 0 – Disabled Clear after print 1 – Enabled 0 – None 1 – g 2 – kg 3 – lb Second unit 4 – oz 5 – t 6 - ton Ohaus Corporation www.ohaus.com B-24 7000 Series T72XW Indicators Service Manual...
-
Page 95: Setup-Application (Read And Write
0 – Disabled Alibi memory 1 – Enabled 0 – None 1 – Displayed weight Totalization mode 2 – Gross weight 0 – Disabled Clear GT on print 1 – Enabled 7000 Series T72XW Indicators Service ManualB-25 Ohaus Corporation www.ohaus.com... - Page 96 [Refer to values for 215] 0 – Disabled 1 – Animal Weighing Function Key Assignment 2 – Check Weigh 3 – Counting 0 – Disabled Function AutoStart 1 – Enabled Ohaus Corporation www.ohaus.com B-26 7000 Series T72XW Indicators Service Manual...
- Page 97 Counting ID Memory Clear on Print 2 – Manual 0 – Disabled Counting ID Memory Update APW 1 – Enabled 0 – Gross Weight Over/Under Operation Source 1 – Displayed Weight 7000 Series T72XW Indicators Service ManualB-27 Ohaus Corporation www.ohaus.com...
- Page 98 0 – Disabled Active Target Menu Key 1 – Enabled 0 – Disabled Quick Set Target Menu Key 1 – Enabled 0 – Disabled Target Table Menu Key 1 – Enabled Ohaus Corporation www.ohaus.com B-28 7000 Series T72XW Indicators Service Manual...
-
Page 99: Setup-Terminal (Read And Write
1 - - Date field separator 2 - . 3 – (space) 4 – None Set hour Manual entry 0 – AM Select AM/PM 1 – PM Set minutes Manual entry 7000 Series T72XW Indicators Service ManualB-29 Ohaus Corporation www.ohaus.com... - Page 100 Operator menu – Time & Date 1 – Enabled 0 – Disabled Operator menu – Totals Memory 1 – Enabled 0 – Disabled Operator menu – x10 1 – Enabled Ohaus Corporation www.ohaus.com B-30 7000 Series T72XW Indicators Service Manual...
-
Page 101: Setup-Communication (Read And Write
37 – Record Description 38 – # of Cycles 39 – AVG Weight 40 – ID 41 – MAX Weight 42 – MIN Weight Template #2 added line feeds Manual entry 7000 Series T72XW Indicators Service ManualB-31 Ohaus Corporation www.ohaus.com... - Page 102 2 – Continuous-Extended Output 3 - Demand Output 4 - Reports COM1 Assignment 5 – SICS 6 – Variable Access 7 – Cont. Multi 1 8 – Cont. Multi 2 Ohaus Corporation www.ohaus.com B-32 7000 Series T72XW Indicators Service Manual...
- Page 103 USB Assignment 6 - Demand Output 7 - Reports 8 – SICS 9 – Variable Access USB template [Refer to values for 434] 0 – Disabled USB checksum 1 – Enabled 7000 Series T72XW Indicators Service ManualB-33 Ohaus Corporation www.ohaus.com...
- Page 104 Setup – Maintenance (read only) B.18.5.9 Index Name Description Maintenance Block Entire Maintenance Block Weighment Counter Scale Overloads Counter Zero Commands Counter Zero Command Failure Counter Calibration Values (read and write) Ohaus Corporation www.ohaus.com B-34 7000 Series T72XW Indicators Service Manual...
- Page 105 Test load counts for high span point. B.18.5.10 Target Values (read and write) Index Name Description Target Block Entire set of Target Values Target Target value -Tol -Tolerance value +Tol +Tolerance value Description Target description 7000 Series T72XW Indicators Service ManualB-35 Ohaus Corporation www.ohaus.com...
- Page 107 *30244628* P/N 30244628B SERVICE MANUAL: 7000 SERIES T72XW INDICATORS...
Need help?
Do you have a question about the 7000 Series and is the answer not in the manual?
Questions and answers