Table of Contents
Advertisement
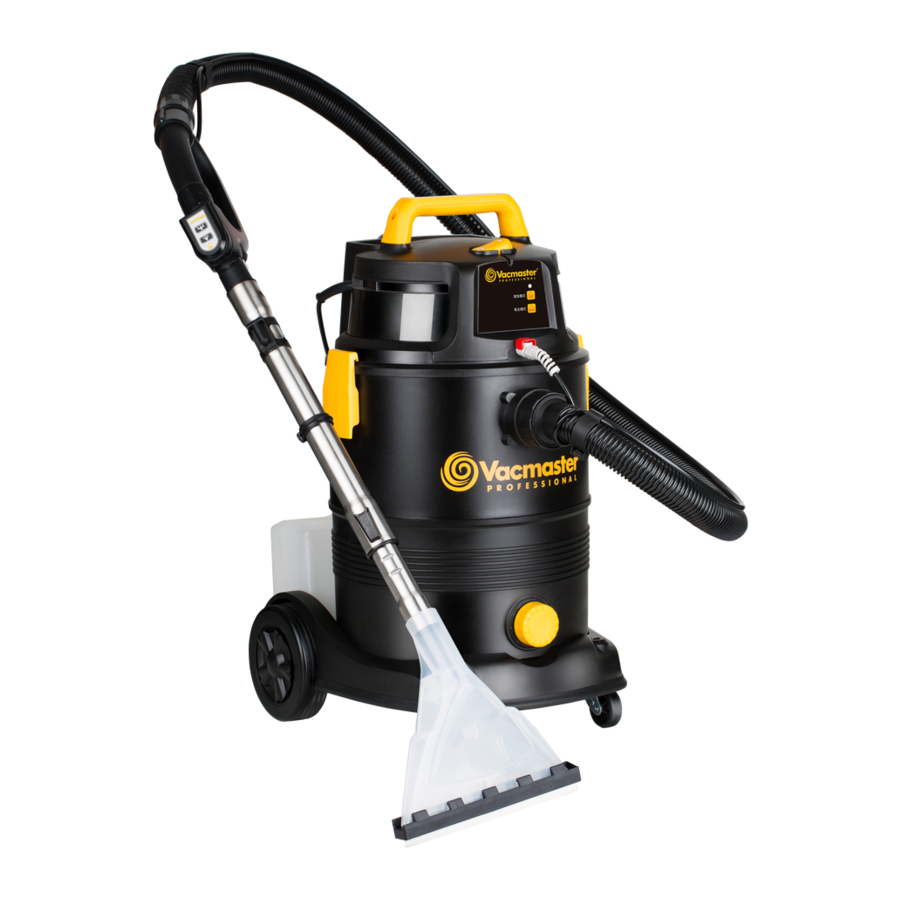
Wet/Dry/Shampoo
Vacuum
Operator's Manual
8 Gallon
Model No.
VK809PIWR
FOR YOUR SAFETY
Read and understand this manual before use.
Keep this manual for future reference.
The Spanish version of this manual is available online at www.vacmaster.com.
Este manual está disponible en Español en www.vacmaster.com.
Distributed By
Replacement Filters &
Cleva North America, Inc.
Accessories available at:
601 Regent Park Court
Greenville, SC 29067
Vacmaster.com.
Advertisement
Table of Contents

Subscribe to Our Youtube Channel
Related Manuals for Vacmaster VK809PIWR


Summary of Contents for Vacmaster VK809PIWR
- Page 1 FOR YOUR SAFETY Read and understand this manual before use. Keep this manual for future reference. The Spanish version of this manual is available online at www.vacmaster.com. Este manual está disponible en Español en www.vacmaster.com. Distributed By Replacement Filters &...
-
Page 2: Table Of Contents
FOR YOUR SAFETY: CAREFULLY READ AND UNDERSTAND ALL INSTRUCTIONS. WARRANTY ® We take pride in producing a high quality, durable product. This Vacmaster product carries a limited two (2) year warranty against defects in workmanship and materials from date of purchase under normal household use. -
Page 3: Important Safety Instructions
IMPORTANT SAFETY INSTRUCTIONS READ AND UNDERSTAND ALL INSTRUCTIONS BEFORE USING THIS VACUUM. Read and understand this operator’s manual and all labels on the vacuum cleaner before operating. Safety is a combination of common sense, staying alert and knowing how your vacuum works. - Page 4 CAUTION: To reduce the risk of injury from moving parts - Unplug before servicing. WARNING: To reduce the risk of electric shock - Unplug before cleaning or servicing. FCC COMPLIANCE This device complies with part 15 of the FCC Rules. Operation is subject to the following two conditions: •...
-
Page 5: Double Insulation Instructions
DOUBLE INSULATION INSTRUCTIONS This Wet/Dry Shampoo Vacuum is double-insulated, eliminating the need for a separate grounding system. Use only identical replacements parts. Read the instructions for Servicing Double- Insulated Wet/Dry Shampoo Vacuums before servicing. Use this vacuum as described in this manual. -
Page 6: Extension Cords
EXTENSION CORDS When using an extension cord with your Wet/Dry Shampoo Vacuum refer to the following table to determine the required A.W.G. wire size. Before using the cleaner make sure the power cord and extension cord are in good working condition. Make repairs or replacements before using the vacuum cleaner. -
Page 7: Unpacking & Checking Carton Contents
UNPACKING & CHECKING CARTON CONTENTS Remove all contents from the box. Remove the power head and take out any contents inside the collection tank. Check each item against the carton contents list. Carton Contents List: Description ..…………..……….…..Qty. Vacuum Assembly…..……….…..Washable Cartridge Filter…..………... - Page 8 ACCESSORIES A choice of accessories and attachments are supplied with this product. Refer to below descriptions for their functions. Illustration Description Function Hand Held Shampoo For cleaning sofas, chairs, stairs, and car Nozzle interiors. Carpet Shampoo For cleaning carpets. Nozzle Crevice Tool For cleaning edges, gaps, and tight spaces.
-
Page 9: General Assembly Instructions
GENERAL ASSEMBLY INSTRUCTIONS Detergent Mode Vacuum Mode Detergent Mode Vacuum Mode ① WARNING: DO NOT PLUG THE POWER CORD INTO A POWER OUTLET. MAKE SURE THE PLUG IS DISCONNECTED BEFORE ASSEMBLING THE WET/DRY SHAMPOO VACUUM. TO REDUCE THE RISK OF ELECTRIC SHOCK, DO NOT EXPOSE TO RAIN. UNPACKING YOUR WET/DRY SHAMPOO VACUUM &... - Page 10 8. Optional: For improved dust filtration, fit the dust bag flange onto the inlet port, taking care not to damage the bag (Fig. 9). NOTE: The dust collection bag is for dry pick-up only. 9. For wet vacuum cleaning, remove the cartridge filter, and install the supplied foam wet filter. See page 18 for the foam wet filter installation instructions (Fig.
-
Page 11: Dry Vacuum Operation
DRY VACUUM OPERATION DRY VACUUMING WARNING: BE SURE TO READ, UNDERSTAND, AND APPLY INFORMATION ENTITLED “IMPORTANT SAFETY INSTRUCTIONS”. DO NOT VACUUM IN AREAS WITH FLAMMABLE GASES, VAPORS, OR EXPLOSIVE DUSTS IN THE AIR. FLAMMABLE GASES OR VAPORS INCLUDE BUT ARE NOT LIMITED TO: LIGHTER FLUID, SOLVENT TYPE CLEANERS, OIL-BASED PAINTS, GASOLINE, ALCOHOL, OR AEROSOL SPRAYS. -
Page 12: Liquid Vacuum Operation
care not to damage the bag (Fig. 5). 5. Place the power head back on the collection tank and secure it in place using the latches (Fig. 6). OPERATING INSTRUCTIONS: DRY VACUUMING 6. Insert the locking end of the hose into the vacuum port on the power head and lock into place (Fig. - Page 13 GUN POWDER. TO REDUCE THE RISK OF HEALTH HAZARDS FROM VAPORS OR DUST, DO NOT VACUUM TOXIC MATERIALS. WARNING: DO NOT PLUG THE POWER CORD INTO A POWER OUTLET. MAKE SURE THE PLUG IS DISCONNECTED BEFORE CHANGING THE FILTERS. 1. Verify that the power cord is disconnected from the outlet. Make sure that the collection tank is clean and free of dust and dirt (Fig.
-
Page 14: Carpet/Upholstery Operation
CARPET/UPHOLSTERY CLEANING OPERATION WARNING: DO NOT RUN THE VACUUM IN DETERGENT MODE WITHOUT SOLUTION IN THE CLEANING SOLUTION TANK. WARNING: USE ONLY MANUFACTURER RECOMMENDED CLEANING SOLUTION WITH THIS VACUUM CLEANER. WARNING: DO NOT REPLACE FURNITURE UNTIL THE CARPET IS COMPLETELY DRY! CAUTION: BEFORE YOU USE THIS PRODUCT TO SHAMPOO CLEAN AN AREA, TEST YOUR WET/DRY SHAMPOO VACUUM AND THE CLEANING SOLUTION ON A SMALL... - Page 15 NOTE: Once depleted, the cleaning solution can be replaced by a high quality liquid carpet cleaning solution that can be purchased from a local retailer. Always use the cleaning solution as directed by the manufacturer. 5. Insert the cleaning solution tank back into the vacuum base. Connect the cleaning solution tube to the cleaning solution inlet coupling on the rear side of the power head.
-
Page 16: Maintenance
• The hand held shampoo nozzle is ideal for cleaning sofas, chairs, stairs and car interiors. • The carpet shampoo nozzle is ideal for cleaning carpets. DISASSEMBLING THE WET/DRY SHAMPOO VAC NOTE: SOME LIQUID MAY REMAIN IN THE TUBES AFTER USING THE PRODUCT FOR LIQUID OR SHAMPOO CLEANING. -
Page 17: Installing & Cleaning Cartridge Filter
STORAGE Before storing your vacuum, the collection tank should be emptied and cleaned. The accessories should be cleaned and stored so they can be readily available when needed. Store the wet/dry shampoo vacuum indoors. REPAIRS Repairs for this wet/dry shampoo vacuum should be performed only by qualified service personnel using only identical replacement parts. -
Page 18: Installing & Cleaning Foam Wet Filter
INSTALLING & CLEANING FOAM WET FILTER INSTALLING FOAM WET FILTER 1. Verify that the power cord is disconnected from the outlet (Fig. 1). 2. Remove the power head and place in an upside down position. Follow instructions to remove the cartridge filter on page 17. 3. -
Page 19: Cleaning & Replacing Exhaust Filter
CLEANING & REPLACING EXHAUST FILTER 1. Verify that the power cord is disconnected from the outlet (Fig. 1). 2. Unlock the exhaust filter door by lifting the locking tab upwards to the release. Pull the door out (Fig. 2). 3. Remove the exhaust filter from the vacuum and clean by gently tapping or brushing off dirt. For optimal performance it is recommended to replace the old filter with a new filter regularly (Fig. -
Page 20: Troubleshooting
TROUBLESHOOTING WARNING: TO REDUCE THE RISK OF ELECTRIC SHOCK, UNPLUG BEFORE TROUBLESHOOTING. PROBLEM POSSIBLE CAUSE SOLUTION Unplug and check the power cord. If damaged, have it Faulty power cord, switch or motor. repaired by a professional or call customer service. Check the power supply, cord, No power supply. - Page 21 PROBLEM POSSIBLE CAUSE SOLUTION Use only manufacturer’s recommended cleaning Foam is leaking from the Incorrect cleaning solution or solution. Ensure the cleaning outlet on the power head. incorrect mix ratio is used. solution is mixed with water at the correct ratio. Replace the old battery with a The battery has no charge.
-
Page 22: Exploded View
EXPLODED VIEW... -
Page 23: Parts List
PARTS LIST Part Drawing Number Description Quantity 551267101 Handle Assembly Power Head Assembly 551121122 Exhaust Filter Assembly 551324103 Exhaust Filter Door 551006103 Float 551005104 Filter Cage 551324115 Cartridge Filter 551004104 Filter Retainer 551267104 Latch Assembly Collection Tank 551017113 Vacuum Port Assembly 551324118 Drain Cap With Gasket 551057115...
Need help?
Do you have a question about the VK809PIWR and is the answer not in the manual?
Questions and answers