
Related Manuals for Vacmaster VK1650SWD 950091


Summary of Contents for Vacmaster VK1650SWD 950091
-
Page 1: Vacuum Cleaner
VK1650SWD 950091 WET AND DRY VACUUM CLEANER NASS UND TROCKENSAUGER WET & DRY VACUUM CLEANER 1600W / 50L / VK1650SWD 950091... -
Page 2: Table Of Contents
® ® Thank you for purchasing this Vacmaster wet/dry vacuum cleaner. Feel confident that with Vacmaster you are obtaining a high quality product engineered for optimal performance. This vacuum is capable of picking up liquids and dry materials. WET & DRY VACUUM... -
Page 3: Warranty
Vacmaster takes pride in producing a high quality, durable product. This service. Vacmaster product carries a limited two (2) year warranty against defects in • Do not vacuum up ashes, hot coals or the like, large fragments of glass and sharp workmanship and materials from date of purchase under normal household objects. -
Page 4: Double Insulation Instructions
OUBLE INSULATION INSTRUCTIONS appliance. • Never use the appliance when you are under the influence of medication, alcohol or drugs, if you are currently under medical care, or if you are tired. This Wet/Dry Vac is double-insulated, eliminating the need for a separate grounding •... -
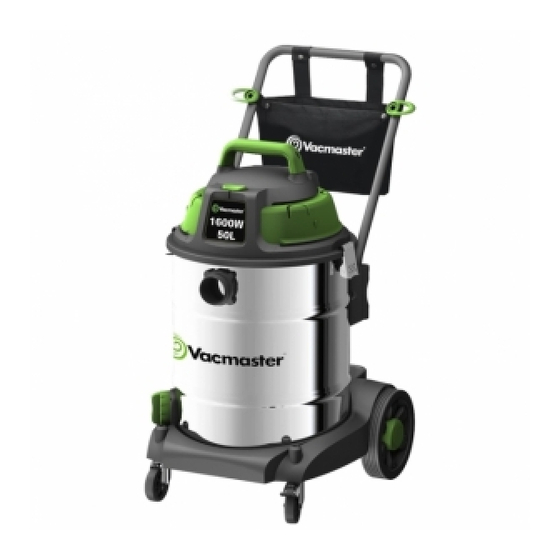
Page 5: Specifications
Main Handle With Soft Grip PECIFICATIONS Cord Retainer Motor: 230V-50Hz Container: Power Head Watt: 1600W Filter-Dry: PET Cartridge Filter & Dust Bag Handle Filter-Wet: Foam Sleeve Filter On-Of f Switc h NPACKING AND CHECKING CARTON CONTENTS Accessory Shelves Remove entire contents of carton. Check each item against the carton V acuum Por t contents list. -
Page 6: General Assembly Instructions
ENERAL ASSEMBLY INSTRUCTIONS WARNING: DO NOT PLUG IN POWER CORD TO POWER OUTLET, MAKE SURE PLUG IS DISCONNECTED BEFORE ASSEMBLING THE WET/DRY VAC UNPACKING YOUR WET/DRY VACUUM & GENERAL ASSEMBLY 1. Undo the latches. (As show in fig.2) 2. Lift the power head off the container. (fig.3) 3. -
Page 7: Wet Vacuum Operation
1. Verify that the power cord is disconnected from the outlet. (fig.1) 2. In order to prepare your vacuum for dry vacuuming, verify that the PET cartridge filter is securely mounted.Make sure the filter is pushed in until it stops against the power head. -
Page 8: Maintenance
AINTENANCE 2. Remove collection bag & cartridge filter, then carefully install the foam sleeve filter over the filter cage and place the power head back on the container. (fig. 2) See filter installing instructions on page 10. WARNING: DO NOT PLUG IN POWER CORD TO POWER OUTLET. MAKE SURE 3. -
Page 9: Installing & Cleaning Cartridge Filter
1. Remove power head and place in upside down position. water. (fig. 4) 2. Slide the cartridge filter down over the filter cage and carefully push filter in until it 3. Allow filter to air dry before installing and using again. stops against the power head. -
Page 10: Exploded View And Parts List
ARTS LIST -EXPLODED VIEW VK1650SW Manual Parts List Key Number Drawing Number Description Quantity VK01SR.10.05 Handle VK01SR.10.00 Power Head Assembly FV9563.02.00 Cartridge Filter FV9546.01.20.01 Filter Retainer TVQTDK.10.00 Latch Assembly TVQTXK.05.01 Vacuum Port Deflector TVQTXK.05.02 Vacuum Port Assembly VF01SR.10.06 Drain Outlet Assembly VJ40SR.20.01 Base VJ40SR.00.01... - Page 11 FV9608.03.00 Dust Bag F V9503.02.00 Foam Sleeve Filter VJ40SR.30.00 Push Handle FV5942.02.10 2 Coated Tube One FV5942.02.20 Bended FV5942.02.22 FV9243.01.00.04 Accessory pouch...
- Page 13 VK1650SWD 950091...
Need help?
Do you have a question about the VK1650SWD 950091 and is the answer not in the manual?
Questions and answers