Condair ME Series Installation And Operation Manual
Adiabatic air humidification/air cooling system
Hide thumbs
Also See for ME Series:
- Operation manual (84 pages) ,
- Installation manual (56 pages) ,
- Addendum manual (16 pages)

Related Manuals for Condair ME Series


Summary of Contents for Condair ME Series
- Page 1 READ AND SAVE THESE INSTRUCTIONS INSTALLATION AND OPERATION MANUAL Adiabatic air humidification/air cooling system Condair MC Humidification and Evaporative Cooling...
- Page 2 Condair Group AG, except to the extent required for installation or maintenance of recipient's equipment. Liability Notice Condair Group AG does not accept any liability due to incorrect installation or operation of the equipment or due to the use of parts/components/equipment that are not authorised by Condair Group AG. Copyright Notice ©...
-
Page 3: Table Of Contents
Specification General Functional description Condair MC 4.2.1 Description 4.2.2 Evaporative Media types 4.2.3 Schematic flow diagram Condair MC Installation Product designation / Which model do you have Installation overview 5.2.1 Installation Health & Safety notes 5.2.2 Typical installation Condair MC Mounting the evaporative module 5.3.1... - Page 4 Routine water sampling and testing Cleaning and disinfection Cleaning and disinfection method statement Fault elimination Fault indication on Condair MC control unit Malfunction list Malfunctions without indication Resetting the fault status on Condair MC Replacing the fuses in the control unit...
-
Page 5: Introduction
We thank you for having purchased the Condair MC Evaporative Humidifier and Cooler (Condair MC hereafter). To ensure a safe, proper, and economical operation of the Condair MC, please observe and comply with all information and safety instructions contained in the present documentation as well as in the separate documentations of the components installed in the humidification system. - Page 6 Please safeguard this manual in a safe place, where it can be immediately accessed. If the equipment changes hands, the documentation must be passed on to the new operator. If the documentation gets mislaid, please contact your Condair representative. Language versions This manual is available in various languages. Please contact your Condair representative for information. Introduction...
-
Page 7: For Your Safety
(in particular the safety instructions). Preventing unsafe operation All persons working with the Condair MC are obliged to report any alterations to the unit that may affect safety to the owner without delay and to secure such systems against accidental power-up. - Page 8 DANGER! Risk of electric shock! The Condair MC unit (and the optional submerged UV system) contain live mains voltage. Live parts may be exposed when the control unit (or the terminal box of the optional submerged UV system) is open. Touching live parts may cause severe injury or danger to life.
-
Page 9: Important Notes
Check packing slip to ensure all parts has been delivered. All material shortages are to be reported to your Condair representative within 48 hours after receipt of the goods. Condair assumes no responsibility for any material shortages beyond this period. -
Page 10: Specification
Specification General 1. The humidifiers will comply fully with CE Directives. 2. The humidifier evaporative glass fibre material shall be A2-S2, D0 (UL Class 1) fire rating and be non-particle releasing. 3. The humidifier shall be powered by a 100-240 V single phase 50/60 Hz power supply with a low power consumption of <145 W (excluding optional submerged UV system). -
Page 11: Functional Description Condair Mc
The Condair MC provides On/Off or stage control by means of the Condair MC control unit and the stage pumps. The Condair MC control unit processes analog sensor/control signals and uses them to control the stage pumps. -
Page 12: Evaporative Media Types
The droplet separator cassettes must be used if the face velocity is high in order to prevent water droplets being carried away in the air stream. Droplet separators allow the operation of the Condair MC with a maximum face velocity of 4.5 m/s. -
Page 13: Installation
Product designation / Which model do you have The product designation and the most important unit data are found on the rating plate fixed to the evaporative module and the control unit. Dimensions evaporative module Condair MC Variable Dimension A (Width) Variable Dimensions A (Width) - Page 14 Evaporative module product key Example: MC–0900–1250–F95–1–CE–DS Product identification MC (media evaporator) Width evaporative module in mm Height evaporative module in mm Material type and efficiency evaporative cassettes: F85= F-Type Glass fibre 85 % F95= F-Type Glass fibre 95 % Number of pump stages Standard Applied: e.g.
-
Page 15: Installation Overview
Installation of the ME unit must only be carried out by trained personnel, and all installation equipment must be checked by a skilled and competent health & safety representative. 5.2.2 Typical installation Condair MC 1. Mounting the evaporative module → see chapter 5.3 2. - Page 16 Control unit Electrical isolator Evaporative module Submerged UV (option) Hydraulic module Water supply line Air flow direction Water drain line AHU drain Fig. 1: Typical installation Condair MC (internal installation) Installation...
-
Page 17: Mounting The Evaporative Module
Mounting the evaporative module 5.3.1 Notes on positioning the evaporative module The design and dimensioning of the AHU/air duct as well as the location of the evaporative module inside the duct are determined, recorded and set when planning the entire system. Prior to installation, however, make sure the following criteria have been taken into consideration: –... - Page 18 Air flow direction Recommended service access Recommended inspection access min. 600 mm / 23.6" 600 mm / 23.6" (min. 200 mm / 7.9" clearance) Dimension "a": Fibre cassettes F85: 445 mm / 17.5" Fibre cassettes F95: 495 mm / 19.5" Fig.
- Page 19 If possible, the evaporative module should be positioned on the negative pressure, i.e. suction side of the fan (position 1 in the diagram below). The maximum media face velocity is 4.5 m/s / 886 fpm (with droplet separator), for both installation positions.
-
Page 20: Inlet Water Quality Requirements
"Effluent treated water" must be treated by an appropriate water treatment method and risk assessed to ensure it is safe and suitable for use in the Condair ME unit. It is the responsibility of the user to ensure that the water supply system is part of a managed, hygiene monitored water system, risk assessed and complies with the local regulations and bylaws. - Page 21 – 1,2-dichloroethane Water Monitoring The Condair MC water system must be monitored for hygiene as part of the maintenance programme, this should be based on a risk assessment & in accordance with local regulations. Disinfection Chemical Depending on the system hygiene, it is advised that preventative disinfection chemical should be added to the Condair MC water tank at an appropriate frequency, such as a monthly basis.
-
Page 22: Installation Procedure Evaporative Module
5.3.3 Installation procedure evaporative module 1. Check tank and framework parts: Ensure tank cross member and any required supports are installed and fixed into the tank assembly using M6 x 16 mm Hex screws. Installation... - Page 23 2. Mount tank in AHU Insert the tank into the AHU/air duct. Air flow direction WARNING! Use an appropriate lifting device or handle the tank with the help of another person to position it inside the duct. It is the customer's responsibility to ensure that operators are trained in handling heavy goods and to enforce the relevant lifting regulations.
- Page 24 3. Fix frame to the tank: – Fix the vertical supports to the tank using the flange nuts (M6, AF: 10 mm). Then, align the verti- cal supports exactly vertical using a level and tighten the nuts. – Fix the cross member to the vertical supports using the flange nuts (M6, AF: 10 mm). Then, tighten the nuts.
- Page 25 4. Fix cross member of frame to AHU/duct ceiling: Fix the cross member to the AHU/duct ceiling using appropriate fixings (supplied as part of the in- stallation kit). Before tightening the screws (not supplied) align the vertical supports exactly vertical using a level.
- Page 26 5. Mount blanking plates on the air inlet side (Condair blanking plates available as option): – Starting on each duct side at the bottom fix the side blanking plates to the duct wall using ap- propriate fixings. Before fixing make sure the side blanking plates are aligned exactly vertical and the free end of the blanking plates touches the side of the corresponding vertical support.
- Page 27 6. Fit float level switch: – Fit the rubber washer over the threaded end of the float switch and insert from the inside of the tank through the locating hole on the tank. – Carefully tighten the plastic nut onto the threaded end of the float switch from the outside of the tank.
- Page 28 7. Mount optional submerged UV, if applicable: If your system is equipped with the optional submerged UV system: 1. Mount two of the provided clips to each UV lamp and locate the assemblies in the tank as shown so that they are positioned underneath the tank cross member and support beam(s) where the media cassettes rest.
- Page 29 8. Mount evaporative cassettes: Note: to avoid damage to the evaporative cassettes during transit, we recommend that the evapora- tive cassettes are fitted on site. – Before installing the evaporative cassettes sweep the interior of the tank. – Starting with the tallest evaporative cassettes on the bottom and working up to the shortest evaporative cassette on the top, hook the cassettes into the vertical supports.
- Page 30 9. Mount the droplet separator cassettes (this step must only be carried out, if your system is equipped with a droplet separator): Note: to avoid damage to the droplet separator cassettes during transit, the droplet separator cas- settes must be fitted on site. – Starting with the tallest droplet separator cassettes on the bottom, and working towards the shortest cassettes at the top, rivet the banks of the droplet separator cassettes together using a rivet gun with ø...
- Page 31 – Starting on one side mount one separator bank after the other onto the supporting lip on the rear face of the tank. Align with the evaporative cassette metalwork and ensure the framework of the droplet separator fits around that of the evaporative cassettes. Secure in place with the upper separator brackets.
- Page 32 10. Mount distribution head assembly to the topmost evaporative cassettes: Note: The topmost evaporative cassettes will be the ones that are shortest (vertically) – Mount the appropriate distribution cassettes onto the corresponding evaporative cassettes, by hooking the return on the underside of the distribution cassette under the top strut of the evaporative cassette.
-
Page 33: Mounting The Hydraulic Module
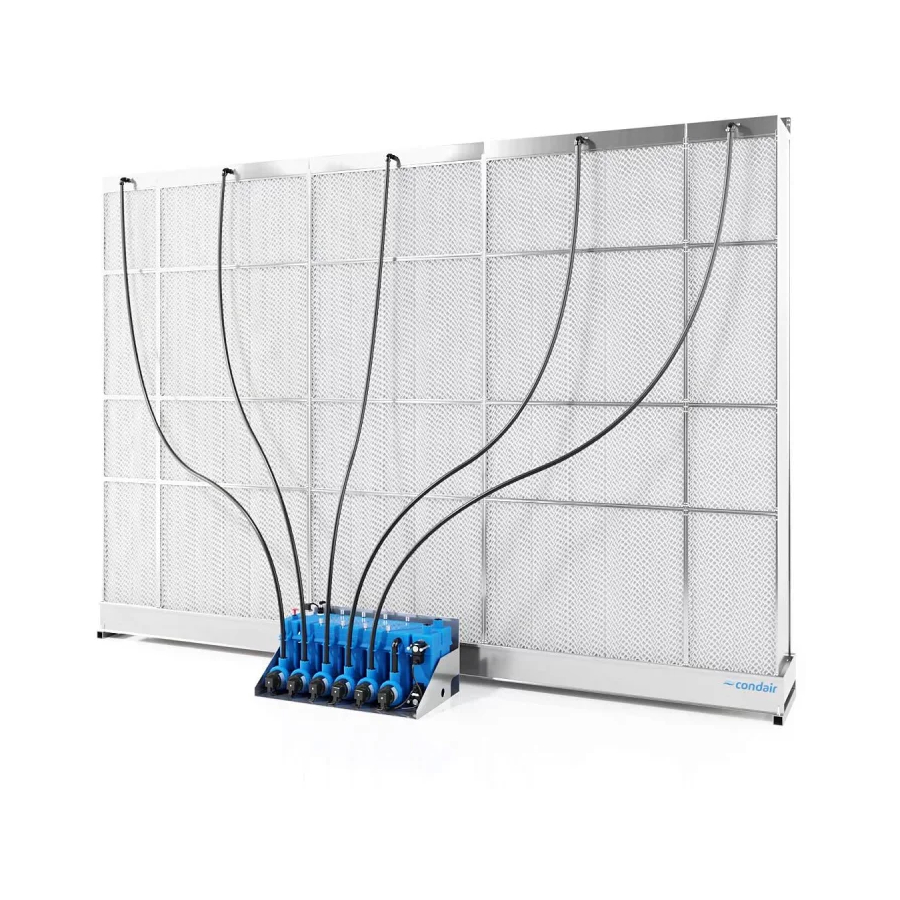
Mounting the hydraulic module 1. Ensure the hydraulic gasket is seated securely in the rear of the hydraulic module. 2. Then, align the 7 mounting holes of the hydraulic module with the fixings on the face of the tank and press into position. -
Page 34: Water Installation
Water installation 5.5.1 Notes on water installation The layout of the water piping (supply, drain and distribution piping) depends on the system version. Refer to the corresponding chapter for detailed information and observe the following installation notes. Notes on water supply –... - Page 35 General notes on installation of the hoses – Use the supplied ø15 mm flexible plastic hoses only. For hygienic reasons do not use other hoses (except products supplied by your Condair distributor). – When cutting hoses use an appropriate cutting tool providing straight, kink-free cuts.
-
Page 36: Water Installation
5.5.2 Water installation Cassette Connection layout Banks distribution hoses 1 or 2 1 or 2 1 or 2 Banks Banks Banks 1 or 2 1 or 2 1 or 2 Banks Banks Banks Banks Banks Banks Banks Banks Banks Bank Bank Bank Banks... -
Page 37: Mounting The Control Unit
The control unit should ideally be positioned as close to the evaporative module as possible for ease of servicing and maintenance. Note: the electrical components of the Condair MC hydraulic module are equipped with 5 m cables for connection to the control unit.. Make sure the control unit is mounted within the range of the inter-connecting cables. -
Page 38: Mounting The Control Unit
Fig. 14: Mounting the control unit of Condair MC Mounting procedure: 1. Mark the 3 attachment points for the Condair MC control unit at the desired position with the help of a level. 2. Fit 2 appropriate fixings to the upper two points, do not fully tighten. Ensure the fixing heads can pass through the widest part of the keyhole slots of the control unit. -
Page 39: Electrical Installation
Electrical installation 5.7.1 Notes on electrical installation DANGER! Risk of electric shock! The control unit contains live mains voltage. Live parts may be exposed when the control unit is open. Touching live parts may cause severe injury or danger to life. Prevention: The control unit must be isolated from the mains before commencing any installation work. -
Page 40: Wiring Diagram Condair Mc
5.7.2 Wiring diagram Condair MC PWR 2 24V PWR 1 24V OUT 24V 24V GND 24V GND 24V GND Fig. 16: Wiring diagram Condair MC Installation... - Page 41 Legend wiring diagram Condair MC Control Board Demand or Humidity/Temperature Signal Fault Monitoring External Pump Enable (Volt-free contact) Cable Bridge (Remove for External Pump Enable) Drain Valve Fuse Mains Supply (6.3A,T) Fuse UV (6.3A,T) External Fuse Mains Supply (10A,T) Inlet Valve...
-
Page 42: Installation Work
Control unit 5.7.3 Installation work ON/OFF Control signal (Y) Note: the control signal type must be set via the Jumper JP1 on the Control Board. The appropriate input signal for the controller/sensor must be set to ensure correct operation. External continuous humidity or temperature con- ANALOG INPUT ANALOG INPUT troller... - Page 43 P1-P3 ANALOG INPUT External Pump Enable The potential-free contact of an external enable switch 0 - 10V 2 - 10V is connected to the contacts "1" and "2" of the ter- PUMP ENABLE PUMP ENABLE 4 - 20mA minal block "J13" on the control board in accordance ON/OFF with the wiring diagram.
- Page 44 P1-P3 Mains voltage supply ANAL CAUTION! Before connecting the mains voltage sup- ply, make sure the voltage indicated on the rating plate meets the local line voltage. Otherwise, do not PUMP ENABLE connect the control unit. unit Connect mains voltage supply 100...240 V/1~/50...60 Hz in accordance with the wiring diagram, to the terminal block "SUPPLY"...
- Page 45 SUPPLY Control unit Drain Valve Connection Connect the Drain Valve cable to the terminals at position FLOAT SWITCH VALVES VALVES J11 on the control board. FAULT The connecting cable must be fed through a free cable gland into the control unit. LOW LVL HIGH LVL DRAIN INLET...
-
Page 46: Installation Of Options
Installation of Options 5.7.4.1 Submerged UV The Condair MC can be equipped with an optional Submerged UV System, whereby up to 3 UV lamps are positioned in the tank underneath the banks of the evaporative cassettes and connected to a power distribution box mounted on the rear face of the tank. -
Page 47: 5.7.4.2 Blanking Plates
Control unit 5.7.4.2 Blanking Plates The space between the AHU walls and the Condair MC evaporative module must be blanked off to ensure all air travelling through the duct passes through the evaporative media. Pre-formed modular blanking plates are available as an option, quantity and sizes are determined during pre-sales specification. -
Page 48: Operation
Please pay attention to local regulations regarding working at heights and electrical work. Safety and hygiene DANGER! The Condair MC must be operated in accordance with this manual. Failure to do so could result in contamination that might cause Legionnaires’ disease, which can be fatal. WARNING! The Condair MC control unit should not be electrically isolated for periods exceeding 24 hours as automatic drain and purge cycles will be disabled. -
Page 49: Initial Commissioning
(cfu/ml). Generally, levels of 10³ cfu/ml may be considered acceptable for this type of humidifier provided the species of microbes and/or fungi involved are themselves not considered to be harmful. If you are unsure of the quality of your water please consult your Condair distributor for advice. - Page 50 17. Reinstate the demand signal settings as required (allowing normal control to be resumed) and check correct control operations (signals, fault outputs, Modbus). 18. If commissioning has not been completed by an approved Condair representative, it is recommended that records are kept of commissioning date and board settings.
-
Page 51: Control Unit Operating Elements
Control Unit operating elements The Condair MC Control unit uses the following features during normal operation: Status LED On/Off Switch Electrical Isolator (supplied by others) Door Lock Screw Operation... -
Page 52: Start Up For Normal Operation
It is assumed that initial commissioning has been carried out properly by the service technician or your Condair representative. If the Condair MC has been out of operation for a prolonged period of time, a complete system service has to be performed prior to the start up. -
Page 53: Notes On Operation
Notes on Operation 6.5.1 Important notes on operation – For hygiene reasons the supply valve will open while the system is in standby mode at regular in- tervals in order to flush water supply line and prevent stagnation. This cycle will be performed when power is first applied to the system, followed by a 2 minute drain down period. -
Page 54: System Status Indication
Red - Inlet/drain fault (sequence of flashes indicates area of fault, see chapter 8.1) 6.5.3 Recommended regular checks on operation During operation the Condair MC has to be checked periodically in accordance with the table below: Operations / Checks Daily Weekly Monthly Quarterly Monitor humidity/temperature control ... -
Page 55: Media Wash Over
MUST be flushed as part of the commissioning process to remove the aluminium sulphate. For further information and guidance on the Media Wash Over Cycle process please contact Condair. At initial commissioning or any time new fibre evaporative cassettes have been installed, a media wash over cycle has to be performed. -
Page 56: Modbus Communication
Modbus Communication System status data can be read from the controller using Modbus RTU protocol via a RS485 connection to the terminals at J15 of the MC Control board. Jumper JP2 (TERM) only has to be set for the last devices in the net (end of line termination at the beginning and end of the Modbus network). -
Page 57: Decommissioning The System
– If the Condair MC is to be isolated from the mains for a prolonged period, then the MC and any stor- age tanks or vessels should be drained and left dry, the pumps should be removed from the hydraulic module to ensure all water is drained from the pump housings. -
Page 58: Maintenance
The instructions and details for maintenance work must be followed and upheld. Only carry out the maintenance work described in this documentation. The Condair MC must be maintained in the prescribed intervals, the cleaning work must be carried out correctly. -
Page 59: Maintenance Intervals
Maintenance intervals In order to maintain operational safety and hygienic demands the Condair MC must be serviced at regular intervals. The time interval for the complete system service is to be adapted to the operating conditions. The hygiene status depends mainly on the quality of the humidifier water but also on the adherence to the exchange intervals of the upstream air filter, the air velocity and the micro-biological and chemical composition of the supply air. -
Page 60: Maintenance Guide
Maintenance guide The Condair MC unit will form part or your hot and cold water system and as such require you to un- dertake certain duties with regards to local regulations and bylaws concerning the control of Legionella microbes in water systems. Your water sampling / testing and disinfection regime must be based on results of a site specific risk assessment. -
Page 61: Dismantling And Installation Of Components For Maintenance
Dismantling and installation of components for maintenance WARNING! A full risk assessment must be completed by suitably trained personnel prior to carrying out mainte- nance of the MC unit. There may be increased risk when carrying out maintenance on systems that necessitate working at height. -
Page 62: Dismantling And Installation Of The Evaporative Module
Dismantling and installation of the evaporative module 1. Take the Condair MC out of operation as described in chapter 4.6 and allow to drain and dry. 2. Switch the AHU off, and isolate the power and water supply to the AHU. -
Page 63: Consumables Guide
Replace pump rotors (impellers) Option consumables Description Standard Frequency (month) UV Lamp Kit Contact your Condair distributor for consumables list/order codes. To help us ensure that the correct spares parts are sent, please confirm your unit serial and model number with your order. Maintenance... -
Page 64: Health And Safety Requirements
2. The control unit of the Condair MC must be left powered on to allow automatic flushing and cleaning cycles to occur. If the control unit Condair MC is powered off for prolonged periods, water stagnation might occur and contamination result, so the system, including the pump housings and any stor- age tanks or vessels should be drained and left dry. -
Page 65: Routine Water Sampling And Testing
4. Clean and disinfect the system in accordance with local regulations and bylaws, and the instructions in this manual. 5. The Condair MC system must be connected to a clean, wholesome mains water supply and it is recommended that the supply water is chlorinated. It is the responsibility of the user to ensure that the water system complies with local regulations and bylaws, particularly those for the control of Legionella microbes. -
Page 66: Cleaning And Disinfection
1. A qualified person appointed by the customer must risk assess the cleaning and disinfection opera- tion. This assessment should include but is not limited to observance of local regulations and the use of PPE, working from heights and ensuring a full understanding of the Condair MC. 2. Coordinate with relevant responsible persons. -
Page 67: Cleaning And Disinfection Method Statement
If the unit is already in operation, check for correct operation. – Ensure the Condair MC system and the AHU are OFF and isolated. – If the system has been without power for more than 48 hours, flush the water supply. - Page 68 Add a mild disinfectant chemical to the tank. – Always leave work area clean, dry and tidy. Step 8 – Re-start the Condair MC system – Refer to the commissioning section of this manual. If in doubt always contact your Condair distributor.
-
Page 69: Fault Elimination
Fault elimination Fault indication on Condair MC control unit Malfunctions during operation detected by the control software are indicated by a corresponding sequence of flashes of the LED in the front panel of the control unit: LED Color LED Behavior... -
Page 70: Malfunction List
Fill timeout Tank (re)fill timeout. The Condair MC stopped operation as the tank could not be (re)filled within a preset time. The Condair MC periodically tries to fill the tank. Note: If – at any time – the required water level is reached, the system will continue with normal operation. -
Page 71: Malfunctions Without Indication
(e.g. licensed electrician) or by your Condair representative’s service techni- cian only. – Repair work and the replacement of faulty components must be carried out by your Condair repre- sentative’s service technician only! DANGER! Make sure the control unit is separated from the mains (check with voltage detector) and the shut-off valve in the water supply line is closed. -
Page 72: Resetting The Fault Status On Condair Mc
Resetting the fault status on Condair MC To reset the error indication: 1. Disconnect the control unit of the Cond air MC from the mains. 2. Wait approx. 5 seconds, then reconnect the control unit to the mains. Note: If the fault has not been eliminated, the fault indication reappears after a short while. -
Page 73: Taking Out Of Service / Disposal
Taking out of service / Disposal Taking out of service If the Condair MC must be replaced or if the humidification system is not needed any more, proceed as follows: 1. Take the Condair MC out of operation as described in chapter 6.7. -
Page 74: Product Specifications
Product Specifications 10.1 Technical data Operating parameter Range Supply voltage control unit 100-240 V / 1~ / 50/60 Hz Supply voltage circulation pumps 24 VDC (supplied by control unit) Power consumption <145 W (3 stages, no options fitted) Control signals 0...10 VDC 2...10 VDC 4...20 mA On/Off (via volt-free contact) - Page 76 CONSULTING, SALES AND SERVICE: CH94/0002.00 Condair Group AG Gwattstrasse 17, 8808 Pfäffikon SZ, Switzerland Phone +41 55 416 61 11, Fax +41 55 588 00 07 info@condair.com, www.condairgroup.com...
Need help?
Do you have a question about the ME Series and is the answer not in the manual?
Questions and answers