Table of Contents
Advertisement
Advertisement
Table of Contents

Related Manuals for Condair Mk5


Summary of Contents for Condair Mk5
- Page 1 Mk5 resistive Humidifiers InstallatIon and operatI ng InstructIons...
-
Page 3: Table Of Contents
Contents Introduction To the very beginning Notes on the installation and operating instructions For your safety Product overview Unit types Standard delivery 3.3 Humidification system overview 3.4 Steam humidifier construction Functional description Basic planning Selecting the unit Selecting the control system Options Accessories 4.4.1 Accessories overview 4.4.2 Accessory details Additional planning instructions... -
Page 4: Introduction
These installation and operating instructions are restricted to: – the planning of a humidifying system that is to be equipped with a steam humidifier Condair Mk5 – the installation, commissioning, operation and servicing of the steam humidifier Condair Mk5 These installation and operating instructions are supplemented by various separate items of documenta- tion (spare parts list, installation instructions for electrical installation, etc.). Where necessary, appropriate... -
Page 5: For Your Safety
– The steam humidifier Condair Mk5 must only be installed, operated serviced and in all cases repaired only by persons who are adequately qualified to undertake such work and are well acquainted with the product. Ascertaining the qualifications is the customer‘s responsibility. – Caution, danger of electric shock! The Condair Mk5 is operated with mains voltage. Before commencing work on the Condair Mk5, the unit is to be rendered inopera- tive in accordance with section 6.3 and prevented from further inadvertent operation ( isolate unit from the electrical power supply, isolate water supply). – Observe all local safety regulations. -
Page 6: Product Overview
Product overview Unit types The steam humidifiers Condair Mk5 are available in 2 different type series: – Visual For direct or indirect room air humidification with standard requirements for control precision. – Process For direct or indirect room air humidification in laboratory and process appli cations where there are increased requirements for control precision. Basically, the devices of both type series are of the same construction except for the level control and electronics. The Visual units >10 kg/h are equipped with a combined contactor/electronic control and a level unit with a single float. To achieve a higher level of accuracy the Process units include a dedi- cated electronic control with special control software and are equipped with a level unit comprising two floats. They are available in versions suitable for operation with untreated drinking water (with lime collec- tor tank) or with fully demineralized water (without lime collector tank). All versions are equipped,... -
Page 7: Standard Delivery
– 400V/3~/50...60Hz 400V/3~ 220V/3~ – 220V/3~/50...60Hz – 415V/3~/50...60Hz 415V/3~ 240V/1N~ – 240V/1N~/50...60Hz – 230V/1N~/50...60Hz 230V/1N~ – 200V/3~/50...60Hz 200V/3~ Standard delivery The standard delivery includes: – Steam humidifier Condair Mk5 compl. (according to type designation) equipped with the desired options (remote operating and fault indication, pressure compensation kit, etc.) according to chap- ter 4.3 – Fixing set including dowels and fixing screws (for single units up to 40 kg/h), mounting profile with dowels and fixing screws (for double units 50...80 kg/h) – Installation and operating instructions – Spare parts list (red) – Ordered accessories (steam distribution pipe, steam hose, etc.) according to chapter 4.4... -
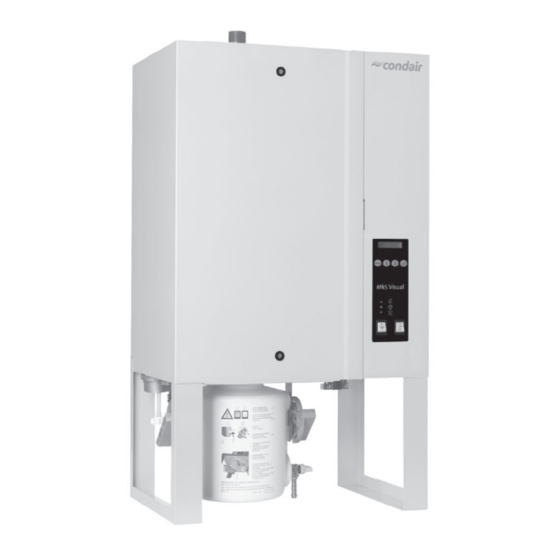
Page 8: Humidification System Overview
Humidification system overview 1 Steam humidifier Electrical connections Water drainage 4 Lime collector tank (only on units for operation with untreated drinking water) Filter valve (accessory “Z261”) Water supply (building side) Fan unit (accessory “FAN..”) Condensate hose (accessory “KS10”) Steam hose (accessory “Z10”) Steam distribution pipe (accessory “81–...”) Steam humidifier construction Housing (500 or 600) Power board... -
Page 9: Functional Description
Functional description The Condair Mk5 steam humidifier is an unpressurized steam generator. It operates on the resistance heating principle and is designed for direct (with fan unit) and indirect (with steam distribution pipe) room air humidification in venti l ating and air-conditioning systems. In conjunction with a “Process” steam distribution pipe the unit may be used for humidification in laboratory and process applications. Water supply The water is taken via a filter valve (accessory “Z261”) to the steam humidifier. It reaches the steam cylinder via the inlet valve (level controlled) and the open water cup. Level regulation The water level in the steam cylinder is continuously monitored with the level unit. If the water level reaches a preset level (owing to the evaporation process) the level unit supplies a signal to the con- troller. This opens the inlet valve and the steam cylinder is filled up. When the preset operating level is reached, the level unit supplies another signal to the controller to close the inlet valve. The pressure equalizing pipe between the steam connection and the level unit ensures that the water levels are the same in the steam cylinder and the level unit. -
Page 10: Basic Planning
Basic planning All the data necessary for the selection and layout of a Condair Mk5 humidifier system are provided in the following chapters. Selecting the unit The selection of the unit is reflected in the type description: Mk5 Visual VE 24-400V/3~ 1. Application 2. Supply water quality 3. Required maximum steam capacity 4. Required heating voltage 1. Application The type series can be selected on the basis of the following table: Scope of use Type series Visual VE 24-400V/3~ For direct or indirect room air humidification with Visual standard requirements for control precision. - Page 11 Max. portion of supply air in m /hr or max. steam room volume to be humidified per hour in m capacity in kg/h Temperature / rel. humidity of supply air -15 °C/90 %rh -5 °C/80 %rh 5 °C/60 %rh 1000 1000 1350 1600 Mk5 Visual VE 24-400V/3~ 2000 2650 3200 2500 3300 4000 3000 4000 4800 3750 5000 6000 Example:...
- Page 12 4. Heating voltage/control voltage Heating voltage The Condair Mk5 steam humidifiers are available with various heating voltages. The maximum achievable steam capacity and the power consumption are directly dependent on the selected heating voltage (see table). Mk5 Visual VE 24-400V/3~ 220 V/3~ 400 V/3~...
-
Page 13: Selecting The Control System
– System 1: Room humidity control System 1 is suited for direct room humidification and air conditioning systems with mainly recirculated air. The humidity sensor or humidistat respectively is preferably located in the room itself or in the exhaust air duct. Condair humidity sensor ventilation interlock B2 airflow monitor... - Page 14 – System 3: Supply air humidity control Supply air humidity control (humidity sensor installed in supply air duct) should be used only where room humidity control is impracticable for technical reasons. Such systems always require a PI-controller. The humidity sensor (A1) is located in the supply air duct after the steam distribution pipe. Condair humidity sensor ventilation interlock B2 airflow monitor B3 safety humidistat internal continuous controller (PI-controller) external continuous controller (e.g.
-
Page 15: Options
Options The following table presents an overview of all options which are available for the steam humidifier Condair Mk5. Condair Mk5 Visual Process Steam capacity in kg/h 5...16 20...40 50...80 5...16 20...40 50...80 Interface RS232/RS485 (Interface PCB RS232/RS485 for data exchange with a building control system) number Remote operating and fault indication (PCB with relay contacts for the connection of remote displays for “Operation”, “Steam”, “Fault” and “Service”) -
Page 16: Accessories
Accessories 4.4.1 Accessories overview The following table presents an overview of all accessories which are avail a ble for the steam humidi- fier Condair Mk5. Condair Mk5 Visual Process Steam capacity in kg/h 5...16 20...40 50...80 5...16 20...40 50...80 Steam distribution pipe 81-... (see accessory details in chapter 4.4.2) number Steam distribution pipe Process (see accessory details in chapter 4.4.2) -
Page 17: Accessory Details
Important! Always select the longest possible steam distribution pipe (opti m um humidification dis- tance). Steam distribution pipes 81-... Duct width (B) Steam output for Condair Mk5 (CrNi steel) Type Length in mm (L) in mm max. in kg/h 210...400 81-200 400...600... - Page 18 For duct width <600 mm the values in parenthesis are valid Note: Further information on the OptiSorp steam distribution system can be found in the separate stallation and operating instructions supplied with the product. Fan unit The fan units – in combination with the steam humidifiers Condair Mk5 Visual – are used for the direct room humidification. They can be mounted separately above the unit to the wall. (FAN3 Mk M BC FAN3 Mk L BC) and the amount required is dependent on the The type of fan unit steam capacity of the basic unit(s) and can be gathered from the table in chapter 4.4.1.
-
Page 19: Additional Planning Instructions
Additional planning instructions In addition to the selection of the steam humidifier, the accessories and the options, other points should be considered during planning. Please note the information in the following chapters: – Unit fitting (see chapter 5.2) – Steam installation (see chapter 5.3) – Water installation (see chapter 5.4) – Electric installation (see chapter 5.5) If you have other questions relating to planning that are not adequately covered by these installation and operating instructions, please contact your supplier. He will be happy to provide further assistance. -
Page 20: Mounting And Installation Works
– Install the steam humidifier so that the length of the steam hose is kept as short as possible (max. 4 m) and that the minimum bend radius (R= 300 mm) and up-slope (20 %) or down-slope (5 %) of the steam hose is observed (see chapter 5.3.3). – The steam humidifiers Condair Mk5 are designed for wall-mounting. Make sure that the construc- tion (wall, pillar, floor-mounted console, etc.) to which the humidifiers are to be mounted, offers a sufficiently high load-bearing capacity (take notice of the weight information found in this chapter), and is suitable for the installation. -
Page 21: Dimensions And Weights
Minimum distances to observe Mk5 ...50.. Mk5 ...60.. Mk5 ...80.. 20 kg/h 30 kg/h 40 kg/h Unit A: 30 kg/h 40 kg/h 40 kg/h Unit B: Unit B Unit A min. 50 mm min. 400 mm min. 600 mm 50 mm... -
Page 22: Mounting The Humidifier
5.2.2 Mounting the humidifier Caution! When fixing the Condair Mk5, use only the fixing materials supplied with the unit. If fixing with the materials supplied is not possible in your particular case, select a method of fixing that is of similar stability. In case of doubt, please contact your supplier. Note: The following explains how to fix the unit without optional mounting profiles. To install the unit with mounting profiles, please note the special instructions printed on the packaging. View from the front Measure Housing size small large 232,0 mm 237,0 mm 175,0 mm 181,0 mm 166,5 mm 166,5 mm 460,0 mm 460,0 mm • Use the drilling template (printed on the packing) to mark attachment point “A” on the wall. -
Page 23: Steam Installation
Steam installation 5.3.1 Positioning and mounting of the steam distribution pipes The location for the steam distribution pipes should be determined at the time of dimensioning the air conditioning system. Please note the following instructions to ensure proper humidification of the duct air. Calculating the humidification distance The water vapor, emitting from the steam distribution pipes, requires a certain distance to be absorbed by the ambient air so that it is no longer visible as steam. This distance is referred to as humidifica- tion distance “B ”... - Page 24 Minimum distances to be observed To prevent the water vapor, that is emitting from the steam distribution pipe, from condensing on downstream system components, a minimum distance to the steam distribution pipe must be observed (depends on the humidification distance “B ”). before/after constriction after expansion before bend 0.5 x B N 0.5 x B N before branch before diffuser before control sensor 5 x B N before/after filter/register...
- Page 25 In positioning the steam distribution pipes, the following dimensions should be observed. gmin= 150 mm hmin= 85 mm min. H= 250 mm H ≥400mm min. H= 200 mm min. H= 400 mm min. H= 350 mm min. H= 300 mm min. H= 600 mm min. H= 500 mm min. H= 400 mm min.
-
Page 26: Positioning And Mounting Of The Fan Unit
5.3.2 Positioning and mounting of the fan unit The fan unit is mounted on the wall separately above the unit. To allow the steam coming from the fan unit to spread out evenly, without condensing on obstacles (ceilings, joists, pillars, etc.), the follow- ing minimum dimensions must be observed when selecting the location for the fan unit. FAN3 Mk M BC FAN3 Mk L BC max. 8 kg/h 16 kg/h 30 kg/h 40 kg/h 3,0 m 6,0 m 8,0 m 10,0 m... -
Page 27: Installing The Steam Hose
5.3.3 Installing the steam hose Important! Use original Condair steam hose exclusively. Other types of steam hoses can cause un- desired operational malfunctions. Important! After installation the protective plastic tube around the steam hose must be re- moved. Instructions for the hose layout The hose layout depends on the position of the steam distribution pipe: –... -
Page 28: Installing The Condensate Hose
90° angle. 5.3.4 Installing the condensate hose Important! Use original Condair condensate hose exclusively. Other types of hoses can cause opera- tional malfunctions. The hose layout depends on the position of the steam distribution pipe: – Steam distribution pipe is mounted more than 300 mm above the top edge of the humidifier: Condensate hose is led down to the humidifier with a minimum slope of 20 %, in the form of a siphon (min. -
Page 29: Inspecting The Steam Installation
– Steam distribution pipe is mounted less than 300 mm above the top edge of the humidifier: Condensate hose is led down with a minimum slope of 20 %, in the form of a siphon (min. hose bend radius Ø200 mm), directly into a discharge funnel. min. 20 % min. -
Page 30: Water Installation
Water installation All work concerning the water installation must be performed only by adequately qualified personnel (e.g. plumbers). Ascertaining the qualifications is the customer’s responsibil- ity. Please observe all local regulations concerning the installation of appliances to the mains and waste water systems. Warning - danger of electric shock! For all installation work, the steam humidifier must be disconnected from the mains supply and secured against unintentional re-con- nection. 5.4.1 Performing the water installation Overview water installation... - Page 31 – Supply rate: 1 l/min per 15 kg/h steam capacity – Admissible supply temperature: 1…40 °C – Notes on water quality: – For the water supply of the Condair Mk5, use exclusively untreated drinking water or fully demineralized water. Note: The use of fully demineralized water reduces the time for maintenance and cleaning to a minimum. – The use of additives such as corrosion inhibitors, disinfectants, etc. is not allowed, since these additives may endanger health and affect proper operation.
-
Page 32: Inspecting The Water Installation
5.4.2 Inspecting the water installation Use the following check list to ascertain that the installation has been performed correctly: – Water supply Has filter valve or shut-off valve and filter 125 µm respectively been installed in supply line? Have admissible water pressure (1.0 – 10 bar) and temperature (1 – 40 °C) been observed? Does supply capacity match the humidifier(s)? Are all pipes properly secured (threaded connections tightened)? Is the feed pipe properly sealed? – Water drain Has minimum inside diameter of drain pipes been maintained at least 40 mm throughout the entire length? Has drain pipe been installed with a downslope of at least 10 %? Has the heat resistance of the material used been verified to be at least 100 °C? -
Page 33: Electric Installation
Condair Condair Supply heating voltage Up 8 Airflow monitor Supply control voltage Uc 9 Ventilation interlock 3 Interface RS232/RS485 1 0 External safety circuit (option “RS” for Mk5 Process only) 1 1 Steam humidifier 4 Remote operating and fault indications (option “RFS”) Internal continuous controller 5 External continuous controller 1 3 Control voltage supply to second unit 6 Humidity sensor (supply air/room/exhaust) 1 4 Control line to second unit Safety humidistat... -
Page 34: Wiring Diagram
5.5.2 Wiring diagram The electrical installation is to be carried out in accordance with the following wiring diagram. Caution! Observe the installation notes in the following section. 200-240V / 50...60Hz... - Page 35 Legend to wiring diagram Controller (active) or humidity sensor Controller (passive), set jumper JP2 to 5V On/Off control, set jumper JP2 to 24V Ventilation interlock Airflow monitor Safety humidistat Internal fuse supply module (6.3 A, slow acting) Internal fuse supply module (1 A, quick acting) External fuse heating voltage supply (see table in the following chapter) External fuse control voltage (max. 10 A, slow acting) Internal fuse control module (200 mA, quick acting) Remote operating and fault indication (option “RFS”) Short circuited, if no external monitoring devices are connected Connection terminal for remote operating and fault indication Connection terminal for control line to unit B (for units with 50...80 kg/h steam capacity only) Connection terminal for control line from unit A JP2 Jumper (control signal) on control board unit A Mains contactor (heating voltage) unit A/unit B External safety circuit (safety humidistat, airflow monitor, etc.) Fan unit (accessory “FAN..”) External main switch heating voltage supply External main switch control voltage supply Auto-transformer control voltage supply (option “TRAF”) Rotary switch "drain interval” Rotary switch “maintenance interval” Rotary switch “control signal” DIP-switch “unit settings” Connection terminal for control voltage to supply module Connection terminal for voltage supply from unit A to unit B...
-
Page 36: Notes On Component Installation
50…60 Hz 50…60 Hz 50…60 Hz 50…60 Hz Mk5 Visual 5-.. 3,8 5,5 1,5 10 3,4 9,0 2,5 16 4,0 6,0 1,5 10 4,0 17,0 2,5 20 4,0 16,5 4,0 20 3,0 8,2 1,5 10 Mk5 Process 5-.. Mk5 Visual 8-.. - Page 37 Control voltage supply Uc Caution! Before connecting, make sure that the mains voltage corresponds with the control voltage of the unit (200…240 V, 50…60 Hz). Caution! The humidifier must only be connected to a mains supply with a protective con- ductor. The connection to the control voltage Uc is made in accordance with the connection schematic, to the terminal “X1” on the supply module. The customer is to install a service switch Q4 in the supply line (all pole disconnecting device with a minimum contact opening of 3 mm) and an F4 fuse (max.
- Page 38 Control signal / Humidity sensor signal The connection of an external active controller “A1”, a passive controller “A2”, an On/Off Humidistat “A3” or a humidity sensor (for control via the internal controller), is accomplished on the appropriate contacts on the terminal strip in accordance with the connection schematic. Note the following con- nection information: External Internal controller controller Connection active passive On/Off Humidity controller “A1” controller “A2” controller “A3” sensor Pos. Jumper JP2 – neutral – 5 V 140 Ω ... 10 kΩ – 24 V Rotary switch S3 Pos.
-
Page 39: Inspecting The Electrical Installation
5.5.4 Inspecting the electrical installation Inspect for correct installation in accordance with the following checklist: Do the mains voltages applied correspond to the respective details stated on the rating plate/s for the power and control components? Are the voltage supplies (Power and control components) correctly fused? Is the service switch “Q” installed in the supply cable to the power and control components? Are all components correctly connected in accordance with the connection schematic? Are all connection cables fixed? Are the connecting cables free of tension (fitted through cable glands/secured with cable clamps?) Is the rotary switch “S3” set to correspond with the controller (active, passive, On/Off) or humidity sensor? Is jumper “JP2” on the control board correctly set for the controller used? -
Page 40: Operation
Setting the drain interval (“S1”) The evaporation process increases the concentration of mineral salts in the steam cylinder. Periodic flushing followed by refilling of fresh water can keep the con c en t ration of mineral salts at a low level. The interval time to be selected depends on the quality of the water and the type of unit. It may have to be adapted to the actual circumstances during operation. The following maintenance intervals can be selected. Unit type Condair Mk5 Visual/Process Position “S1” drain interval at 100% steam capacity 5-.. 8-.. - Page 41 Setting the maintenance interval (“S2”) The maintenance interval for the small and the extended maintenance is set with switch “S2”. When the set time has expired, a maintenance message indicates that the unit should be serviced. The intervals to be selected depend on the quality of the water and the type of unit. It may have to be adapted to the actual circumstances during operation. The following maintenance intervals can be selected: Unit type Condair Mk5 Visual/Process Position Interval for “S2” small maintenance extend. maintenance 5-.. 8-.. 10-.. 16-.. 20-.. 24-.. 30-.. 40-.. 50-.. 60-.. 80-.. 200 h 600 h 300 h...
-
Page 42: Putting Into Operation
• The following procedure should be carried out only on the first occasion that the unit is operated: • Carry out the software-dependent equipment settings (Condair service technician). Note: Information on the settings that can be made by the customer is provided in chapter 6.5). -
Page 43: Taking Out Of Operation
Remote operating and fault indication If your steam humidifier is equipped with the optional remote operating and fault indication (option “RFS”), the operating status will be shown as follows: Display on unit Meaning Activated remote display relay Steam production Green LED lit K1 “Steam production” Insoluble problem Red LED lit K2 “Error” Red LED flashing Fault elimination No message Steam cylinder service due Yellow LED flashing K3 “Maintenance”... -
Page 44: Interrogation Of The Operating Status
600/1200 Operation: Call up the display level with <B> or <A> <B> next operating parameter <A> previous operating parameter Exit the display level with <Menu> Note: 1) appears only if “controller funct” is active (“on”) 2) appears only if “softstart” is active (“on”) 3) appears only if “demineral. mode” is active (“on”) 4) appears only on Mk5 Process units... - Page 45 Description of the operating parameters on the display level The following describes the individual operating parameters that can be selected using the keys <B> and <A> , after the display level has been called-up. – Steam production steam-prod[kg/h] Current actual and nominal value of steam production in kg/h. ref.=50/act=25 – Nominal value: max. unit capacity x input signal value Note: if a capacity limitation is set the nominal value is given in brackets – Actual value: max. unit capacity x input signal value x capacity limitation Note: if the internal controller is activated only the actual value is shown. Under the following conditions the actual value may differ from the nominal value: upon activation of the heating power, if capacity limitation is active, dur- ing the filling cycle of the steam cylinder. – Analog input (humidity demand) analog input [%] Current value of the signal applied to the analog input in % of its max. value.
- Page 46 – Flushing cycle drain cycle The following indications are provided for the set flushing interval: 4: 120 Left: Switch setting on rotary switch “S1” Right: Set flushing interval Note: The flushing interval is set on switch “S1” on the control board. Please observe the notes in chapter 6.1. – Stand-by heating stand-by heating Stand-by heating activated (“on”)/deactivated (“off”). Note: If stand-by heating is active the water temperature in the steam cylinder is con s tantly kept at approx. 70 °C. Stand-by heating may be activated/deac- tivated with the DIP switch “S4-1” on the control board. Please observe the information given in chapter 6.1. – Capacity limitation power limit The set capacity limitation as a percentage of the maximum capacity.
- Page 47 – Inlet valve correction inlet valve cor. Set inlet valve correction (cycle ratio) in % of standard setting value to balance out water pressure variations. Note: This menu point is available only with Mk5 Process units. – Modbus address Modbus address Actual modbus address of the unit. Note: The modbus address is needed only for units with built-in telemonitoring interface or built-in RS232/RS485 serial interface. Detailed information about the telemonitoring interface and the serial interface can be found in the separate manuals that are supplied with these options. – Analog signal analog signal Range of the active analog signal in V or mA, respectively.
-
Page 48: Setting The Operating Parameters
– <B> Next menu item – <A> Previous menu item – For change to set values see the section “Changing the set values” – Exit the setting level with <Menu> Note: 1) appears only on Mk5 Process units 2) appears only if “controller funct” is activate (“on”) 3) appears only if “softstart” is activate (“on”) 4) appears only if “demineral. mode” is activate (“on”) - Page 49 Call-up of the setting level With the Condair Mk5 in normal operation: Mk5 Visual • Simultaneously depress the keys <B> and <A>. ready You are now prompted to enter the four digit access code “8808”. The digit on entry code the far left flashes. 9999 • Enter the access code “8808” as follows: Change the first digit with the keys <B> and <A>. Accept your input with the entry code key <C>. The next digit starts to flash. 8999 Repeat this step for the remaining digits. After acceptance of the last digit, the adjacent message appears briefly on the adjust level display to confirm that you are on the setting level. The first menu item then ap-...
- Page 50 100 % Setting range: 10…100 % Note: This parameter is used to limit the maximum performance in case the steam capacity exceeds the humidification required by your installation. – Inlet valve correction inlet valve cor. Setting the cycle frequency of the inlet valve in % of the standard setting. Note: This menu point is only given in Mk5 Process unit. Factory setting: 100 % 70-130 % Setting range: Comment: The water feed quantity can be reduced (value <100) or increased (value >100) with this parameter in order to balance out variations in water pressure.
- Page 51 – Proportional range (P-band) of the internal PI controller P-band [%] Proportional range of the internal PI controller in %. Note: This menu option is available only if the internal PI controller is ac- tive. Factory setting: 30 % Setting range: 4…100 % Note: The P-Range is used to smooth the control characteristic. Increasing the P-Range boosts the smoothing applied to the control characteristic.
- Page 52 Diagnose pgm The diagnostic program simulates various operating conditions of the steam hu- (ENTER=Entry) midifier. However, the diagnostic program requires in-depth knowledge of par- ticular internal functions of the unit. Therefore, the diagnostic program should be used by Condair service technicians only. – Error history faulthistory Numerical codes of the last 4 errors encountered (oldest entry far left). . / . /9.A/9.A Note: For detailed information on the meaning of particular error numbers please refer to chapter 6.7.
-
Page 53: Maintenance
– Only the type of maintenance work outlined in this documentation must be carried out. – Use original Condair spare parts exclusively to replace defective parts. – Before maintenance is initiated, the steam humidifier must be taken out of op- eration in accordance with instructions in chapter 6.3 and protected against unintentional switching on. -
Page 54: Dismantling And Re-Assembly Work
6.6.2 Dismantling and re-assembly work Note: The lime collector tank must be replaced every 5000 hours, or after 3 years at the latest. Removal of the lime collector tank Caution! Before commencing any dismantling work, the steam-air humidifier is to be taken out of operation as described in chapter 6.3 and rendered safe from inadvertent operation. 1. Empty the lime collector tank via the drain valve. Caution: Danger of scalding! The water in the lime collector tank may be hot. 2. Press the securing knob on both rotation locks. Then rotate both rotation locks clockwise and remove the lime collector tank downwards, from the base of the unit. - Page 55 Removal and dismantling of the steam cylinder Caution! Before commencing any dismantling work, the steam-air humidifier is to be taken out of operation as described in chapter 6.3 and rendered safe from inadvertent operation. Caution! If steam has been produced shortly before discontinuing operation, the steam cylin- der will be hot. Well-insulated gloves should therefore be worn when carrying out the removal operation. 1. Release the front door locking devices using a screwdriver (rotate 90° left) and remove the front doors.
- Page 56 7. Carefully lift off the cover with the heating rods. Warning! Take care with the cover whilst it is removed, so as not to damage the heating rods. Note: If the cover cannot be removed due to heavy calcification (maintenance period exceeded), place the steam cylinder in a basin of formic acid (8 %) until it can be removed (Caution! Observe instructions on the safe use of this cleaning agent). 8. If necessary, loosen the cylinder insert by lightly rotating it in either direction and lift it from the steam cylinder. Then remove the screen insert and the funnel insert. 9. If a heating element has to be replaced during servicing: first make a note of how the cables are connected and the position of the heating element.
-
Page 57: Notes On Cleaning
6.6.3 Notes on cleaning Cleaning the steam cylinder, lime collector tank, steam cylinder insert • Wherever possible, chip off the lime coating that has formed. • Wash parts with lukewarm soap suds and then rinse off well. Note: If the components are heavily scaled, place them in 8-percent formic acid until the scale has dissolved. Then treat components as previously described. Cleaning the heating elements • Immerse cover with heating elements fitted to 2 cm below the rim of the cover in a container with 8-percent formic acid. Allow the acid to take effect until the scale coating has dissolved. -
Page 58: Fault Elimination
Fault elimination 6.7.1 Fault indication In case of malfunction during operation, the humidifier control checks whether there is a temporary problem (e.g. water supply interrupted for a short time) or whether it can resolve the problem by taking necessary measures. Such malfunctions set the unit into the “Alarm” status (fault elimination). The red LED flashes and an alarm message appears in the display alternating with the notice “recover- ing - please wait”. Note: If the cause of the malfunction disappears of its own accord or if the controls can repair the mal- function, the alarm message will automatically switch off. Example of an “Alarm” indication red LED flashes Message in the display Error code Unit designation (A or B) Alarm 1A... -
Page 59: What, If
6.7.2 What, if..? Most operational malfunctions are not caused by faulty equipment but rather by improper installation or disregarding of planning guidelines. Therefore, a complete fault diagnosis always involves a thorough examination of the entire system. Often, the steam hose connection has not been properly executed, or the fault lies with the humidity control system. The following table gives a list of possible malfunctions, the appropriate alarm or error message, details of their cause, and notes on how to deal with each problem. Malfunction/Indication Cause Remedy Water feed to steam cylinder heavily calcified. Carry out major servicing. Min. filling time not reached Level in steam cylinder and level unit do not Error code: 1A/1B match. - Page 60 Malfunction/Indication Cause Remedy Drain pump not connected or faulty. Connect or replace drain pump. Max. flushing time exceeded Error code: 5A/5B Outlet lead from unit kinked or blocked. Inspect outlet lead from unit, replace if neces- sary. Alarm 5A Water outlet blocked (external outlet lead or Clean water outlet lead and siphon. drain siphon blocked. Error 5A Hoses to level unit blocked. Clean or replace hoses.
-
Page 61: Replacing Unit Fuses
F5 on control board 50 mA, quick-acting Control signal F1…F3 on power board 16 A, super quick-acting Heating elements (on short-circuit) (Mk5 Visual/Process 5-.. and 8-..) F1…F9 on power board 20 A, super quick-acting Heating elements (on short-circuit) (all other models) 6.7.4 Resetting fault indication “Error”... -
Page 62: Technical Data
Technical data Condair Mk5 Visual/Process 5-.. 8-... 10-.. 16-.. 20-.. 24-. 30-. 40-.. 50-.. 60-.. 80-.. Steam output 0 - 100 % infinitely variable Number of units Steam connection G 1 1/4” Resolution 1,0 % Control of steam output – active 0…20 V (Phase intersect), 0…10 VDC, 1…5 VDC, 0…5 VDC 0…4.25 VDC (Potentiometer), 0…1 VDC, 2…10 VDC... - Page 63 © Walter Meier (climate International) ltd. 2000, printed in switzerland technical modifications reserved...
- Page 64 consultIng, sales and servIce: JS Humidifiers plc Artex Avenue, Rustington, LITTLEHAMPTON, West Sussex BN16 3LN (United Kingdom) Phone +44 (0)1903 850 200, Fax +44 (0)1903 850 345 www.jshumidifiers.com, sales@jshumidifiers.com solutions for Indoor climate reg.no. 40002-2 Manufacturer: Walter Meier (climate International) ltd. talstr.
Need help?
Do you have a question about the Mk5 and is the answer not in the manual?
Questions and answers