Table of Contents
Advertisement
Quick Links
Service record Dynamis MV
Dynamis MV
Dynamis MV
Wheelchair described. Tools and specialist knowledge are required for
these settings. Please leave these adjustments to a qualified rehabili-
2021-01-12
Service record
Service record
All individual adjustments to the
tation specialist.
Service record Dynamis MV
Unique people, unique solutions.
Besondere Menschen, besondere Lösungen.
ENG
1 von 36
Advertisement
Table of Contents

Related Manuals for SORG Dynamis MV


Summary of Contents for SORG Dynamis MV
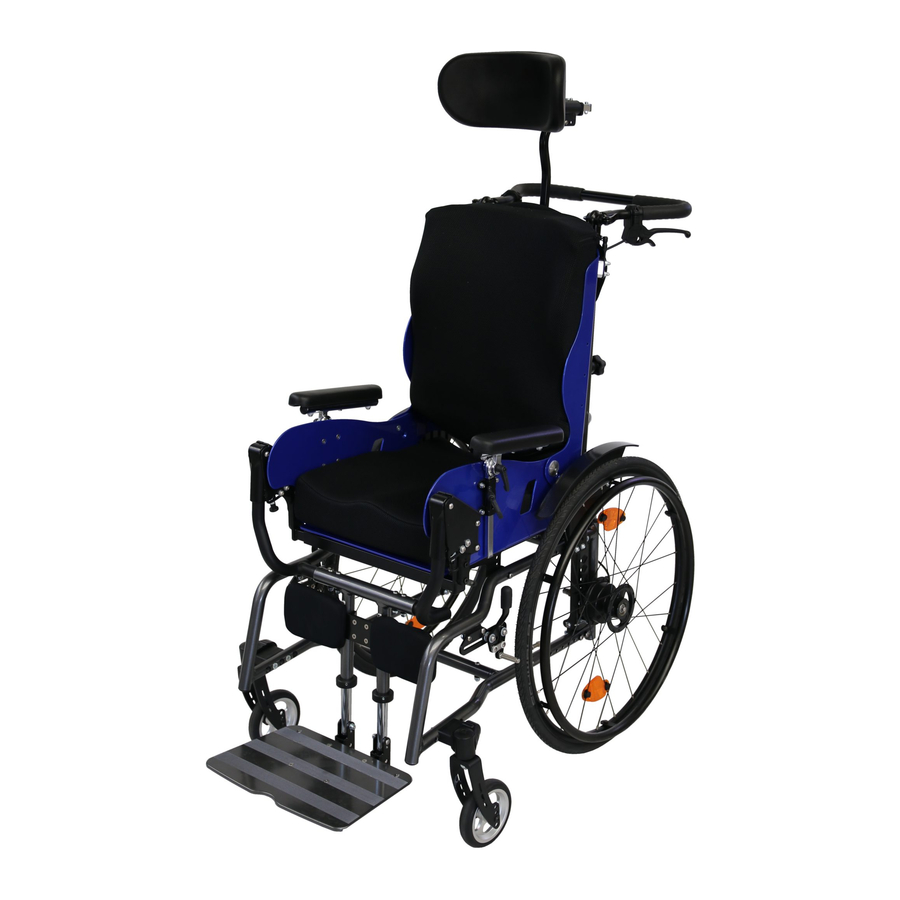
- Page 1 Service record Dynamis MV Dynamis MV Dynamis MV Service record Service record All individual adjustments to the Wheelchair described. Tools and specialist knowledge are required for these settings. Please leave these adjustments to a qualified rehabili- tation specialist. 2021-01-12 Service record Dynamis MV Unique people, unique solutions.
- Page 2 All content, especially texts, photographs and graphics, are protected by copyright. All rights, including copying, publishing, editing and translating, are reserved. © by SORG Rollstuhl- technik GmbH + Co. KG Benzstrasse 3-5, 68794 Oberhausen-Rheinhausen / Germany. You can find our general terms and condi- tions on our order sheets and at www.sorgroll-...
-
Page 3: Table Of Contents
3.9 Headrest assembly 3.9.1 Height adjustment 3.9.2 Depth adjustment and dynamics of the headrest 3.9.3 Adjust the inclination 3.10 Abduction wedge assembly 3.10.1 Depth adjustment 3.10.2 Height adjustment 3.11 Lateral support assembly 3.11.1 Nomenclature 2021-01-12 Service record Dynamis MV 3 von 36... -
Page 4: The Wheelchair At A Glance
17 star grip for height adjustment of the push handle 18 armrest 19 back guide 20 drive wheel 21 shock absorbers 22 Brake lever of the knee lever brake 23 caster wheel 4 von 36 Service record Dynamis MV 2021-01-12... -
Page 5: General Information
Slotted screwdriver • Plastic hammer • Side cutter • Thread locking liquid • Bicycle tube repair kit • Workbench / vice with plastic jaws • Special open-end wrench for adjusting the shock absorber 2021-01-12 Service record Dynamis MV 5 von 36... -
Page 6: Explanation Of Symbols
Front view Turn counterclockwise Rear view Steps to be performed at the same time Attach part Steps to be performed in se- quence Remove part Steps to be performed on both sides 6 von 36 Service record Dynamis MV 2021-01-12... -
Page 7: General Safety Information
In the combination of a wheelchair and an additional electric drive, particular loads occur that can damage the wheelchair. Approach obstacles slowly and overcome them carefully so that little force is exerted on the caster wheel, drive wheel and the wheelchair as a whole. 2021-01-12 Service record Dynamis MV 7 von 36... -
Page 8: Wheel Assembly
Remove the caster wheels at short intervals and thoroughly clean the forks, axles and sleeves. Please proceed in the same way with plastic forks. 8 von 36 Service record Dynamis MV 2021-01-12... -
Page 9: Rear Seat Height, Seat Inclination
9 Nm, screw (B) with 7 Nm An incorrectly set caster head inclination can lead to caster wheel flutter and when cor- nering (due to the wheel caster) to cumbersome "uphill and downhill driving". 2021-01-12 Service record Dynamis MV 9 von 36... -
Page 10: Camber
(A) and tighten the screws (A). The setting may not be possible if you want to widen the seat, otherwise you will have to unscrew the quick-release axle fittings too far out of the perforated plate. 10 von 36 Service record Dynamis MV 2021-01-12... -
Page 11: Track Compensation Drive Wheels
The wheelchair is delivered with the appropriate toe-in, depending on the camber setting and any installation of the SORG outdoor front end. When changing the camber or retrofitting the outdoor front end, it may be necessary to change the toe-in. -
Page 12: Ergo-Seat Assembly
To remove the ERGO seat, the screw connection of the back guide must be removed (2 A). In the next step, the screw connection on the seat frame must be removed (3 A). 12 von 36 Service record Dynamis MV 2021-01-12... -
Page 13: Growth In Seat Depth Ergo Seat
Put the seat support bracket in position, push the sleeves back into the selected holes (3 B) of the seat support bracket and tighten the screws on both sides. 2021-01-12 Service record Dynamis MV 13 von 36... -
Page 14: Increase Seat Width Ergo Seat And Back Unit
Now the previously removed screws are screwed in again in order to reconnect the seat side guard with the seat middle part. Please repeat the same step with the other side guard. 14 von 36 Service record Dynamis MV 2021-01-12... -
Page 15: Frame Assembly
• Vyou can find out analogously with all screw connections on the opposite side. • Then tighten the screws again. The traverses must be offset at the same distance on both sides. 2021-01-12 Service record Dynamis MV 15 von 36... -
Page 16: Back Assembly
(1). Please note the following steps: 1. Increase the counterforce (2): Turn the adjusting nut to the right with the help of the SORG open-end wrench. This increases the dynamism of the back. 2. Reduce the counterforce (3): Turn the adjusting nut to the left with the help of the SORG open-end wrench. -
Page 17: Legrest Assembly
The depth of the legrest can be continuously adjusted up to 8 cm. To do this, please follow the steps below: 1. Loosen the clamping screws (A) on the seat frame, then 2. Adjust the depth as desired. 3. Tighten the screws again and check. 2021-01-12 Service record Dynamis MV 17 von 36... -
Page 18: Adjusting The Height
1. Loosen the screws. (1A) 2. Now move the calf clamping plate and at- tach the removed elements in reverse order. 3. Make sure that all screws are properly tigh- tened. 18 von 36 Service record Dynamis MV 2021-01-12... -
Page 19: Height Adjustment Of The Footrest
When the footplate (s) is in use, both adjusting screws must lie firmly against the tubes (C) of the leg support. It is essential to avoid an uneven contact point for the adjus- ting screws. 2021-01-12 Service record Dynamis MV 19 von 36... -
Page 20: Brakes Assembly
(2) First check the tire pressure of the drive wheels (required information on the tire casing). To adjust the brake, loosen the two screws (C) on both sides, bring the brake body into the corres- ponding position and tighten the screws (C) again. 20 von 36 Service record Dynamis MV 2021-01-12... -
Page 21: Drum Brake
(B) again. Possible impairment of the braking force can result from incorrectly adjusted pulling force of the Bowden cable, defective Bowden cable, or dirty brake bodies / brake shoes. 2021-01-12 Service record Dynamis MV 21 von 36... -
Page 22: Anti-Tipper Assembly
Use a suitable saw to shorten the anti- tipper bar to the desired length • and put the anti-tipper wheel with hol- der back on. • Put the screw (B) in the appropriate hole (A) and tighten it again. 22 von 36 Service record Dynamis MV 2021-01-12... -
Page 23: Tilt Bracket Assembly
(B) in the frame. It is not possible to mount the tilt bar and anti- tipper on the same side of the frame at the same time. 2021-01-12 Service record Dynamis MV 23 von 36... -
Page 24: Headrest Assembly
The inclination of the headrest can be brought into the desired orientation by loosening the three screws (A) on the spherical head and then adjusting the shaped head part. The screws must then be tightened again. 24 von 36 Service record Dynamis MV 2021-01-12... -
Page 25: Abduction Wedge Assembly
2. Remove the clamping cone and pull out the star grip with the threaded rod. 3. Set the desired height and 4. Put everything back together in reverse order. The protruding adjustment part (2 A) must now be sawed off. 2021-01-12 Service record Dynamis MV 25 von 36... -
Page 26: Lateral Support Assembly
Horizontal extension (6) An additional horizontal extension can be achieved by inserting an extension piece (spare part). Remove screw (6C), insert extension pie- ce and screw tight again at both ends. 26 von 36 Service record Dynamis MV 2021-01-12... -
Page 27: Fine Adjustment Of The Lateral Support Holder
(8) When all positioning and extension work has been carried out, close the pads, align the joints in the required position and tighten all joint screws (6A) firmly. Fix the ball joint by tightening the four screws (B). 2021-01-12 Service record Dynamis MV 27 von 36... -
Page 28: Repairs / Maintenance / Re-Use
Set the seat tilt (if available) to 90 ° • If necessary, pack removable textile parts in foil or similar • Secure the wheelchair against rolling away and soiling • Storage in a dry environment without aggressive environmental influences 28 von 36 Service record Dynamis MV 2021-01-12... -
Page 29: Lifespan
For safety reasons and to maintain product liability, an inspection by your specialist retailer is re- quired at least once a year. This must be carried out and documented according to the checklist on the following page. 2021-01-12 Service record Dynamis MV 29 von 36... - Page 30 Locking mechanisms (tripod springs of the push handles, quick release axles, eccentric clamps, etc.) checked for functionality, Anti-tipper checked for tight fit and functionality. Oil: Moving parts and bearings are oiled Final check: Functional check of all mechanical adjustment devices carried out 30 von 36 Service record Dynamis MV 2021-01-12...
-
Page 31: Technical Data
Frame size 1, seat frame, 22 '' wheels with Minimum empty weight. with RB 300 drum brakes, PU caster wheels, legrests, push mm, 20 '' rear wheels, 5 '' PU caster wheels 2021-01-12 Service record Dynamis MV 31 von 36... -
Page 32: Meaning Of The Labels
5.3 Declaration of Conformity SORG Rollstuhltechnik declares that the Dynamis MV product is a class 1 device and that it com- plies with the relevant provisions of EC Directive 93/42 / EEC Appendix VII on medical products. This was verified by a conformity assessment procedure in accordance with the medical device guidelines Annex VII. - Page 33 Notes: 2021-01-12 Service record Dynamis MV 33 von 36...
- Page 34 Notes: 34 von 36 Service record Dynamis MV 2021-01-12...
- Page 35 Notes: 2021-01-12 Service record Dynamis MV 35 von 36...
- Page 36 Service record Dynamis MV SORG Rollstuhltechnik GmbH + Co. KG Benzstraße 3-5 68794 Oberhausen-Rheinhausen Germany Fon +49 7254 9279-0 Fax +49 7254 9279-10 info@sorgrollstuhltechnik.de www.sorgrollstuhltechnik.de Retailer stamp...
Need help?
Do you have a question about the Dynamis MV and is the answer not in the manual?
Questions and answers