
Related Manuals for Sole Fitness SB900


Summary of Contents for Sole Fitness SB900
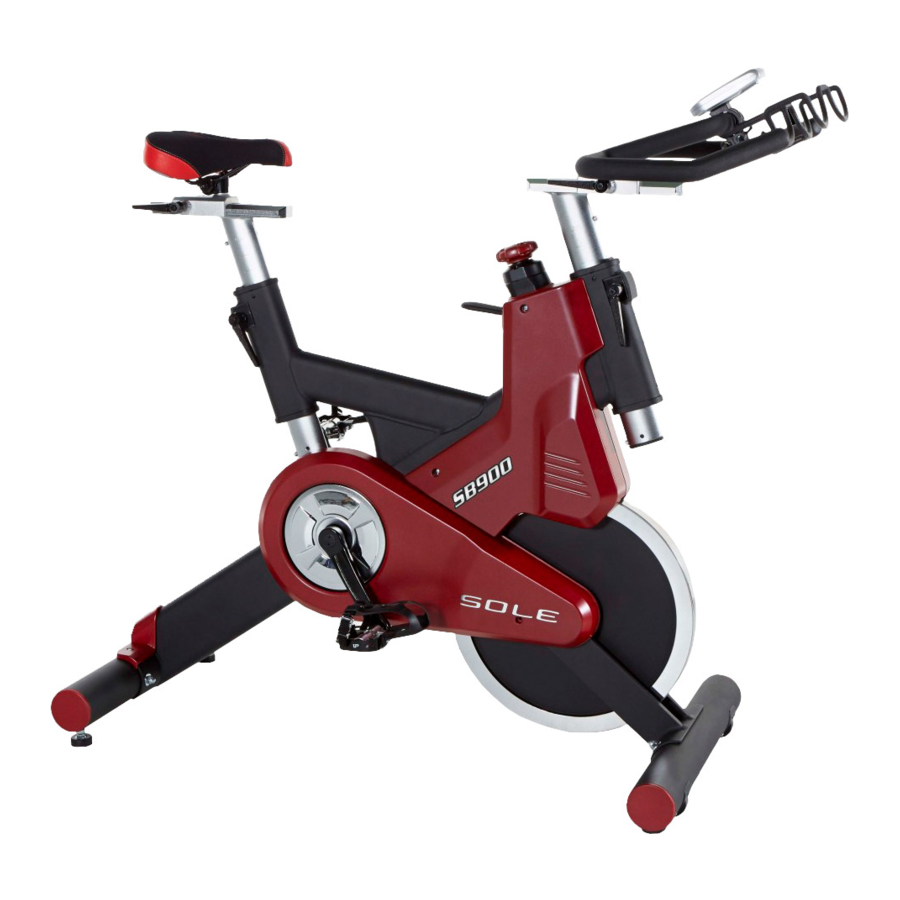
- Page 1 OWNERÊS MANUAL PLEASE CAREFULLY READ THIS ENTIRE MANUAL BEFORE OPERATING YOUR NEW INDOOR CYCLE! ...
-
Page 2: Table Of Contents
TABLE OF CONTENTS Important Safety Instructions Important Operation Instructions SB900 Assembly Instructions Operation of Your New Indoor Cycle Exploded View Drawing Parts list ... -
Page 3: Important Safety Instructions
5. Proper installation and regular maintenance are required to ensure user’s safety. Maintenance is the sole responsibility of the owner. SB900 INDOOR CYCLE... - Page 4 SB900 ASSEMBLY PACK CHECKLIST HARDWARE STEP 1 #82. 3/8” #81. 3/8” x 3-1/2” #83. 3/8” x 23mm Nut (4 pcs) Carriage Bolt (4 pcs) Curved Washer (4 pcs) HARDWARE STEP 2 ...
- Page 5 #101. 4 × 16mm_ Sheet Metal Screw (3 pcs) ASSEMBLY TOOLS #85.14/15m/m_Wrench #86. M5_Combination M5 Allen Wrench & Phillips Head Screw Driver #145.13/14m/m_Wrench SB900 INDOOR CYCLE ...
-
Page 6: Sb900 Assembly Instructions
SB900 ASSEMBLY INSTRUCTIONS PRE-ASSEMBLY 1. Using a razor knife (Box Cutter) cut the outside, bottom, edge of box along the dotted Line. Lift Box over the unit and unpack. 2. Carefully remove all parts from carton and inspect for any damage or missing parts. - Page 7 1. Install the rear stabilizer cover with two Phillips Head Screws (91). CONSOLE 1 – Console 2 – Clamp mounting screw 3 –Mounting Clamp SB900 INDOOR CYCLE...
- Page 8 1. Install the Handlebar( ). Fixing Plate( ) and Sliding Handlebar Mount( ) with four M8 × P1.25 × 20L Button Head Socket Bolts ( ), four 5/16"× 16 × 1T_Flat Washers ( )). Tighten the bolts securely by using the M5_ Combination M5 Allen Wrench & Phillips Head Screw Driver ( ). 2. Install the Drink Bottle Holder(L) ( )and Drink Bottle Holder(R) ( ) with four 5/16" × 15L_Button Head Socket Bolt ( ) and four 5/16" × 7T_Nylon Nut ( )by using the M5_Combination M5 Allen Wrench & Phillips Head Screw Driver ( )and 13/14m/m_Wrench( ). SB900 INDOOR CYCLE ...
- Page 9 1. Install the Left (25L) and Right (25R) pedals to the crank arms. Please note that the Left pedal has a reverse threaded bolt and needs to be tightened in a counterclockwise direction. The pedals are identified by either an R or L stamped into the end of the bolt. SB900 INDOOR CYCLE ...
- Page 10 When new batteries are installed in the transmitter or console you must perform the synchronizing procedure below for the console to work properly After synchronizing, make sure the wire from transmitter is wrapped around the plastic as in the above image. Reinstall left cover. SB900 INDOOR CYCLE...
- Page 11 2. Install and slightly tighten the thumb screw (4) then adjust the console angle for optimal visibility. Once the console is adjusted, continue to tighten the screw until it is securely attached to the handle bar. *See P.9 for replacing transmitter battery. SB900 INDOOR CYCLE...
-
Page 12: Operation Of Your New Indoor Cycle
This is measured by RPM. CALORIES (KCAL) Kcal is the approximation of calories burned during work out. Calories are calculated by measuring rider’s instantaneous heart rate, age, and weight. SB900 INDOOR CYCLE... - Page 13 If user presets the COUNT DOWN TIME, the TIME will count down to zero with flashing display, then, start counting up the Timer. Under DIST or KCAL, user can go into TIMER setting by holding ‘PAGE’ key for 3 seconds. SB900 INDOOR CYCLE...
- Page 14 1. Please download Kinomap / Zwift from Google Play/APP Store 2. After open the APP, press the phone icon on bike console. 3. After APP search for bike console, the bike console will display the pairing interface. 4. Video of pairing process SB900 INDOOR CYCLE...
- Page 15 1. Log in to Zwift 2. Select power source and cadence, system will prompt you to select machine 3. SB900 INDOOR CYCLE...
- Page 16 4. Select ride to start 5. Enjoy the ride! SB900 INDOOR CYCLE...
- Page 17 1. Select “More” on the bottom right corner 2. Select equipment management SB900 INDOOR CYCLE...
- Page 18 3. Select “+” on the top right corner 4. Select exercise bike SB900 INDOOR CYCLE...
- Page 19 5. Select “sensor” at the very bottom 6. Select “FTMS” SB900 INDOOR CYCLE...
- Page 20 7. Select machine you wish to connect 8. Successfully paired machine will show up on this page SB900 INDOOR CYCLE...
- Page 21 9. Go to browse to select a video you would like to play 10. Select start SB900 INDOOR CYCLE...
- Page 22 11. Press start on the console when kinomap ask you to start pedaling 12. Enjoy the ride! This console is compatible with most virtual active apps available SB900 INDOOR CYCLE...
- Page 23 Loosen the quick release under the handlebar and slide the handlebar forward or backward as desired. A suitable forward/aft position should allow the rider to comfortably grasp the handlebar with a slight bend at the elbow. Tighten the quick release to secure the handlebar assembly. SB900 INDOOR CYCLE...
- Page 24 Binding tension is adjustable and should be set so that cleat and shoe do not disengage when pedaling. Use an Allen key to turn tension adjusting screws, clockwise to increase binding tension, counterclockwise to decrease binding tension. SB900 INDOOR CYCLE...
- Page 25 1. Do not service internal parts of pedals. If they are found to be worn internally, we recommend replacing the pedal. 2. Use of lubricants or cleaning solutions other than those so specified will result in diminished performance and a shorter life span for that part. SB900 INDOOR CYCLE...
- Page 26 EXPLODED VIEW DIAGRA SB900 INDOOR CYCLE ...
- Page 27 Drive Pulley Crank Arm(L) Crank Arm(R) Crank Arm Dust Cap Crank Axle Ø8 × Ø16 × 1T_Flat Washer Ø8 × 1.5T_Split Washer Transportation Wheel M8 × P1.25 × 10L_Button Head Socket Bolt Ø35 × 10m/m_Rubber Foot SB900 INDOOR CYCLE ...
-
Page 28: Exploded View Drawing
4 × 16L_Sheet Metal Screw 3.5 × 12L_Sheet Metal Screw Braking Magnet Magent Base Magnet Separator M3 × P0.5 × 6L_Socket Head Cap Bolt Ø4 × Ø14 × 1T_Flat Washer M4 × P0.7 × 8L_Phillips Head Screw SB900 INDOOR CYCLE ... - Page 29 5/16" × UNC18 × 5/8"_Button Head Socket Bolt Tablet Holder (Bottom) Tablet Holder Adjustable Clip 138-1 Tablet Holder (Front) 138-2 Fixing Plate Drink Bottle Holder(L) Drink Bottle Holder(R) 5/16" × 15L_Button Head Socket Bolt 5/16" × 7T_Nylon Nut 13/14m/m_Wrench SB900 INDOOR CYCLE ...
Need help?
Do you have a question about the SB900 and is the answer not in the manual?
Questions and answers