Table of Contents
Advertisement
Quick Links
Advertisement
Table of Contents

Related Manuals for BZB Gear BG-HDVS42U


Summary of Contents for BZB Gear BG-HDVS42U
- Page 1 BG-HDVS42U MICRO 4 CHANNEL HDMI LIVE STREAM MULTI-FORMAT VIDEO SWITCHER...
- Page 2 USING THE UNIT SAFELY Before using this unit, please carefully review the following information concerning the proper operation of the unit. To ensure that you are getting the most out of your product review the manual in its entirety. This manual should be saved and kept on hand for future reference. Warning and Precautions ※...
-
Page 3: Table Of Contents
CONTENTS 1. BRIEF INTRODUCTION ................... 1 1.1. Overview ........................... 1 1.2. Main Features........................1 2. INTERFACES ......................2 2.1. Interface Overview ......................2 2.2. Tally PIN Definition ......................2 3. SPECIFICATION ....................... 3 4. FRONT CONTROL PANEL ..................4 5. POWER ON/ OFF ...................... 5 6. - Page 4 11.1. Output Interfaces ......................18 11.2. Multiview Out ........................ 18 11.3. PGM Out ........................18 11.4. USB Out ........................18 11.5. Output Format Setting....................19 11.6. FTB ..........................20 12. AUDIO SETTING ....................21 12.1. Master Audio ........................ 21 12.2. Audio On (MIX) ......................21 12.3.
-
Page 5: Brief Introduction
1. BRIEF INTRODUCTION 1.1. Overview The BG-HDVS-42U is a 4-channel HDMI multi-format video Switcher with a compact metal case design. It supports various functions including video switching, audio mixing, PGM/ Multiview/ Aux out, different transition effects, Luma Key, Chroma Key, DSK, LOGO, PIP/ POP, media library, pattern, and color generator, and more. -
Page 6: Interfaces
2. INTERFACES 2.1. Interface Overview MIC/Line level IN × 2 HDMI IN × 4 MULTIVIEW(AUX) OUT × 1 PGM(AUX) OUT × 1 USB OUT × 1 (for live streaming on PC) LAN port for PC software control GPIO (for tally) DC 12V IN ×... -
Page 7: Specification
3. SPECIFICATION CONNECTION Video In HDMI type-A ×4 HDMI type-A PGM ×1 HDMI type-A Multiview ×1 Video Out USB2.0 type C ×1 (Streaming on PC) Assignable HDMI 1~4, PGM, Clean PGM, PVW, Color bar, Multiview Audio In MIC/ Line level (3.5mm stereo audio) ×2 PC Control Port LAN×1 Media Library... -
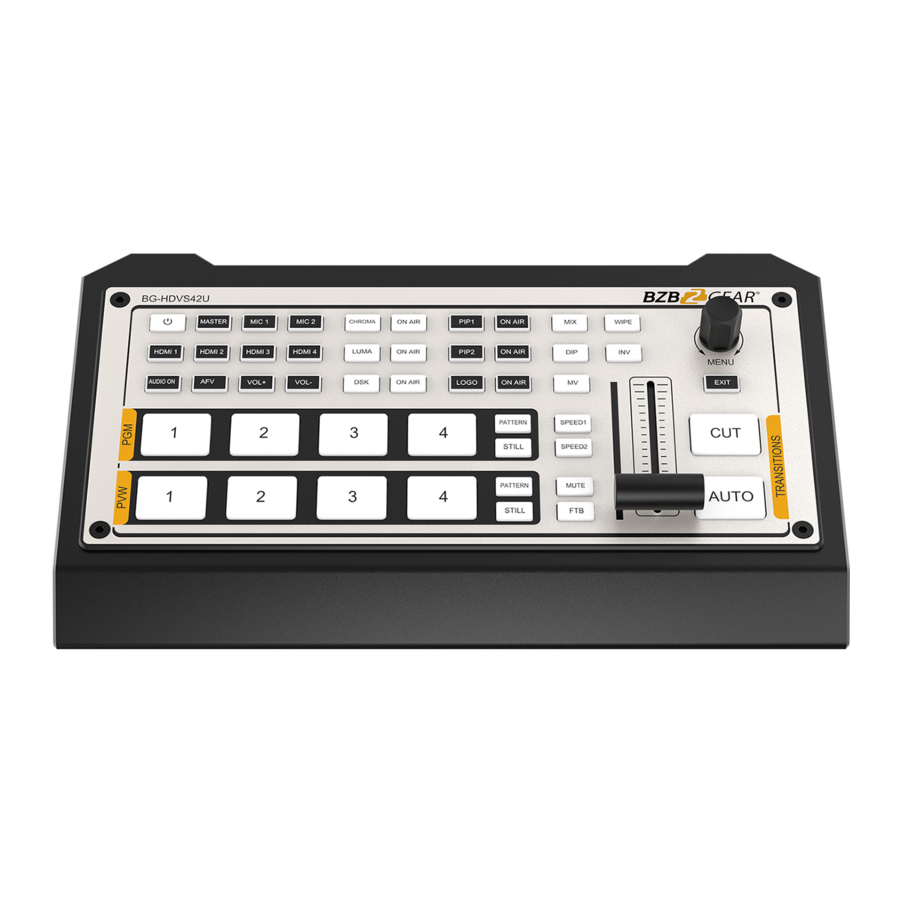
Page 8: Front Control Panel
Image format support: png, bmp, jpg Logo format support: png, bmp, jpg; Logo size support: 10×10 pixel to 600×600 pixel OTHERS Power Wide voltage: 7~24V; Operating power:12W (12V 1A) Dimension (LWD) 244.5 × 143.2 × 44.5mm Weight Net: 1030g; Gross: 1500g Temperature Working: -20℃~60℃, Storage: -30℃~70℃... -
Page 9: Power On/ Off
freezes the input source image (Refer to Part 7.2). Configure the audio of each channel, including AFV or audio mix mode, AUDIO audio source selecting, volume + & volume - DSK: Enable the downstream key ON AIR: Put the DSK on air CHROMA: Enable the Chroma Key LUMA: Enable the Luma Key CHROMA KEY... -
Page 10: Multiview
6. MULTIVIEW The switcher provides two HDMI outputs (PGM/Multiview). Both ports are assignable AUX outputs that are user assignable as HDMI 1/ HDMI 2/ HDMI 3/ HDMI 4/ PGM/ Clean PGM/ PVW/ Color Bar/ Multiview output (Refers to Part 6). Connecting the HDMI Multiview out to an additional monitor will provide the Multiview image. -
Page 11: Layouts
The information on the status page will be updated in real time as the settings are changed. Pressing the menu button on the switcher will open the menu page as shown in the image below. 6.2. Layouts There are two Multiview layouts which can be selected. Simply switch between the horizontal layout and vertical layout from the menu as shown in the images below. -
Page 12: Audio Meter
Vertical: 6.3. Audio Meter There are audio meters in each window of the Multiview, including HDMI1-4, PGM and MIC to show the audio level of each input. The audio meters of MIC 1 and MIC 2 show in the left and right of PVW window. Users can turn on/off all or individual audio meters from the menu. -
Page 13: Umd Settings
6.5. UMD Settings The default UMD of the four inputs are HDMI1, HDMI2, HDMI3, HDMI4. Users can turn on/off the UMD in each window. Users can also set the overlay Opacity (50%, 75%, 100%), Size (Small/Medium/Large), Position & (1-100), Foreground color, Background Color. -
Page 14: Pgm Pvw Switching
7. PGM PVW SWITCHING 7.1. PGM PVW Channel Selection Choose the PGM and PVW sources from their corresponding row and enable/disable PATTERN (different patterns can be configured in the menu, refer to Part 13.1) on the front panel. The selected button for PGM will turn red and the selected button for PVW will turn green. -
Page 15: Transition: Cut/ Auto/ T-Bar
7.3. Transition: CUT/ AUTO/ T-BAR There are two transitional control types for this video switcher: Transition without effects (CUT) and Transition with effects (AUTO, T-Bar). CUT performs a simple immediate switch between Preview and Program. This is no delay providing seamless switching, and the selected transition effect WIPE, MIX or DIP is not utilized. -
Page 16: Mix
8.3. MIX Press the MIX button to perform the MIX transition effect. 8.4. Transition Speed Setting Users can set two speeds of transition on the menu, as well as define the speed value which can be saved and will correspond to the Speed 1 or Speed 2 button. The higher value, the slower the transition speed, selectable range is between 0.1s - 8.0s. -
Page 17: Chroma Key
Menu Sub-Menu Item Parameter Default Luma Status OFF/ KEY (PVW)/ ON AIR (PGM)/ KEY & ON AIR Black/ Color Bar/ Color 1/ Color 2/ HDMI 1/ HDMI Fill Source Color1 2/ HDMI 3/ HDMI 4/ Image Black/ Color Bar/ Color 1/ Color 2/ HDMI 1/ HDMI Key Source Image 2/ HDMI 3/ HDMI 4/ Image... - Page 18 Press the CHROMA key button, press the Menu knob and choose Chroma to configure the effect of Chroma Key, including the key source, Key color, Clip, Gain, Key Fetch and Mask, etc., detailed parameters setting as below. Press the ON AIR button next to the CHROMA button to enable the KEY on PVW. Use the AUTO key or T-Bar control to switch the PVW with key to PGM.
-
Page 19: Pip & Pop
Mask Right 0%-100% Mask Bottom 0%-100% 9.2. PIP & POP The video switcher supports two groups PIP or one POP. When pressing PIP1 or PIP2 button, there will be a small image display on the top left corner of PVW window. Press the Menu knob and choose the PIP setting interface, user can set parameters including position, size, border, etc. -
Page 20: Downstream Key
DOWNSTREAM KEY 10.1. DSK Press the DSK button to Mask the DSK signals utilizing the mask signal of the source. The source (Fill Source, Key Source), Clip, Gain and mask (Mask Enable, Mask Left, Mask Top, Mask Right, Mask Bottom) of DSK can be set from the menu. Options are detailed below. Press the ON AIR button next to the DSK button to enable the KEY on PGM. -
Page 21: Logo
Mask Top 0%-100% Mask Right 0%-100% Mask Bottom 0%-100% 10.2. LOGO This switcher permits users to import logos. Press the menu knob and choose the logo setting interface, this is where the user can choose a logo from the media pool on the USB disk and set the position, size, and opacity. Rotate the menu knob to choose the logo, press the Menu knob to select and delete a logo. -
Page 22: Output Setting
OUTPUT SETTING 11.1. Output Interfaces The HDVS42U has 3 output interfaces, Multiview Out, PGM Out and USB-C Out. The 3 outputs can also be assigned as AUX OUT for HDMI1, HDMI2, HDMI3, HDMI4, PVW, PGM, Clean PGM, Color Bar and Multiview out. 11.2. -
Page 23: Output Format Setting
and UAC (USB audio class) standards. No additional drivers need to be installed. The video source of USB for the PGM output can be associated with HDMI1, HDMI2, HDMI3, HDMI4, PVW or the Clean PGM output. This means users can capture any input source for live streaming capabilities. -
Page 24: Ftb
11.5.3. PGM and Multiview Color Space There are YUV, RGB Full, RGB Limit color space options for PGM and Multiview out. The default color space of the output is YUV. 11.6. FTB The FTB (Fade to black) feature is usually for an emergency situation when using the switcher for a live event. -
Page 25: Audio Setting
AUDIO SETTING All audio statuses are displayed in the status page of Multiview, and in each Multiview window there is an audio meter for monitoring status of all the audio inputs. =Audio off; =Audio on, AFV off; =Audio on, AFV on & activated; =Audio on, AFV on &... -
Page 26: Audio Delay
12.4. Audio Delay In the menu there is an audio delay setting for HDMI 1, HDMI 2, HDMI 3, HDMI 4, MIC 1 and MIC 2. Users can adjust the audio delay to make the audio and video synchronization. One level of the audio delay setting equal 5ms. -
Page 27: Audio Keyboard Configuration
12.7. Audio Keyboard Configuration The audio not only can be configured in the menu, but it can also be configured using the keyboard control of the switcher. The keyboard includes two parts as below image. Part A is for selecting one audio to be configurated, including Master, MIC 1, MIC 2, HDMI 1, HDMI 2, HDMI 3 and HDMI 4. -
Page 28: Mute
When any button in Part-A is pressed and the indicator for the button in Part B turns green it means the corresponding audio function is ON. When the indicator is OFF it means the corresponding function is OFF. In the example image, after pressing the HDMI 1 button, the indicator for HDMI continues flashing. -
Page 29: Media Library
MEDIA LIBRARY 13.1. PVW Pattern & PGM Pattern The switcher can generate patterns for PVW and PGM. The PVW/PGM pattern source can be selected from the Color Bar, Black, Color 1, Color 2 and Image. 13.2. User-defined Color Pattern There are two color patterns Color 1 and Color 2 for user-definition. Users can set the hue, saturation, and luminance to generate the color pattern for Color 1 and Color 2. - Page 30 13.3.2. Local Image The local images are the images which you upload from USB disk. When you plug in a USB drive, a USB icon will appear in the bottom of the Status/Menu page. The image list from USB disk displays on the right side of the menu.
-
Page 31: System Setting
- Factory Reset: Restore all settings to default Factory Settings. 14.4. Download The BG-HDVS42U comes with a free PC control software. Users can connect the switcher with a windows OS computer via LAN port to have remote control. The software and user manual can be downloaded from www.bzbgear.com. -
Page 32: Network Setting
14.6.2. Time Synchronization Connect the video switcher to a PC (windows OS) via LAN port and use the control software to search for the device. The time will automatically synchronize once the video switcher is discovered on the network. 14.7. Network Setting There is a switch setting for DHCP in the menu. - Page 33 14.8.2. Rename Rename the current user account name. 14.8.3. Switch Switch to another saved user account to have the saved settings easily and quickly. Meanwhile, the Username will be updated in the bottom of the Status/Menu page after switching. 14.8.4. Delete Delete a saved user account which you will never use again.
-
Page 34: Warranty / Mission Statement
Warranty BZBGEAR wants to assure you peace of mind. All BZBGEAR cameras and camera-related products include our Stress-Free Three-Year Warranty. For complete warranty information, please visit BZBGEAR.com/warranty. For questions, please call 1.888.499.9906 or email support@bzbgear.com. Mission Statement BZBGEAR manifests from the competitive nature of the audiovisual industry to innovate while keeping the customer in mind.
Need help?
Do you have a question about the BG-HDVS42U and is the answer not in the manual?
Questions and answers
Why is my screen pink