
Related Manuals for BZB Gear BG-PS21-4K


Summary of Contents for BZB Gear BG-PS21-4K
- Page 1 User Manual BG-PS21-4K 18G 2x1 Presentation Switcher with Soft Codec and CEC All Rights Reserved...
- Page 2 Preface Read this user manual carefully before using the product. Pictures shown in this manual are for reference only. Different models and specifications are subject to real product. This manual is only for operation instruction, please contact the local distributor for maintenance assistance.
- Page 3 SAFETY PRECAUTIONS To ensure the best from the product, please read all instructions carefully before using the device. Save this manual for further reference. Unpack the equipment carefully and save the original box and packing material for possible future shipment. Follow basic safety precautions to reduce the risk of fire, electrical shock and injury to persons.
-
Page 4: Table Of Contents
Table of Contents 1. Product Introduction ....................1 1.1 Features ......................1 1.2 Package List ....................... 2 2. Specification ........................ 3 3. Panel Description ......................5 3.1 Front Panel ......................5 3.2 Rear Panel ......................6 4. System Connection ..................... 7 4.1 Usage Precaution .................... -
Page 5: Product Introduction
1. Product Introduction Thanks for choosing the HDMI 2.0 2x1 Presentation Switcher. The switcher is designed to switch HDMI input or USB-C input to one HDMI output. It supports video resolution up to 4Kx2K@60Hz 4:4:4 8bit, 1080P, and 3D. In addition, there is smart built-in EDID setting can be selected by the 4-pin DIP switch on the front panel. -
Page 6: Package List
1.2 Package List 1x BG-PS21-4K 18G 2x1 Presentation Switcher 2x Mounting Ears with 4 Screws 4x Plastic Cushions 1x 5-pin Terminal Block 1x RS232 Cable (3-pin terminal block to DB9) 1x Power Cord 1x Power Adapter (24V DC, 2.71A) 1x User Manual Note: Please contact your distributor immediately if any damage or defect in the components is found. -
Page 7: Specification
2. Specification Video Video Input (1) HDMI, (1) USB-C Video Input Connector (1) Type-A female HDMI, (1) Type-C USB HDMI Input Resolution Up to 4Kx2K@60Hz 4:4:4 8bit USB-C Input Resolution Up to 4Kx2K@30Hz 4:4:4 Video Output (1) HDMI Video Output Connector (1) Type-A female HDMI HDMI Output Resolution Up to 4Kx2K@60Hz 4:4:4 8bit... - Page 8 Bandwidth 18Gbps Operation Temperature -10℃ ~ +55℃ Storage Temperature -25℃ ~ +70℃ Relative Humility 10% ~ 90% External Power Supply Input: AC 100~240V, 50/60Hz, Output: 24V DC 2.71A Power Consumption 54W (Max) Dimension (W*H*D) 168.0mm x 24.5mm x 95.0mm Net Weight 245g...
-
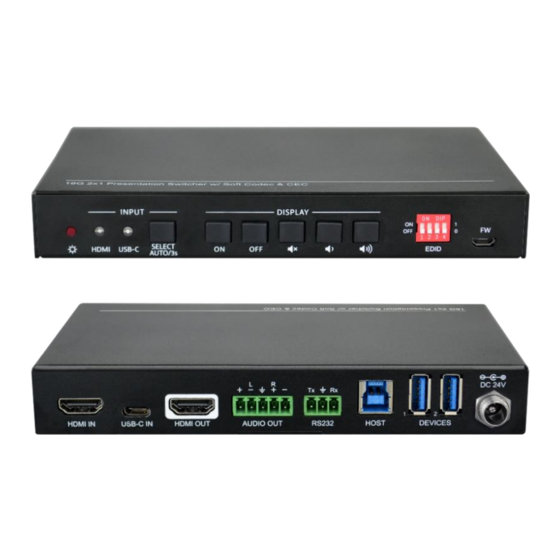
Page 9: Panel Description
3. Panel Description 3.1 Front Panel INPUT DISPLAY 1 2 3 4 SELECT HDMI USB-C EDID AUTO/3s ① Power LED: The LED illuminates red when the device is power on. ② INPUT: A. HDMI: The LED illuminates green when the HDMI input is selected in AUTO mode, or illuminates orange when the HDMI input is selected in manual mode. -
Page 10: Rear Panel
3.2 Rear Panel DC 24V HDMI IN USB-C IN HDMI OUT AUDIO OUT RS232 HOST DEVICES ① HDMI IN: Type-A female HDMI input port to connect HDMI video source. ② USB-C IN: Type-C USB with charging capability to connect the Macbook or other device with SlimPort output. -
Page 11: System Connection
4. System Connection 4.1 Usage Precaution Make sure all components and accessories included before installation. System should be installed in a clean environment with proper temperature and humidity. All of the power switches, plugs, sockets, and power cords should be insulated and safe. -
Page 12: Button Control
5. Button Control 5.1 Manual Switching When the switcher is in the manual switching mode, press the SELECT AUTO/3s button repeatedly to cycle through the two video inputs, and the corresponding source LED illuminates orange immediately. 5.2 Automatic Switching Press and hold the SELECT AUTO/3s button at least three seconds to enable automatic switching. -
Page 13: Edid Setting
signal within the setting time (default 10mins), automatically send RS232 and CEC commands to turn off the display device. The RS232 command can be set by sending commands, please refer to the 6.2.7 Third-party Device Control for more details. 5.4 EDID Setting The Extended Display Identification Data (EDID) is used for the source device to match its video resolution with the connected display. -
Page 14: Rs232 Control
6. RS232 Control Connect the RS232 port to control device (e.g. PC) with RS232 cable. The switcher can be controlled by sending RS232 commands. 6.1 RS232 Control Software Installation: Copy the control software file to the control PC. Uninstallation: Delete all the control software files in corresponding file path. Basic Setting: Connect the switcher with all input devices and output devices needed, then to connect it with a PC which is installed with RS232 control software. - Page 15 The main view is shown as below: Parameter configuration area Monitoring area, show the commands and its feedback information. Command sending area Operation area Please set the parameters of COM number, bound rate, data bit, stop bit and the parity bit correctly, and then you are able to send command in command sending area.
-
Page 16: Rs232 Command
6.2 RS232 Command Communication protocol: RS232 Communication Protocol Baud rate: 9600 Data bit: 8 Stop bit: 1 Parity bit: none Note: All commands need to be ended with “<CR><LF>”. In the commands, “[”and “]” are symbols for easy reading and do not need to be typed in actual operation. -
Page 17: User-Defined Edid
6.2.3 User-defined EDID There are five EDID values can be customized by sending the below command. Command Function & Operation [PARAM]=1~5, represents the EDID, its DIP switch status shows as below: [PARAM] DIP Switch Status 1011 1100 1101 1110 1111 #UPLOAD_USER_EDID Operation: [PARAM]. -
Page 18: Cec/Rs232 Function Setting
6.2.5 CEC/RS232 Function Setting The ending mark of command is “<CR><LF>”. Command & Feedback Command Description Example Enable the function of automatically sending CEC commands. When detecting video input signal or not #SET_SYNCACT_CEC 1 @SYNCACT_CEC 1 detecting any video signal, the switcher will automatically send the corresponding CEC command to control the display device. -
Page 19: Display Control
6.2.6 Display Control Command & Feedback Command Description Example Mute/unmute the display audio through #SET_AUDIO_MUTE @AUDIO_MUTE_UNMUTE CEC and RS232 channels. Increase the display audio through CEC #SET_VOL + @VOL - and RS232 channels. Decrease the display audio through CEC #SET_VOL - @VOL + and RS232 channels. -
Page 20: Third-Party Device Control
6.2.7 Third-party Device Control Connect a third-party device (e.g. projector) to the RS232 port of switcher, the third-party device can be controlled simultaneously by the below RS232 commands while press the front panel button (ON, OFF, MUTE, VOLUME + or VOLUME -). Note: The below commands don’t need ending mark. - Page 21 Command & Feedback Command Description Example Set the ASCII RS232 command XXXX to #SET_OF_05_30:ABCDEFG be sent to control the third-party device when the DISPLAY OFF button is pressed. [PARAM1] = 00~06 (Baud Rate) 00 - 115200 01 - 57600 @BAUDRATE: 4800 #SET_OF_[PARAM1]_ 02 - 38400 @DELAY TIME: 30 s...
- Page 22 Command & Feedback Command Description Example Set the ASCII RS232 command XXXX to #SET_AM_05_30:ABCDEFG be sent to control the third-party device when the VOLUME MUTE button is pressed. [PARAM1] = 00~06 (Baud Rate) 00 - 115200 01 - 57600 @BAUDRATE: 4800 #SET_AM_[PARAM1]_ 02 - 38400 [PARAM2]:XXXX...
- Page 23 Command & Feedback Command Description Example Set the ASCII RS232 command XXXX to #SET_AU_05_30:ABCDEFG be sent to control the third-party device when the VOLUME UP button is pressed. [PARAM1] = 00~06 (Baud Rate) 00 - 115200 01 - 57600 @BAUDRATE: 4800 #SET_AU_[PARAM1]_ 02 - 38400 @DELAY TIME: 30 s...
- Page 24 Command & Feedback Command Description Example Set the ASCII RS232 command XXXX to #SET_AD_05_30:ABCDEFG be sent to control the third-party device when the VOLUME DOWN button is pressed. [PARAM1] = 00~06 (Baud Rate) 00 - 115200 01 - 57600 #SET_AD_[PARAM1]_ 02 - 38400 @BAUDRATE: 4800 [PARAM2]:XXXX...
-
Page 25: Panel Drawing
7. Panel Drawing 168.0mm DC 24V HDMI IN USB-C IN HDMI OUT AUDIO OUT RS232 HOST DEVICES 18G 2x1 Presentation Switcher w/ Soft Codec & CEC INPUT DISPLAY 1 2 3 4 SELECT HDMI USB-C EDID AUTO/3s... -
Page 26: Troubleshooting & Maintenance
8. Troubleshooting & Maintenance Problems Potential Causes Solutions Bad quality of the Try another high quality connecting cable. cable. Output image with snowflake Make sure the connection Fail or loose connection. is good Check with oscilloscope or No signal at the input / multimeter if there is any output end. -
Page 27: Customer Service
9. Customer Service The return of a product to our Customer Service implies the full agreement of the terms and conditions hereinafter. There terms and conditions may be changed without prior notice. 1) Warranty The limited warranty period of the product is one year. 2) Scope These terms and conditions of Customer Service apply to the customer service provided for the products or any other items sold by authorized distributor only. -
Page 28: Second Year Assurance
10. Second Year Assurance BZBGEAR wants to assure you peace of mind. We're so confident in the quality of our products that along with the manufacturer's one-year limited warranty, we are offering free second-year warranty coverage upon registration*! Taking advantage of this program is simple, just follow the steps below: 1. -
Page 29: Mission Statement
11. Mission Statement BZBGEAR manifests from the competitive nature of the audiovisual industry to innovate while keeping the customer in mind. AV solutions can cost a pretty penny, and new technology only adds to it. We believe everyone deserves to see, hear, and feel the advancements made in today’s AV world without having to break the bank.
Need help?
Do you have a question about the BG-PS21-4K and is the answer not in the manual?
Questions and answers