
Related Manuals for BZB Gear BG-PHD4X1


Summary of Contents for BZB Gear BG-PHD4X1
- Page 1 User Manual BG-PHD4X1 HDMI 2.0 4x1 Presentation Switcher with Audio Extraction All Rights Reserved...
- Page 2 HDMI 2.0 4x1 Presentation Switcher with Audio Extraction Preface Read this user manual carefully before using the product. Pictures shown in this manual are for reference only. Different models and specifications are subject to real product. This manual is only for operation instruction, please contact the local distributor for maintenance assistance.
- Page 3 HDMI 2.0 4x1 Presentation Switcher with Audio Extraction SAFETY PRECAUTIONS To ensure the best from the product, please read all instructions carefully before using the device. Save this manual for further reference. Unpack the equipment carefully and save the original box and packing material for possible future shipment.
-
Page 4: Table Of Contents
HDMI 2.0 4x1 Presentation Switcher with Audio Extraction Table of Contents 1. Product Introduction ....................1 1.1 Features ......................1 1.2 Package List ....................... 2 2. Specification ........................ 3 3. Panel Description ......................5 3.1 Front Panel ......................5 3.2 Rear Panel ......................6 4. - Page 5 HDMI 2.0 4x1 Presentation Switcher with Audio Extraction 8.2.3 EDID Management................. 22 8.2.4 Audio Control..................22 8.2.5 Display Control ..................24 8.2.6 Third-party Device Control ..............24 8.2.7 Button Command Setting ............... 25 9. Firmware Upgrade ..................... 28 10. Panel Drawing ......................29 11.
-
Page 6: Product Introduction
HDMI 2.0 4x1 Presentation Switcher with Audio Extraction 1. Product Introduction Thanks for choosing the HDMI 2.0 4x1 Presentation Switcher. The switcher allows selection of four different sources (three HDMI inputs and one DisplayPort input), and will simultaneously switch the selected video to HDMI output. It supports video resolution up to 4Kx2K@60Hz 4:4:4 8bit, 1080P, and 3D. -
Page 7: Package List
HDMI 2.0 4x1 Presentation Switcher with Audio Extraction 1.2 Package List 1x HDMI 2.0 4x1 Presentation Switcher 2x Mounting Ears with 4 Screws 4x Plastic Cushions 1x IR Receiver 1x IR Remote 1x 3-pin Terminal Block 1x 5-pin Terminal Block 1x RS232 Cable (3-pin terminal block to DB9) 1x Power Adapter (12V DC, 1A) 1x User Manual... -
Page 8: Specification
HDMI 2.0 4x1 Presentation Switcher with Audio Extraction 2. Specification Video Video Input (1) HDMI/MHL, (2) HDMI, (1) DP Video Input Connector (3) Type-A female HDMI, (1) DisplayPort HDMI Input Resolution Up to 4Kx2K@60Hz 4:4:4 8bit MHL Input Resolution Up to 1080P@60Hz DP Input Resolution Up to 4Kx2K@60Hz 4:4:4 8bit Video Output... - Page 9 HDMI 2.0 4x1 Presentation Switcher with Audio Extraction >70dB, 10KHz sine at 0dBFS level (or max level Crosstalk Isolation before clipping) < 0.3dB, 1KHz sine at 0dBFS level (or max level L-R Level Deviation before clipping) Frequency Response <± 0.5dB 20Hz ~ 20KHz Deviation 1KΩ...
-
Page 10: Panel Description
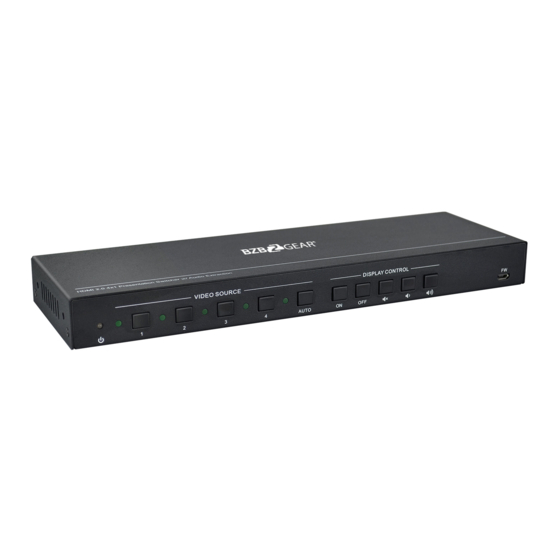
HDMI 2.0 4x1 Presentation Switcher with Audio Extraction 3. Panel Description 3.1 Front Panel ① Power LED: The LED illuminates red when the device is in standby, or illuminates green when the device is power on. ② VIDEO SOURCE: Press 1~4 button to select input source respectively, and its corresponding LED illuminates green. -
Page 11: Rear Panel
HDMI 2.0 4x1 Presentation Switcher with Audio Extraction 3.2 Rear Panel ① VIDEO SOURCE: Three type-A female HDMI input ports to connect HDMI video source. One DisplayPort input port to connect DisplayPort video source. ② HDMI OUT: Type-A female HDMI output port to connect video display. ③... -
Page 12: System Connection
HDMI 2.0 4x1 Presentation Switcher with Audio Extraction 4. System Connection 4.1 Usage Precaution Make sure all components and accessories included before installation. System should be installed in a clean environment with proper temperature and humidity. All of the power switches, plugs, sockets, and power cords should be insulated and safe. -
Page 13: Button Control
HDMI 2.0 4x1 Presentation Switcher with Audio Extraction 5. Button Control 5.1 Manual Switching When the switcher is in the manual switching mode, the Auto Mode LED goes out. If need to change the input source, please directly press the 1, 2, 3 or 4 button, and the corresponding LED illuminates green immediately. -
Page 14: Edid Setting
HDMI 2.0 4x1 Presentation Switcher with Audio Extraction 5.4 EDID Setting The Extended Display Identification Data (EDID) is used for the source device to match its video resolution with the connected display. By default, the source device obtains its EDID from the first connected display. Meanwhile, since the displays with different capabilities are connected to the switcher, the 4-pin DIP switch on the rear panel can be used to set the EDID to a built-in fixed value. -
Page 15: Ir Remote Control
HDMI 2.0 4x1 Presentation Switcher with Audio Extraction 6. IR Remote Control Connect the IR IN port to an IR receiver, the switcher can be controlled by the below IR remote. ① Enter or exit standby mode. ② Video input selection buttons (1~4) and AUTO mode button. -
Page 16: Gui Control
HDMI 2.0 4x1 Presentation Switcher with Audio Extraction 7. GUI Control The switcher also be controlled via TCP/IP, and the default IP setting is: IP Address: 192.168.0.178 Subnet Mask: 255.255.255.0 Please type 192.168.0.178 in the internet browser, and it will enter the below log-in webpage: Username: admin Password: admin... -
Page 17: Switching Tab
HDMI 2.0 4x1 Presentation Switcher with Audio Extraction 7.1 Switching Tab Click the AUTO button to enable automatic switching mode. Click 1~4 button to select input source respectively. 7.2 Display Control Tab... -
Page 18: Audio Tab
HDMI 2.0 4x1 Presentation Switcher with Audio Extraction ON: Display On. OFF: Display Off. : Mute/unmute display audio. : Volume down display audio. : Volume up display audio. 7.3 Audio Tab Turn on or turn off the digital audio output. Turn on or turn off the analog audio output. -
Page 19: Edid Tab
HDMI 2.0 4x1 Presentation Switcher with Audio Extraction 7.4 EDID Tab Note: Before select EDID in this tab, please ensure the 4-pin DIP switch on the rear panel is on the “1111” position. Built-in EDID: There are ten built-in EDID values can be selected by this tab. User-defined EDID: There are four EDID values can be customized by the below steps: Step 1: Prepare the EDID file (.bin) on the control PC. -
Page 20: Rs232 Tab
HDMI 2.0 4x1 Presentation Switcher with Audio Extraction 7.5 RS232 Tab Baud Rate: Supports 2400, 4800, 9600, 19200, 38400, 57600 or 115200. Command Ending: NULL, CR, LF or CR+LF can be chosen. Command: Type the command in this box to control the third-party device which is connected to the RS232 port of the switcher. -
Page 21: Interface Tab
HDMI 2.0 4x1 Presentation Switcher with Audio Extraction 7.6 Interface Tab Modify the title bar label. Modify the button labels. -
Page 22: Access Tab
HDMI 2.0 4x1 Presentation Switcher with Audio Extraction 7.7 Access Tab Modify the login password. Lock or unlock the front panel buttons. 7.8 Network Tab... -
Page 23: Gui Upgrade
HDMI 2.0 4x1 Presentation Switcher with Audio Extraction Set Static IP or Dynamic Host Configuration Protocol (DHCP). Modify the static IP Address, Subnet Mask, and Gateway. 7.9 GUI Upgrade Please visit at http://192.168.0.178:100 for GUI online upgrade. Type the username and password (the same as the GUI log-in setting, modified password will be available only after rebooting) to login the configuration interface. -
Page 24: Rs232 Control
HDMI 2.0 4x1 Presentation Switcher with Audio Extraction 8. RS232 Control Connect the RS232 port to control device (e.g. PC) with RS232 cable. The switcher can be controlled by sending the RS232 commands. 8.1 RS232 Control Software Installation: Copy the control software file to the control PC. Uninstallation: Delete all the control software files in corresponding file path. - Page 25 HDMI 2.0 4x1 Presentation Switcher with Audio Extraction The main view is shown as below: Parameter configuration area Monitoring area, show the commands and its feedback information. Command sending area Operation area Please set the parameters of COM number, bound rate, data bit, stop bit and the parity bit correctly, and then the command is ready to be sent in command sending area.
-
Page 26: Rs232 Command
HDMI 2.0 4x1 Presentation Switcher with Audio Extraction 8.2 RS232 Command Communication protocol: RS232 Communication Protocol Baud rate: 9600 Data bit: 8 Stop bit: 1 Parity bit: none Note: All commands not need to end with “<CR><LF>”. In the commands, “[”and “]” are symbols for easy reading and do not need to be typed in actual operation. -
Page 27: Edid Management
HDMI 2.0 4x1 Presentation Switcher with Audio Extraction 8.2.3 EDID Management Command Function Feedback Example Read the preset EDID. [xxxx] represents EDID_0001! EDIDR[xxxx]. … the 4-pin DIP switch status. Invoke the preset EDID. [xxxx] represents the 4-pin DIP switch status. EDIDUSE0001! Please refer to the 5.4 EDID Setting. - Page 28 HDMI 2.0 4x1 Presentation Switcher with Audio Extraction...
-
Page 29: Display Control
HDMI 2.0 4x1 Presentation Switcher with Audio Extraction 8.2.5 Display Control Command Function Feedback Example TVON. Power on the display. CEC_TV_POWON! TVOFF. Power off the display. CEC_TV_POWOFF! TVVOL+. Volume up the display. CEC_TV_VOLUP! TVVOL-. Volume down the display. CEC_TV_VOLDOWN! TVMUTE. Mute/unmute the display. -
Page 30: Button Command Setting
HDMI 2.0 4x1 Presentation Switcher with Audio Extraction 8.2.7 Button Command Setting When power on the switcher, set the command “xxx” to send to the third-party device whose baud rate is X. When press the DISPLAY ON CMDON/+3/0:455665. button, send the command “xxx” CMDON/+3/1:455665. - Page 31 HDMI 2.0 4x1 Presentation Switcher with Audio Extraction 9600 19200 38400 57600 115200 The “Y” can be 0 or 1. CMD_OFF Save Success! If the “Y” is “0”, clear the saved 455665 command “xxx”. If the “Y” is “1”, automatically send the command “xxx”...
- Page 32 HDMI 2.0 4x1 Presentation Switcher with Audio Extraction 19200 38400 57600 115200 The “Y” can be 0 or 1. CMD_VOLUP Save Success! If the “Y” is “0”, clear the saved command “xxx”. If the “Y” is “1”, automatically send the command “xxx” to the third-party device when press the VOLUME UP button When press the VOLUME MUTE...
-
Page 33: Firmware Upgrade
HDMI 2.0 4x1 Presentation Switcher with Audio Extraction 9. Firmware Upgrade Please follow the steps as below to upgrade firmware by the FW port on the front panel: 1) Prepare the latest upgrade file (.bin) and rename it as “USERAPP.bin” on PC. 2) Power off the switcher, and connect the FW port of switcher to the PC with USB cable. -
Page 34: Panel Drawing
HDMI 2.0 4x1 Presentation Switcher with Audio Extraction 10. Panel Drawing 262.0 mm... -
Page 35: Troubleshooting & Maintenance
HDMI 2.0 4x1 Presentation Switcher with Audio Extraction 11. Troubleshooting & Maintenance Problems Potential Causes Solutions Bad quality of the Try another high quality connecting cable cable. Output image with snowflake Make sure the connection Fail or loose connection is good Check with oscilloscope No signal at the input / or multimeter if there is... -
Page 36: Warranty
HDMI 2.0 4x1 Presentation Switcher with Audio Extraction 12. Warranty BZBGEAR wants to assure you peace of mind. We're so confident in the quality of our products that along with the manufacturer's one-year limited warranty, we are offering free second-year warranty coverage upon registration*! Taking advantage of this program is simple, just follow the steps below: 1.
Need help?
Do you have a question about the BG-PHD4X1 and is the answer not in the manual?
Questions and answers