
Related Manuals for Contex IQ Quattro X Series


Summary of Contents for Contex IQ Quattro X Series
- Page 1 User Guide Wide Format Scanner Models: IQ Quattro X Series UG14405-1D EN IQQ X AUG 2020...
-
Page 2: Table Of Contents
Contents Contents ................... 2 How to replace the scanner glass plate ..........47 Downloading New Firmware ..............53 About this Guide ................2 What is Firmware? .................53 Overview................... 3 When do I need new firmware? .............53 Specification ..................4 Identifying scanner firmware ..............53 Overview................... -
Page 3: Overview
Overview This user guide covers the following models: Model Scanner Name Description NOTE: Windows Compatibility - Your scanner and drivers are tested Number and developed to support the most current active Microsoft Windows IQ Quattro X 3600 Series MV52D 36” color scanner operating systems. -
Page 4: Specification
Specification IQ Quattro X Series large format CIS scanners have an improved Ethernet interface and enhanced USB 3.0. External touch tablet devices can also be used allowing wireless control of the scanner (operates in conjunction with the normal scanner pc running Nextimage). The 3600 and 4400 models have scan widths of 36”... -
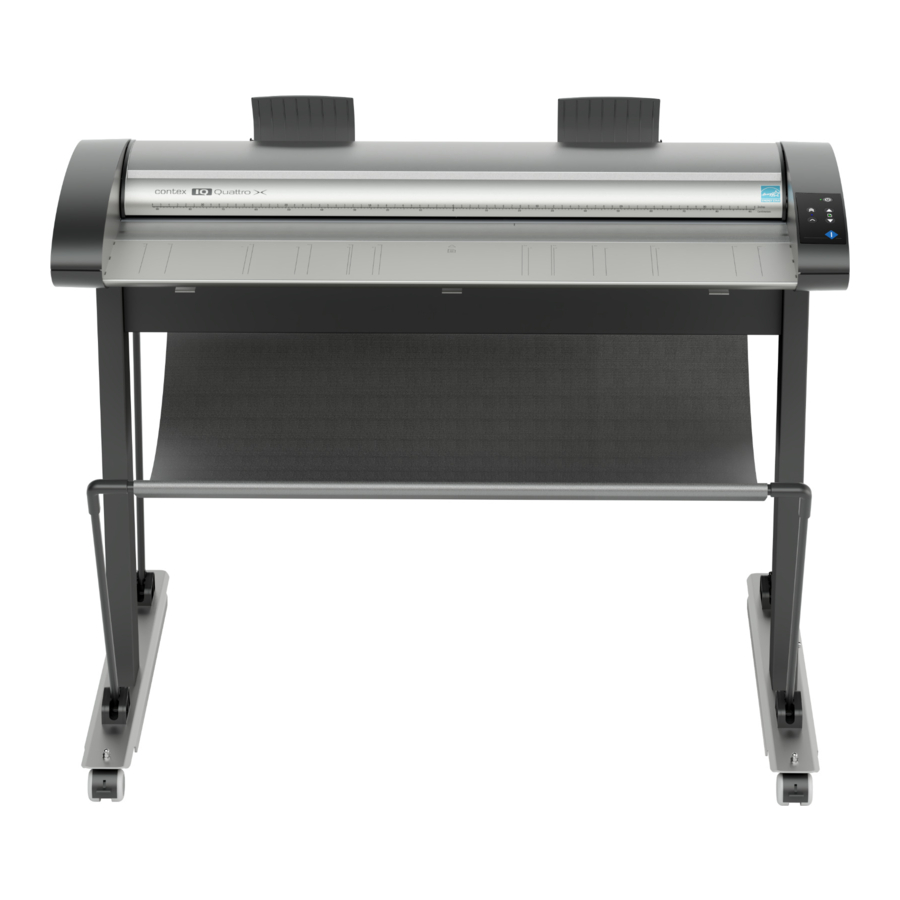
Page 5: Overview
Overview The parts, buttons and areas you need to recognize for using the scanner. Front view Lid release button (for maintenance) Scanner lid Paper return guides Lid release button (maintenance) Keypad Slot for portable device Power button and tri-color LED Ready (green) Magnetic paper Standby (yellow) -
Page 6: Rear View
Overview Rear view Release buttons for opening scanner lid (for maintenance) Connection panel Paper return guides Gigabit socket USB 3.0 socket Main power switch Mains power Connection socket... -
Page 7: Installation
Installation Follow the steps below for quick and easy installation of your scanner and scanner drivers. System requirements • Minimum recommended PC or workstation: Core 2 processor, 4 GB RAM, 5 GB of available hard drive space, USB 3.0 interface •... -
Page 8: Software Installation
After successful installation the WIDEsystem icon will display in the pc system tray • Now install the scan and copy software from Contex or a third-party supplier • Leave the PC switched ON ready to finish setting up the scanner : During all installation steps, be sure to select “YES”... -
Page 9: Clean The Scanner
Installation Clean the scanner feeding bed This is the flat surface in front of the insertion slot. Wipe thoroughly so dirt and dust are not dragged into the scan area with the original. Open the scanner lid by sliding the lid release buttons The internal scan area should be wiped clean for any dust accumulated during packaging and shipping. - Page 10 Installation Raise the lid Retain pressure on the lid release buttons and your grip on the lid edge as you pull the lid backwards towards your body. Open the scanner lid all the way back. Clean the internal scan area Wipe the internal scan area free of dust.
-
Page 11: Connecting The Power Cable
Installation Connect the power cable to the scanner Connect the scanner power cable to the scanner main power connection socket. The main power connection socket is on the back of the scanner. Connect power to the wall outlet Connect the other end of the scanner power cable to the power outlet. CAUTION: The scanner is equipped with a three-wire (pin) grounding type plug. -
Page 12: Turn On The Scanner
Installation Turn on the scanner Turn on the main power switch at the back of the scanner Connect the USB 3.0 interface cable Initial installation and activation of the scanner is easiest using the USB 3.0 connection. This applies also for Gigabit enabled models. •... - Page 13 Installation Connect the USB 3.0 interface cable to PC • On the PC check that WIDEsystem is running. The WIDEsystem icon should be visible in your system tray • If WIDEsystem is not running locate the WIDEsystem entry under your Programs menu and start it manually •...
-
Page 14: Setting The Energy Star Sleep Timer
Installation Windows installs the scanner • Click Next and follow the instructions on your screen to install the scanner on your PC • Most of the scanner installation process is automatic • Wait until the completion message appears • Press Next when done IMPORTANT: During the installation always allow the software to access the internet if Windows asks your permission. - Page 15 Installation Activate the scanner You must activate your scanner with its licence before you can use it. Please follow the Scanner Activation Wizard instructions. NOTE: Your supplier may have pre-activated the scanner for you. If the scanner is pre- activated, the wizard will skip this step and following steps 16a, 16b. About license keys and activation codes: •...
-
Page 16: Online Scanner Activation
Installation Online activation Online activation is very easy. You only need your license key. When you choose Online as the activation method, the dialog shown on the top right appears. • Enter your license key in the designated field • A green tick will appear after the authentication check if the license is valid •... -
Page 17: Manual Scanner Activation
Installation INTERNET DEVICE SCANNER Manual activation • Have your license key ready before proceeding. If you don’t have one License Key document from supplier contact you dealer • Manual Activation uses an Activation Code that requires the scanner ID (either a serial number or the hardware ID) and the license key. The hardware ID is read from the scanner and displayed automatically by the pc wizard (*1) during the manual activation process •... -
Page 18: Scanner Calibration
Installation Scanner calibration Calibration is initiated automatically as part of the scanner installation. • Press Calibrate to start the wizard • Follow the wizard instructions to perform scanner calibration • If you did not clean the internal scan area and glass as instructed in the previous installation steps do so now •... - Page 19 Installation Installation complete The scanner has been installed correctly when you see this message. NOTE: Scanner connected using USB 3.0...
-
Page 20: Using The Scanner On A Network (Ethernet)
Installation Using the scanner on a network (Ethernet) First switch off the scanner. If connected remove the USB 3.0 cable from the scanner. Insert one end of the supplied Ethernet network cable into the gigabit network socket on the scanner. Now connect the opposite end of this cable to the network. - Page 21 Installation Checking the firewall The scanner installation wizard launches • Click Next • The firewall settings of some Windows computer installations may prevent or block WIDEsystem from locating the scanner. If you think this might be happening ask your IT administrator to check the firewall settings on the computer being used.
- Page 22 Installation Selecting a networked scanner The scanner selection window appears • New network scanner(s) that are available will be shown highlighted in blue • Select the scanner • Click Next • WIDEsystem confirms connection and displays the scanner serial number •...
-
Page 23: Removing A Networked Scanner
Installation Removing a networked scanner Disconnected or old scanners that remain in the scanner list can be removed using WIDEsystem • Double-click or right-click the WIDEsystem icon • Click the Network tab • Click the Remove button • Choose the network scanner to remove •... -
Page 24: Changing Scanner Network Settings
Installation Changing scanner network settings In the system tray double-click the WIDEsystem icon or right-click it and select Restore WIDEsystem from the menu. Ensure the WIDEsystem icon is yellow which indicates the scanner is connected. Select the Network tab Click the Scanner Setup button The scanner setup window has options to change the: •... -
Page 25: Turning The Scanner On And Off
Turning the scanner ON/OFF Main power switch Scanner ready to scan The scanner is ready for scanning when the power LED turns green. The The main power switch is at the back of the scanner. Press the left side of scanner starts up in Wake mode (see next section). -
Page 26: Sleep And Wake Modes
Turning the scanner ON/OFF Scanner in Sleep mode – power LED is yellow. Sleep and wake modes With the main power switch ON, scanner power can be set in Sleep mode and Wake mode. Sleep mode is the energy saving mode. The scanner cannot scan when in the Sleep mode. -
Page 27: Automatic Shut Down After Idle Time
Turning the scanner ON/OFF Automatic shut down after idle time The scanner is factory set for automatic entry into sleep mode after a preset default idle time, i.e. the length of time the scanner is not active. You can prolong or shorten the idle time value to match your normal workflow. NOTE: You will normally be prompted to change the idle time during installation. -
Page 28: Loading Originals
Loading originals Load face-up in the center of the scanner Automatic loading With automatic loading, the scanner takes the original as soon as you • Load your document with the image side facing insert it in the paper slot. Automatic loading is reliable for most jobs and upwards. -
Page 29: Manual Loading
Loading originals Manual loading Unloading the original after the scan • Press the Paper Backward button to eject the original back towards you • Make sure the Paper handling option “Manual” is set in your scanning application. • Align the center of the document with the center arrow marking on the scanner bed. -
Page 30: Soft Handling
Loading originals Soft handling Setting the input size The scanning software input size dialogue defines the area to be scanned. The soft-handling option can be selected in your scan application. Soft-handling means that feeding and scanning are slowed down. You can use the option with both Manual and Automatic loading. NOTE: The exact choice of input size options will depend on your scanning software and its compatibility with the scanner. -
Page 31: Scanning
Scanning Scanning software Batch scanning Your scanner is controlled through scan, copy or imaging software installed Batch scanning involves jobs where you want to feed and scan a whole set on your PC. of originals that require equal scan settings. The basic steps are: Optimal full featured scanning functionality is obtainable through scan •... -
Page 32: Monitoring Your Scanner With Widesystem
Scanning Monitoring your scanner with WIDEsystem WIDEsystem is software that controls and continuously monitors the health of the scanner. Double left-click the system tray WIDEsystem icon to open the WIDEsystem control interface. Scanner status message on Windows system tray • Obtain scanner status by moving the mouse over the WIDEsystem icon. -
Page 33: Maintenance
Maintenance About scanner maintenance Scanner maintenance will ensure the best performance of your scanner. There are three basic maintenance tasks. • Cleaning This section describes how to thoroughly clean the internal scan area. How often you need to clean will depend on how often and the types of media you scan. -
Page 34: How To Clean The Parts Inside The Scanner
Maintenance How to clean the parts inside the scanner Here is the scanner seen from above with its lid open showing the key parts and areas inside important for cleaning. The number of rollers and lid-release catches will be different for different sizes of scanner. Lower rubber transport rollers Lower pressure rollers (long &... - Page 35 Maintenance To clean your scanner: Turn the main power to OFF Press the main power switch at the back of the scanner to the OFF position (“0”). Disconnect the scanner power plug CAUTION: Always disconnect power before cleaning the scanner. This is to ensure your own personal safety and to help protect your device from electrical damage.
- Page 36 Maintenance Clean the scanner surface Clean the flat surface of the scanner so that dirt and dust are not dragged into the scan area with the original during scanning. Open the scanner lid by sliding the lid release latches Next open the scanner lid using the release latches at the back of the lid. •...
- Page 37 Maintenance Open the scanner lid Keeping pressure on the lid release latches pull the lid upwards toward your body. Now continue rotating the lid until it us laying upside down on the feed tray. Clean the scanner glass plate Make sure you use two fresh and clean lint-free cloths for cleaning the glass plate.
- Page 38 Maintenance Clean the upper precision rollers The lid upper precision rollers are arranged in two rows each side of the glass plate and keep the document moving in a straight line. These rollers are in direct contact with the color side of documents and may become quite dirty.
- Page 39 Maintenance Clean the transport rollers The two rows of powered transport rollers each side of the white pressure rollers in the base of the scanner rotate to drive documents through the scanner. • Spray/apply a mild, streak-free, glass cleaner onto a lint-free cloth •...
- Page 40 Maintenance Your scanner is now clean You have completed the steps required for cleaning your scanner and the scan area. Replace the rear paper guides and two paper tray magnetic guides as required.
-
Page 41: Calibration
Maintenance Calibration Scanner calibration is a mostly automatic process and carried out using the WIDEsystem program that was installed as part of the initial scanner installation. NOTE: It is very important that the scanner feed area and glass are completely clean before calibrating. To calibrate your scanner: Turn the scanner power ON If the main power is OFF, press the main power switch at the back of the... - Page 42 Maintenance Calibration Launch the scanner calibration wizard • Click the WIDEsystem icon in the system tray to open the WIDEsystem program. • Press the Calibrate button. Calibration Choose the calibration Select either camera alignment or full calibration • Camera alignment will align horizontal capture for correct image stitching •...
- Page 43 Maintenance Insert the calibration sheet The software wizard will ask you to insert the calibration sheet that came with your scanner. NOTE: The printed side of the sheet must be inserted face up into the scanner arrow edge first.
- Page 44 Maintenance Calibration Scanner calibration The program works in steps to analyze and correct the status of the sensors, calibrate black and white values and calibrate color (on color scanners). The calibration sheet will be rescanned a number of times as the program processes data. Let the program complete the calibration steps you requested (Alignment or Complete).
-
Page 45: Replacing The Glass Plate
Maintenance Replacing the glass plate Over time, documents moving against the glass plate will cause it to wear and image capture quality may start to be affected. If this happens a replacement glass should be fitted to restore peak scanner performance. To replace a worn glass plate: Turn the main power to OFF Press the main power switch at the back of the scanner to the OFF position. - Page 46 Maintenance Open the scanner lid by sliding the lid release latches Next open the scanner lid using the release latches at the back of the lid. • Stand at the front of the scanner • Push down on the lid while at the same time sliding both release latches towards the center of the scanner until you feel them unlock •...
-
Page 47: How To Replace The Scanner Glass Plate
Maintenance How to replace the scanner glass plate Here is the scanner seen from above with lid open showing parts and areas important when replacing a worn glass plate. The glass plate is locked in place by several white latches. Press down the latch release buttons to release the glass plate (see below). The number of latches will be different for different sizes of scanner. - Page 48 Maintenance Detaching glass plate - right-side latch Stand at the front of the scanner looking at the keypad end of the glass. • Detaching the first (right) latch requires a sharp, flat tool like a pen or a small screwdriver NOTE: A tool is only needed to start the removal process •...
- Page 49 Maintenance Preparing to remove the glass plate • Stand at the front of the scanner • Insert the tip of each thumb under the front edge of the glass in the middle area • Tip the glass back and up so the two ends are free NOTE: Use the flat tool again if you cannot get your thumbs underneath.
- Page 50 Maintenance Installing a new scanner glass plate • Pick up the glass plate from its ends to avoid touching the glass surface • Do not touch the underside of the glass as this will not be cleaned during regular maintenance •...
- Page 51 Maintenance Glass plate location • Identify the glass groove furthest from your body • Place the lower edge of the glass plate in the rear position groove • Carefully tilt the upper edge (the edge closest to your body) down until the glass plate rests in the two rear and front position grooves Rear position groove Glass plate lower edge...
- Page 52 Maintenance Clean the new glass plate Obtain two fresh lint-free cloths. • Spray or apply a mild, streak-free glass cleaner on a lint-free cloth • Gently wipe the glass clean leaving no fingerprints • Dry the glass completely using the other clean, dry lint-free cloth •...
-
Page 53: Downloading New Firmware
Maintenance Identifying scanner firmware Downloading New Firmware • What is Firmware? Start WIDEsystem and double-click its icon • Like a computer uses an operating system your scanner uses firmware to Select the Info tab to view the following: run its systems and link with the software controlling the scanner. •... -
Page 54: Trouble-Shooting
Trouble shooting This section lists the most common issues that might affect your scanner and how you can overcome them. Please browse the problem descriptions and follow the procedure relevant to your situation before requesting a service call. Scanner error reporting The scanner panel error indicator LED will flash and WIDEsystem will display the error type on the pc screen. -
Page 55: Scanner Installation Problems
Trouble shooting Scanner installation problems Problem Possible causes and remedy • ‘Unknown device found’ message Your interface is not enabled on the PC or set up correctly. Check the installation steps for the selected interface. Check the interface and its driver are listed in the Windows device manager •... - Page 56 Trouble shooting Scanner installation problems Problem Possible causes and remedy • WIDEsystem does not detect the The WIDEsystem driver version installed on your PC is older than your scanner model. Install the WIDEsystem drivers from the WIDEsystem TOOLS USB drive that came with your scanner. If not available download the newest version scanner from the manufacturer website or contact your dealer to obtain the correct WIDEsystem version.
-
Page 57: Scanner Operation Problems
Trouble shooting Scanner operation problems Problem Possible causes and remedy Error - Indicator LED blinking An error was detected The error may be reported immediately through a screen message. If there is no message open WIDEsystem (scanner icon on your system tray) and select the Status tab to view additional information about the error. Perform one of the following: •... -
Page 58: Scanner Operation Problems
Trouble shooting Scanner operation problems Problem Possible causes and remedy Error message: Paper jam Scanner stops scanning and the paper-ready LED goes out (stops blinking) when document still in drive system. Software displays ‘Paper Jam Error’. • Press and hold down the Paper-Backwards or the Paper-Forward key to eject the document from the scanner •... -
Page 59: Scanner Maintenance Problems
Trouble shooting Scanner maintenance problems Problem Possible causes and remedy Error message: Stitching failed Stitching maintenance error messages • Dirty or smudged glass plate - Clean the scanning area, reboot the scanner and then complete the calibration steps as described in the section Maintenance •... -
Page 60: Scanner Result Problems
Trouble shooting Scanner result problems Problem Possible causes and remedy • Scanned image is incomplete Check the scanning software size settings are set to auto detection or the size of the original • Check the scanning software paper justification matches the position being used to load the original on the paper feed tray •... -
Page 61: Important Safety Instructions
Appendix Important safety instructions H. Slots or openings in the cabinet at the back or bottom are provided for ventilation. This ensures reliable operation of the product and protects it from overheating. These openings must not be blocked or covered. The Read all of these instructions and save them for later use. -
Page 62: Regulations
Appendix Regulations Toxic or Hazardous Substances or Elements 有毒有害物质或元素名称及含量 FCC Regulations Restricted substances and its chemical symbols 限用物質及其化學符號 NOTE: This equipment has been tested and found to comply with the limits 單元 六價鉻 多溴二苯醚 for a Class A digital device, pursuant to Part 15 of the FCC Rules. These Unit 鉛... -
Page 63: Scanner Weights (Unpacked) & Dimensions
Appendix Scanner weights (unpacked) & dimensions Scanner L x W x H Scanner (Model) Weight mm (inches) kg (lbs) IQ Quattro X 3600 Series (MV52D) 1160 x 489 x 161 (45.7 x 19.3 x 6.3) 21.9 (48.3) IQ Quattro X 4400 Series (MU52D) 1349 x 489 x 161 (53.1 x 19.3 x 6.3) 24.5 (54) Low Adjustable Stand and High Adjustable Stand working heights... - Page 64 Appendix Low Adjustable Stand NOTE: Drawing shows stand (44”) at its lowest working height setting of 827 (dimensions in mm).
- Page 65 Appendix High Adjustable Stand NOTE: Drawing shows stand (44”) at its highest working height setting of 1292 (dimensions in mm).
- Page 66 Appendix Contex HQ & EMEA Contex Americas Contex Japan & Asia Global Scanning Denmark A/S Global Scanning Americas (MD) Inc. Global Scanning Japan A/S Copenhagen, Denmark Chantilly, VA. 20151, USA Yokohama, Japan Phone: +45 4814 1122 Phone: +1 (703) 964 9850 Phone: +81 45 548 8547 info@contex.com...
Need help?
Do you have a question about the IQ Quattro X Series and is the answer not in the manual?
Questions and answers
how can i save me scanning settings to a file