Comunello CU - 230V - HP Installation And User Manual
Hide thumbs
Also See for CU - 230V - HP:
- Installation and user manual (64 pages) ,
- Installation and user manual (25 pages)
Table of Contents
Advertisement
Available languages
Available languages
Quick Links
Advertisement
Table of Contents

Related Manuals for Comunello CU - 230V - HP


Summary of Contents for Comunello CU - 230V - HP
- Page 1 INSTALLATION AND USER’S MANUAL CU - 230V - HP Control unit comunello.com ISTRUZIONI D’USO E DI INSTALLAZIONE INSTALLATIONS-UND GEBRAUCHSANLEITUNG INSTRUCIONS D’UTILISATION ET D’INSTALLATION INSTRUCCIONES DE USO Y DE INSTALACION Cod. 91300176 - Rev. 05 - 09.09.19...
-
Page 2: Dichiarazione Di Conformitá Ce
ISTRUZIONI D’USO E DI INSTALLAZIONE CU 230V - HP DICHIARAZIONE DI CONFORMITÁ CE Il sottoscritto, sig. COMUNELLO LUCA rappresentante il seguente costruttore F.lli COMUNELLO spa Via Cassola 64, 36027 Rosà (VI) Italy DICHIARA che l’apparecchiatura descritta in appresso: Descrizione Centralina di controllo due motori 230V per cancelli automatici... - Page 3 Nel manuale sono presenti dei QR-CODE con il link diretto al canale You-Tube “COMUNELLO TV” dove sono pubblicati i video tecnici delle programmazioni più importanti per la messa in servizio dell’automazione spiegati passo-passo.
-
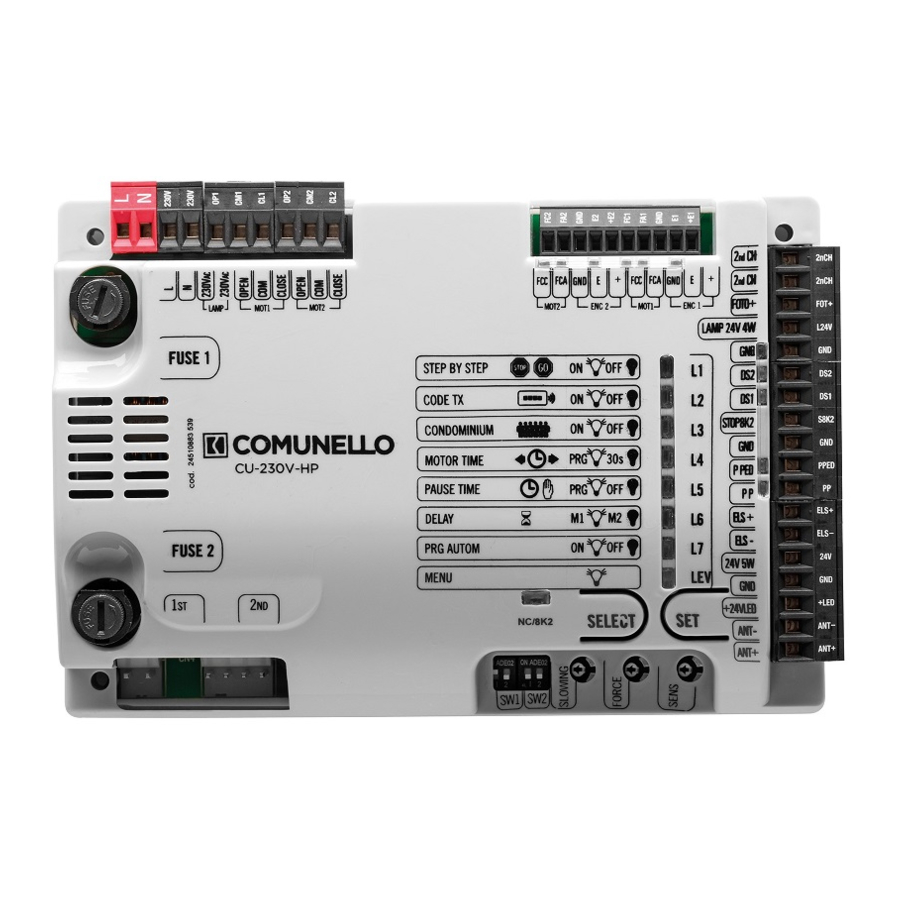
Page 4: Descrizione Dei Collegamenti
PEDESTRIAN PUSH BUTTON (N.O) PULSANTE APRI-CHIUDI (N.O.) PUSH BUTTON (N.O) 11.8V ANTENNA ELETTROSERRATURA 12VDC 15W ELECTRIC LOCK 12V ALIMENTAZIONE SERVIZI SUPPLY SERVICES LUCE SPIA TRASFORMATORE LIGHT TRANSFORMER 230 / 25V - 0,8A, 11,8V - 3,5A COMUNELLO ®Copyright 2019 - All rights reserved... - Page 5 3 STEP Slowin Force Sens. ATTENZIONE: DS1, DS2 e STOP/8K2 sono ponticellate da fabbrica. Per collegare le fotocellule, il pulsante di stop ed i bordi sensibili è necessario rimuovere il ponticello dal morsetto. COMUNELLO ®Copyright 2019 - All rights reserved...
-
Page 6: Caratteristiche Tecniche
120 (CODE PP o CODE PED/2°CH) Dimensioni scheda: 160 x 107 mm. Fusibile 1: T 6,3 A 250V (Ritardato) Fusibile 2: T 0,5 A 250V (Ritardato) Uscita LED 24Vcc Lampada spia Uscita servizi 24V~ 5W COMUNELLO ®Copyright 2019 - All rights reserved... - Page 7 ATTENZIONE: NON CAMBIARE LA CONFIGURAZIONE l’automazione apre a SINISTRA e chiude a DESTRA (vista di profi- l’automazione apre a SINISTRA e chiude a DESTRA (vista di profi- lo come nell’immagine) lo come nell’immagine) COMUNELLO ®Copyright 2019 - All rights reserved...
- Page 8 GND E1 2° CH MOT2 ENC2 MOT1 ENC1 FOTO+ LAMP 24V 4W (N.C.) END STOP CLOSE MOTOR INTERNAL MOTOR 230V 50HZ (N.C.) END STOP OPEN MOTOR (SALIENT 230V - WITH MAIN BOARD) (SALIENT 230V) COMUNELLO ®Copyright 2019 - All rights reserved...
- Page 9 Collegamento filare SENZA ENCODER dei motori alla centrale di comando OPEN / APRI con OP1 OPEN / APRI con OP2 COMMON / COMUNE con CM1 COMMON / COMUNE con CM2 CLOSED / CHIUDI con CL1 CLOSED / CHIUDI con CL2 COMUNELLO ®Copyright 2019 - All rights reserved...
- Page 10 Collegamento filare dei motori alla centrale di comando OPEN / APRI con OP1 OPEN / APRI con OP2 COMMON / COMUNE con CM1 COMMON / COMUNE con CM2 CLOSED / CHIUDI con CL1 CLOSED / CHIUDI con CL2 COMUNELLO ®Copyright 2019 - All rights reserved...
- Page 11 CM2 CLOSED / CHIUDI con CL1 CLOSED / CHIUDI con CL2 Blue Brown Black 2nCH 2nCH FOT+ L24V S8K2 PPED ELS+ ELS- +LED ANT- ANT+ CONDOR [2/2]- schema di collegamento dei motori COMUNELLO ®Copyright 2019 - All rights reserved...
- Page 12 Configurazione con motore MASTER a SINISTRA e motore SLAVE a DESTRA MOTORE n.1 (a sinistra) MOTORE n.2 (a destra) NERO con OP1 BLACK con OP2 BLU con CM1 BLUE con CM2 MARRONE con CL1- MARRONE con CL2 COMUNELLO ®Copyright 2019 - All rights reserved...
- Page 13 Collegamento filare dei motori alla centrale di comando MOTORE n.1 (a sinistra) MOTORE n.2 (a destra) NERO con OP1 NERO con OP2 BLU con CM1 BLU con CM2 MARRONE con CL1 MARRONE con CL2 COMUNELLO ®Copyright 2019 - All rights reserved...
- Page 14 In caso di intervento il motore fa un' Inversione Parziale In caso di intervento il della fotocellula DS1 motore fa un' Inversione Completa BLOCCO / 8K2 Configurazione dell'ingresso Impostazione bilanciata 8K2 Impostazione Normalmente di Sicurezza Chiusa TAB.03 COMUNELLO ®Copyright 2019 - All rights reserved...
- Page 15 3 s. del lampeggiante prima della chiusura / lamp. in pausa TAB.05 Nota importante: La centrale permette di essere programmata se tutte le sicurezze (ingressi N.C. della scheda) sono in condizione di riposo con il contatto chiuso. COMUNELLO ®Copyright 2019 - All rights reserved...
-
Page 16: Collegamenti Elettrici
Nota importante: Gli ingressi DS1 e DS2 (NC) sono ponticellati di fabbrica. Per cablare le fotocellule rimuovere i ponticelli dai relativi ingressi. COMUNELLO ®Copyright 2019 - All rights reserved... - Page 17 Led. Premendo più volte il tasto, è possibile posizionarsi sulla funzione desiderata. La selezione resta attiva per 10 secondi, visualizzata dal Led lampeggiante, trascorsi i quali la centrale esce dalla programmazione. COMUNELLO ®Copyright 2019 - All rights reserved...
-
Page 18: Menu Principale
- Se la centrale è utilizzata nella configurazione ad 1 Motore (dip 1 di SW1 • Il LED L2 resterà acceso in modo fisso indicando che la programmazione OFF), la programmazione del tempo di lavoro del Motore 2 non viene sarà completata. COMUNELLO ®Copyright 2019 - All rights reserved... - Page 19 Motore 1. - Non è possibile effettuare la Programmazione Automatica in assenza dei finecorsa e/o encoder cablati a centrale. Se si desidera abilitare invece la modalità “APRE-CHIUDI” per utilizzare il COMUNELLO ®Copyright 2019 - All rights reserved...
- Page 20 Tempo di Pausa. Ripetere l’operazione se si desidera ripristinare la configurazione iniziale. Per attivare tale funzione procedere nel seguente modo: • Assicurarsi di aver abilitato il Menù Esteso 2 (evidenziato dal lampeggio COMUNELLO ®Copyright 2019 - All rights reserved...
- Page 21 • Assicurarsi di aver abilitato il Menù Esteso 2 (evidenziato dal lampeggio apertura. Se si desidera abilitare la funzione di Colpo d’Ariete alla massima 1 1 0 1 1 0 del LED LEV); potenza, procedere nel seguente modo: COMUNELLO ®Copyright 2019 - All rights reserved...
-
Page 22: Garanzia
Se si desidera abilitare la seconda funzione, ripetere l’operazione sopra Il materiale ritenuto difettoso ed inviato a Fratelli Comunello S.p.a. rimarrà di descritta,premendo il tasto SELECT due volte (ottenendo il lampeggio proprietà... - Page 23 La garanzia non comprende il costo per materiale di consumo né quello per vizi presunti o verifiche di comodo. Caratteristiche dei prodotti I prodotti realizzati da Fratelli Comunello S.p.A. sono soggetti a continue innovazioni e miglioramenti; pertanto, le caratteristiche costruttive e l’immagine degli stessi, potranno subire variazioni anche senza preavviso.
-
Page 24: Ec Declaration Of Conformity
INSTALLATION AND USER’S MANUAL CU 230V - HP EC DECLARATION OF CONFORMITY: The undersigned Mr. Luca Comunello, representing the following manufacturer, Fratelli COMUNELLO Spa Via Cassola 64, 36027 Rosà (VI) – Italy DECLARES that the equipment described below: Description: Electronic control unit for gate automation... - Page 25 In the manual there are QR-CODEs with the direct link to the You-Tube channel “COMUNELLO TV” where the technical videos of the main functions for the programming of the automation are shared, explained step by step.
- Page 26 PEDESTRIAN PUSH BUTTON (N.O) PULSANTE APRI-CHIUDI (N.O.) PUSH BUTTON (N.O) 11.8V ANTENNA ELETTROSERRATURA 12VDC 15W ELECTRIC LOCK 12V ALIMENTAZIONE SERVIZI SUPPLY SERVICES LUCE SPIA TRASFORMATORE LIGHT TRANSFORMER 230 / 25V - 0,8A, 11,8V - 3,5A COMUNELLO ®Copyright 2019 - All rights reserved...
- Page 27 Vel.Med. Vel.Max. CAUTION: DS1, DS2 and STOP/8K2 are bridged by the factory. To connect the photocells, the stop button and the edge sensors, it is necessary to remove the jumper from the terminal. COMUNELLO ®Copyright 2019 - All rights reserved...
-
Page 28: Technical Specifications
Board dimensions: 160 x 107 mm. Fuse 1: T 6,3 A 250V (Delayed fuse) Fuse 2: T 0,5 A 250V (Delayed fuse) LED output 24Vcc Pilot light Services output 24 V 5 W COMUNELLO ®Copyright 2019 - All rights reserved... - Page 29 Black CLOSES M2 NOT MOTOR CONSID. IMPORTANT NOTE: DO NOT CHANGE THE CONFIGURATION. Opens to LEFT, closes to Rights (left profile view, as in the image). Double motor installation (up to 16 m COMUNELLO ®Copyright 2019 - All rights reserved...
- Page 30 DIP1 OFF = inversion MOTOR ration no. 1 disabled DIP2 OFF = Delay of motor no. 2 DIP2 OFF = inversion MOTOR no. 2 disabled DELAY MOTORS MOT.2 DELAY OF THE MOTOR no.1 COMUNELLO ®Copyright 2019 - All rights reserved...
- Page 31 DIP1 OFF = inversion MOTOR ration no. 1 disabled DIP2 OFF = Delay of motor no. 2 DIP2 OFF = inversion MOTOR no. 2 disabled DELAY MOTORS MOT 2 DELAY OF THE MOTOR no.1 COMUNELLO ®Copyright 2019 - All rights reserved...
- Page 32 DIP1 ON = 2 motors configu- DIP1 OFF = inversion MOTOR ration no. 1 disabled DIP2 OFF = Delay of motor no. 2 DIP2 ON = inversion MOTOR no. 2 enabled DELAY MOTORS MOT 2 MOT 2 COMUNELLO ®Copyright 2019 - All rights reserved...
- Page 33 DIP1 ON = 2 motors configu- DIP1 OFF = inversion MOTOR ration no. 1 disabled DIP2 OFF = Delay of motor no. 2 DIP2 ON = inversion MOTOR no. 2 enabled DELAY MOTORS MOT 2 MOT 2 COMUNELLO ®Copyright 2019 - All rights reserved...
- Page 34 DIP1 OFF = inversion MOTOR ration no. 1 disabled DIP2 OFF = Delay of motor no. 2 DIP2 ON = inversion MOTOR no. 2 enabled DELAY MOTORS MOT. 2 MOT. 2 DELAY OF THE MOTOR no.1 COMUNELLO ®Copyright 2019 - All rights reserved...
- Page 35 Configuration - MOTEUR 1 À GAUCHE, MOTEUR 2 À DROITE Motor line connection to control unit MOTOR # 1 (left) MOTOR # 2 (rights) BLACK in OP1 BLACK in OP2 BLUE in CM1 BLUE in CM2 BROWN in CL1 BROWN in CL2 COMUNELLO ®Copyright 2019 - All rights reserved...
- Page 36 N.C. STOP pushbutton 8.2 K Ohm resistive input. Table 3 The third menu is the one defined as EXTENDED 2 and to access the programmable functions follow the instructions given in Tab. 4: COMUNELLO ®Copyright 2019 - All rights reserved...
-
Page 37: Electrical Connections
2nd CH: Aux Radio CH Output (Free Contact max load 30V DC 1A) ENC1 +: Motor 1 Encoder power supply input 2nd CH: Aux Radio CH Output (Free Contact max load 30V DC 1A) COMUNELLO ®Copyright 2019 - All rights reserved... -
Page 38: Functional Characteristics
Important Note: change the settings of dip-switches SW1 and SW2 with opening cycle with 5 seconds pre-flashing. the control unit off and only subsequently repeat the control unit programming COMUNELLO ®Copyright 2019 - All rights reserved... - Page 39 7.3.6 BLACK-OUT • Press key SET twice to memorize the PPED channel and the led will In the case of a black-out and subsequent restoration of the power supply, modify its blinking (110110110); COMUNELLO ®Copyright 2019 - All rights reserved...
- Page 40 • Disconnect the power supply to the control unit. follows: • Change the position of Dip Switch SW2 to change the drive direction to the desired motor without physically using the electrical connections. COMUNELLO ®Copyright 2019 - All rights reserved...
-
Page 41: Extended Menu
In contrast, if you wish to enable “OPEN-CLOSE” mode in order to use the Pedestrian Pushbutton to activate exclusively closing of the gate and the P/P Pushbutton to (CN2 input no. 11) to activate exclusively COMUNELLO ®Copyright 2019 - All rights reserved... - Page 42 Note: this command is programmable only if a Pause Time has already been programmed. Proceed as follows if you wish to enable the function: • Make sure you have enabled the extended Menu 2 (as shown by the COMUNELLO ®Copyright 2019 - All rights reserved...
- Page 43 SELECT and SET button simultaneously for about 5 seconds, at the same • LED L3 becomes steady on and programming will be completed. time, all RED indicator LEDs will simultaneously turn on, with subsequent immediate shut-down. COMUNELLO ®Copyright 2019 - All rights reserved...
-
Page 44: Warranty
Fratelli Comunello S.p.A. The material under warranty shipped to the headquarters of Fratelli Comunello S.p.A., must be shipped prepaid and will then be sent back carriage forward. The material considered defective and shipped to Fratelli Comunello S.p.A. -
Page 45: Ce-Konformitätserklärung
INSTALLATIONS- UND GEBRAUCHSANLEITUNG CU - 230V - HP CE-KONFORMITÄTSERKLÄRUNG Der Unterzeichnende, Herr COMUNELLO LUCA , gesetzlicher Vertreter des Herstellers F.lli COMUNELLO spa Via Cassola 64, 36027 Rosà (VI) Italien ERKLÄRT, dass das nachstehend beschriebene Gerät: Beschreibung: Steuereinheit für zwei Motoren mit 230 V für zwei automatische Tore... - Page 46 Die Anlage regelmäßig überprüfen, um eventuelle werden (Abbildung 3B). Schäden sofort zu erkennen. Im Handbuch gibt es QR-CODES mit dem direkten Link zum You-Tube-Kanal „COMUNELLO TV“, in dem die technischen Videos der wichtigsten Programmierungen für die Inbetriebnahme der Automatisierung Schritt für Schritt erklärt werden.
-
Page 47: Beschreibung Der Anschlüsse
PEDESTRIAN PUSH BUTTON (N.O) PULSANTE APRI-CHIUDI (N.O.) PUSH BUTTON (N.O) 11.8V ANTENNA ELETTROSERRATURA 12VDC 15W ELECTRIC LOCK 12V ALIMENTAZIONE SERVIZI SUPPLY SERVICES LUCE SPIA TRASFORMATORE LIGHT TRANSFORMER 230 / 25V - 0,8A, 11,8V - 3,5A COMUNELLO ®Copyright 2019 - All rights reserved... - Page 48 + wird die Geschwindigkeit des Motorhubs während der Ver- langsamungsphase in SCHRITT 3 geändert ACHTUNG: DS1, DS2 und STOPP/8K2 wurden werkseitig überbrückt. Um die Fotozellen, die Stopp-Tate und die Näherungsleisten anzuschließen, muss die Überbrückung der Klemme entfernt werden. COMUNELLO ®Copyright 2019 - All rights reserved...
-
Page 49: Technische Daten
18 Bit o Rolling Code Max. gespeicherte CODE TXs 120 (CODE PP o CODE PED/2°CH) Abmessungen der Platine: 160 x 107 mm. Sicherung 1: T 6.3 A 250V (Verzögert) Sicherung 1: T 0.5 A 250V (Verzögert) COMUNELLO ®Copyright 2019 - All rights reserved... - Page 50 MOTOR 1 ÖFFNET Blau AUSGANG MOTOR 2 Schwarz NICHT VERWENDEN SCHLIESST M2 NOT MOTOR CONSID. ACHTUNG: DIE KONFIGURATION NICHT VERÄNDERN die Automatisierung öffnet LINKS und schließt RECHTS (Seitenan- sicht, wie in der Abbildung) COMUNELLO ®Copyright 2019 - All rights reserved...
- Page 51 GND E1 2° CH MOT2 ENC2 MOT1 ENC1 FOTO+ LAMP 24V 4W (N.C.) END STOP CLOSE MOTOR INTERNAL MOTOR 230V 50HZ (N.C.) END STOP OPEN MOTOR (SALIENT 230V - WITH MAIN BOARD) (SALIENT 230V) COMUNELLO ®Copyright 2019 - All rights reserved...
- Page 52 Kabelanschluss der Motoren OHNE GEBER an das Steuergerät OPEN / ÖFFNEN mit OP1 OPEN / ÖFFNEN mit OP2 GEMEINSAME LEITUNG mit CM1 GEMEINSAME LEITUNG mit CM2 CLOSED / SCHLIESSEN mit CL1 CLOSED / SCHLIESSEN mit CL2 COMUNELLO ®Copyright 2019 - All rights reserved...
- Page 53 Kabelanschluss der Motoren an das Steuergerät OPEN / ÖFFNEN mit OP1 OPEN / ÖFFNEN mit OP2 GEMEINSAME LEITUNG mit CM1 GEMEINSAME LEITUNG mit CM2 CLOSED / SCHLIESSEN mit CL1 CLOSED / SCHLIESSEN mit CL2 COMUNELLO ®Copyright 2019 - All rights reserved...
- Page 54 OP2 GEMEINSAME LEITUNG mit CM1 GEMEINSAME LEITUNG mit CM2 CLOSED / SCHLIESSEN mit CL1 CLOSED / SCHLIESSEN mit CL2 Blue Brown Black 2nCH 2nCH FOT+ L24V S8K2 PPED ELS+ ELS- +LED ANT- ANT+ COMUNELLO ®Copyright 2019 - All rights reserved...
- Page 55 Konfiguration mit HAUPTMOTOR LINKS und NEBENMOTOR RECHTS MOTOR Nr. 1 (links) MOTOR Nr. 2 (rechts) SCHWARZ in OP1 SCHWARZ mit OP2 BLAU in CM1 BLAU mit CM2 BRAUN auf CL1- Braun auf CL2 COMUNELLO ®Copyright 2019 - All rights reserved...
- Page 56 Konfiguration - MOTOR NR. 1 LINKS, MOTOR NR. 2 RECHTS Kabelanschluss der Motoren an das Steuergerät MOTOR Nr. 1 (links) MOTOR Nr. 2 (rechts) SCHWARZ in OP1 SCHWARZ in OP2 BLAU in CM1 BLAU in CM2 BRAUN in CL1 BRAUN in CL2 COMUNELLO ®Copyright 2019 - All rights reserved...
- Page 57 Im Falle eines Eingriffs führt der Motor eine Teilumkehrung aus Im Falle eines Eingriffs führt der Fotozelle DS2 der Motor eine vollständige Umkehrung aus SPERRE / 8K2 Konfiguration des Sicherheit- Ausgeglichene Einstellung 8K2 Einstellung als Öffner seingangs Tabelle 3 COMUNELLO ®Copyright 2019 - All rights reserved...
- Page 58 3 Sekunden des Blinklichts vor dem Schließe / Blinkleuchten-Pause Tabelle 5 Wichtiger Hinweis: Das Steuergerät kann programmiert werden, wenn sich alle Sicherheitseinrichtungen (Öffner-Eingänge der Platine) im Ruhezustand mit geschlossenem Kontakt befinden. COMUNELLO ®Copyright 2019 - All rights reserved...
-
Page 59: Elektrische Anschlüsse
Testergebnis: Andernfalls erlaubt die Steuerung keine sowohl beim Öffnen als auch beim Schließen die Umkehr der Bewegung. Bewegung und bei jeder Schaltung weist das Blinken aller Programmier-Leds auf den Alarmzustand hin. COMUNELLO ®Copyright 2019 - All rights reserved... - Page 60 1 DELAY Das elektronische Steuergerät ist mit einem DIP-Schalter SW1 ausgestattet, mit dem die Funktion 1 und 2 Motoren ausgewählt und bestimmt werden kann, welcher der Motoren zuerst und welcher danach starten soll. COMUNELLO ®Copyright 2019 - All rights reserved...
- Page 61 Motorbetriebszeit von 30 Sekunden (kann bis max. 4 Minuten eingestellt • Nach Ablauf dieser 10 Sekunden bleibt die LED f3 fix eingeschaltet. werden) und ohne Verlangsamung. Zur Änderung der Betriebszeit der Motoren 1 und 2, die Programmierung COMUNELLO ®Copyright 2019 - All rights reserved...
-
Page 62: Pause Time
Aktivierung dieses Betriebsmodus muss folgendermaßen vorgegangen werden: 8.1.7. LED L7 - AUTOMATISCHE PROGRAMMIERUNG: Das Steuergerät ermöglicht es, eine automatische Programmierung • Sicherstellen, dass das Erweiterte Menü 1 freigegeben wurde (VEREINFACHT) durchzuführen, um den Hub und die Verlangsamung COMUNELLO ®Copyright 2019 - All rights reserved... - Page 63 8.3.2 LED L2 - STEP BY STEP 1: abgeschlossen. Wenn die Betriebslogik der Funktionsweise „P/P1 Schritt-Schritt 1“ aktiviert Dieser Vorgang muss wiederholt werden, wenn die anfängliche Einstellung werden soll, folgendermaßen vorgehen: wieder aktiviert werden soll. COMUNELLO ®Copyright 2019 - All rights reserved...
- Page 64 Programmierung nach Vollendung des Öffnungs- und Schließzyklus KLEUCHTEN-PAUSE zweimal hintereinander, anstatt nur einmal auf die Taste SET zu drücken. MENÜEBENE 3 BLINKEN Während der Programmierung kann anstatt der Taste SET auf dem COMUNELLO ®Copyright 2019 - All rights reserved...
- Page 65 Defektüberwachung gemäß Kategorie 2 der Richtlinie EN 954-1. (die LED L4 wird schnell blinken) und dann die Taste SET betätigen. Dieser Vorgang muss wiederholt werden, wenn die anfängliche Einstellung wieder aktiviert werden soll. COMUNELLO ®Copyright 2019 - All rights reserved...
-
Page 66: Garantie
S.p.A. gesendete von der Garantie abgedeckte Material muss frei Haus geliefert werden und wird dann an den zugewiesenen Ort zurückgesandt. Das Material, das als fehlerhaft eingestuft und an Fratelli Comunello S.p.A. gesendet wurde, bleibt Eigentum der letztgenannten Gesellschaft. - Die Arbeitskosten für Reparaturen und Ersatz gehen zu Lasten des Käufers. -
Page 67: Déclaration De Conformité Ce
été identifiée et que sa conformité avec les conditions de la Directive 2006/42/CE et la législation nationale transpose. Dr. LUCA COMUNELLO Fratelli Comunello Représentant légal t légal Fratelli Comunello S.p.A. Société avec système de gestion de la qualité certifié UNI EN ISO 9001:2015. COMUNELLO ®Copyright 2019 - All rights reserved... - Page 68 Le manuel contient des QR-CODE avec lien direct vers la chaîne You-Tube «COMUNELLO TV» où sont publiées les vidéos techniques de la programmation la plus importante pour la mise en service de l’automatisation, qui sont expliquées étape par étape.
-
Page 69: Description Des Connexions
PEDESTRIAN PUSH BUTTON (N.O) PULSANTE APRI-CHIUDI (N.O.) PUSH BUTTON (N.O) 11.8V ANTENNA ELETTROSERRATURA 12VDC 15W ELECTRIC LOCK 12V ALIMENTAZIONE SERVIZI SUPPLY SERVICES LUCE SPIA TRASFORMATORE LIGHT TRANSFORMER 230 / 25V - 0,8A, 11,8V - 3,5A COMUNELLO ®Copyright 2019 - All rights reserved... - Page 70 3 ÉTAPES DS1, DS2 et STOP/8K2 sont pontés de l’usine. Pour connecter les photocellules, le bouton d’arrêt et les bords sensibles, il est nécessaire de retirer le cavalier du terminal. COMUNELLO ®Copyright 2019 - All rights reserved...
-
Page 71: Caractéristiques Techniques
Codes TX max. en mémoire : 120 (CODE PP o CODE PED/2°CH) Taille de la carte : 160 x 107 mm. Fusible 1 : T 6,3 A 250V (retardé) Fusible 2 : T 0,5 A 250V (retardé) COMUNELLO ®Copyright 2019 - All rights reserved... - Page 72 SORTIE MOTEUR 2 NE PAS UTILISER Noir FERMER M2 NOT MOTOR CONSID. ATTENTION : NE CHANGEZ PAS LA CONFIGURATION l’auto- mation s’ouvre à GAUCHE et ferme à DROITE (vue de profil comme dans l’image) COMUNELLO ®Copyright 2019 - All rights reserved...
- Page 73 GND E1 2° CH MOT2 ENC2 MOT1 ENC1 FOTO+ LAMP 24V 4W (N.C.) END STOP CLOSE MOTOR INTERNAL MOTOR 230V 50HZ (N.C.) END STOP OPEN MOTOR (SALIENT 230V - WITH MAIN BOARD) (SALIENT 230V) COMUNELLO ®Copyright 2019 - All rights reserved...
- Page 74 Raccordement filaire SANS ENCODEUR des moteurs à l’unité de commande OPEN / OUVRIR avec OP1 OPEN / OUVRIR avec OP2 COMMON avec CM1 COMMON avec CM2 CLOSED / FERMER avec CL1 CLOSED / FERMER avec CL2 COMUNELLO ®Copyright 2019 - All rights reserved...
- Page 75 Raccordement filaire des moteurs à l’unité de commande OPEN / OUVRIR avec OP1 OPEN / OUVRIR avec OP2 COMMON avec CM1 COMMON MMON avec CM2 CLOSED / FERMER avec CL1 CLOSED / FERMER avec CL2 OSED F ER COMUNELLO ®Copyright 2019 - All rights reserved...
- Page 76 OPEN / OUVRIR avec OP2 COMMON avec CM1 COMMON avec CM2 CLOSED / FERMER avec CL1 CLOSED / FERMER avec CL2 Blue Brown Black 2nCH 2nCH FOT+ L24V S8K2 PPED ELS+ ELS- +LED ANT- ANT+ COMUNELLO ®Copyright 2019 - All rights reserved...
- Page 77 Configuration avec moteur MAÎTRE à GAUCHE et moteur ESCLAVE à DROITE MOTEUR n.1 (à gauche) MOTEUR n.2 (à droite) NOIR su OP1 BLACK with OP2 BLEU sur CM1 BLUE on CM2 MARRON sur CL1- BROWN on CL2 COMUNELLO ®Copyright 2019 - All rights reserved...
- Page 78 5.5 CONDOR 500 / CONDOR 500 S - schéma de raccordement des moteurs Configuration à ouverture retardée du MOTEUR n°2 COMUNELLO ®Copyright 2019 - All rights reserved...
Need help?
Do you have a question about the CU - 230V - HP and is the answer not in the manual?
Questions and answers