L-Acoustics KARAi Rigging Manual
Hide thumbs
Also See for KARAi:
- User manual (30 pages) ,
- Product information (12 pages) ,
- User manual (16 pages)
Table of Contents
Advertisement
Advertisement
Table of Contents

Related Manuals for L-Acoustics KARAi


Summary of Contents for L-Acoustics KARAi
- Page 1 KARAi rigging manual (EN)
- Page 2 Document reference: KARAi_RM_EN_1-1 Distribution date: March 2, 2017 © 2017 L-ACOUSTICS ® . All rights reserved. No part of this publication may be reproduced or transmitted in any form or by any means without the express written consent of the publisher.
-
Page 3: Safety Warnings
Read this manual Heed all safety warnings Follow all instructions The user should never incorporate equipment or accessories not approved by L-ACOUSTICS ® Personnel qualification Installation and set-up should only be carried out by qualified personnel that are familiar with the rigging techniques and safety recommendations outlined in this manual. - Page 4 (Mechanical Data section) [3.4] to ensure the mechanical conformity of the system before installation. 11. Local regulations Some countries require higher Ultimate Strength Safety Factors and specific rigging approvals. It is the user’s responsibility to verify that any overhead suspension of L-ACOUSTICS ® systems has been made in accordance with all applicable local regulations.
-
Page 5: Ec Declaration Of Conformity
Head of Engineering & Design dept. Maximum flown vertical array configurations: - General standard: 12 KARAi or 4 SB18i/12 KARAi or 8 SB18i. - BGV standard: 12 KARAi or 3 SB18i/9 KARAi or 8 SB18i. Maximum stacked vertical array configurations: - General standard: 9 KARAi. -
Page 6: Table Of Contents
Modeling and safety ..........................9 6.1.2 Array assembling procedure ........................9 6.1.3 Array disassembling procedure ......................15 Flying a SB18i/KARAi mixed array or a SB18i standalone array ................16 6.2.1 Modeling and safety ..........................16 6.2.2 Array assembling procedure ........................16 6.2.3... -
Page 7: Introduction
All along the manual, a bracketed number refers to a section. For example, [3.2] stands for the present section: Symbol description. Unpacking Carefully open the shipping carton and check the product for any noticeable damage. Each L-ACOUSTICS ® product is tested and inspected before leaving the factory and should arrive in perfect condition. -
Page 8: Kara I System
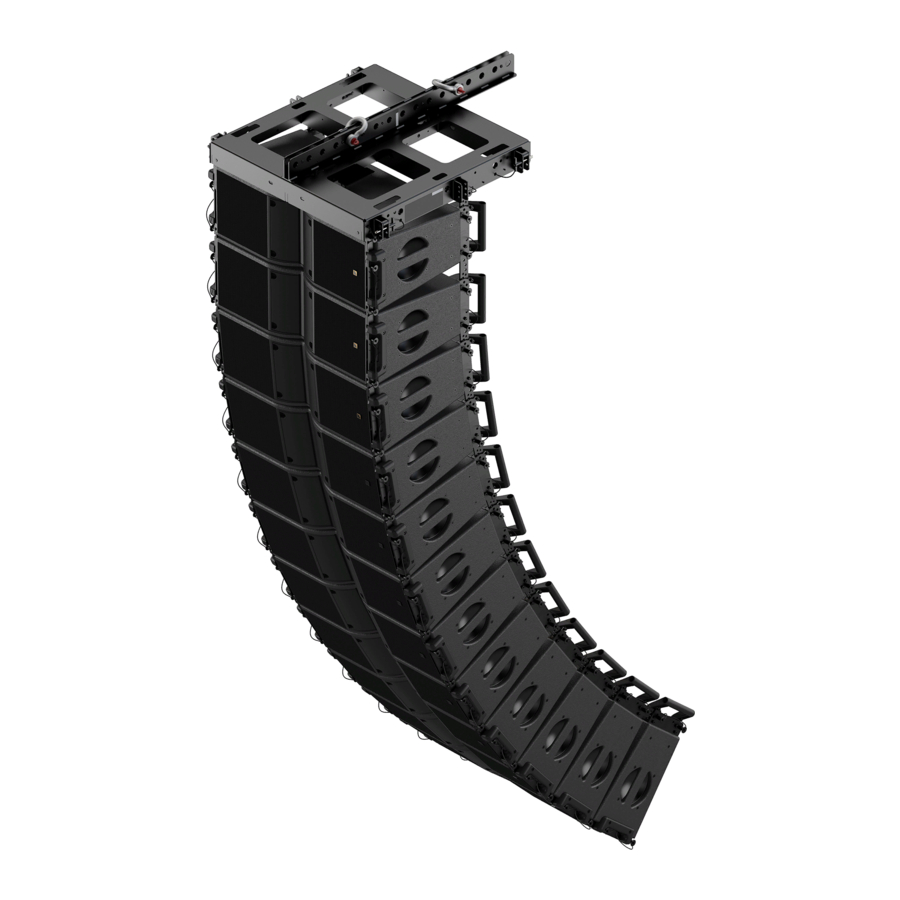
VERSION 1.1 KARA SYSTEM ® The L-ACOUSTICS ® M-BUMPi and KARAiSB18LINK elements have been designed to rig the KARAi ® Modular ® Line Source System. The system approach developed by L-ACOUSTICS for KARAi consists of the elements needed to fully take advantage ®... - Page 9 M-BUMPi Two SB18i enclosures KARAiSB18LINK Six KARAi enclosures SB28 Figure 2: KARAi system components (part 2) w w w . l - a c o u s t i c s . c o m KARA _RM_EN_1-1...
-
Page 10: Karai
A set of M6 hex bolts and washers to attach a KARAi or a SB18i enclosure to the M-BUMPi. A set of screws to fix a bar to the bottom KARAi of a flown array and obtain a pullback configuration. -
Page 11: Installation
Check the mechanical conformity of the system. The M-BUMPi can fly an array of up to 12 KARAi enclosures along with all loudspeakers cables (refer to the KARAi User manual [3.4]). However, this maximum number can decrease in line with the rigging option [9.1.1] and the array curvature. - Page 12 ® KARA MODULAR WST ® SYSTEM RIGGING PROCEDURES VERSION 1.1 Procedure After having selected a rigging option [9.1.1], assemble an M-BUMPi as follows: a. Assemble the bars by slightly driving the self-locking M8 hex bolts (by groups of four on each bar end) as shown in both top boxes of Figure 5 (6 mm hex bit, 13 mm hex key).
- Page 13 Figure 6. Note: It is recommended to select the 10° angle on the KARAi intended to be fixed to the M-BUMPi. In that way, the KARAi axis will be parallel to the M-BUMPi.
- Page 14 Attach KARAi#1 to the M-BUMPi by driving four self-locking M6 hex bolts (included in the M-BUMPi package) into the KARAi#1 top link holes and the M-BUMPi link holes (5 mm hex bit, 10 mm hex key, 5 N.m/45 in.lb On each angle arm, select hole 10° (KARAi#1 projection axis parallel to the M-BUMPi).
- Page 15 35 mm Torx screw (T30 bit). ® b. Rotate KARAi#2 so as to position its rear top link holes with both KARAi#1 rear bottom link holes and secure each pair by slightly driving a 55 mm Torx screw (T30 bit).
- Page 16 VERSION 1.1 Repeat steps 4 and 5 until all KARAi enclosures composing the array are assembled. Secure the fixation points on the bottom KARAi as follows (repeat on both sides of the enclosure): a. Drive a 35 mm Torx screw into the front bottom hole (T30 bit, 5 N.m/45 in.lb ®...
-
Page 17: Array Disassembling Procedure
If the array is intended to be flown in pullback configuration, mount a M-BUMPi bar to the bottom KARAi as follows: a. Undo the two flat-head Torx screws on holes shown in Figure 10 (T30 bit). ® b. Position an M-BUMPi bar face to both holes and drive two round-head 35 mm Torx ®... -
Page 18: Flying A Sb18I/Karai Mixed Array Or A Sb18I Standalone Array
Check the mechanical conformity of the system. The M-BUMPi can fly an array of up to 4 SB18i/12 KARAi or 8 SB18i along with all loudspeaker cables (refer to the KARAi and SB18i User manuals [3.4]). However, this maximum number can decrease in line with the rigging option [9.1.1] and the array curvature. - Page 19 Procedure After having selected a rigging option [9.1.1], assemble an M-BUMPi as follows: a. Assemble the bars by slightly driving the self-locking M8 hex bolts (by groups of four on each bar end) as shown in both top boxes of Figure 11 (6 mm hex bit, 13 mm hex key). b.
- Page 20 ® KARA MODULAR WST ® SYSTEM RIGGING PROCEDURES VERSION 1.1 Mount four arms to a first SB18i (hereafter designated as SB18i#1) as follows (repeat on each corner of the enclosure): a. Undo the five 35 mm Torx screws on a corner of SB18i#1 (T30 bit). ®...
- Page 21 Attach SB18i#1 to the M-BUMPi by driving four self-locking M6 hex bolts (included in the M-BUMPi package) into the SB18i#1 top link holes and the M-BUMPi link holes (5 mm hex bit, 10 mm hex key, 5 N.m/45 in.lb Full view Detailed view of the front left bolt Detailed view of the rear left bolt Figure 13: Attaching SB18i#1 to the M-BUMPi...
- Page 22 ® KARA MODULAR WST ® SYSTEM RIGGING PROCEDURES VERSION 1.1 Mount four arms to a second SB18i (hereafter designated as SB18i#2) by applying step 2. Attach SB18i#2 to SB18i#1 as follows: a. Position the four SB18i#2 top link holes face to the four SB18i#1 bottom link holes and secure each pair by driving a 35 mm Torx screw (T30 bit, 5 N.m/45 in.lb ®...
- Page 23 Repeat steps 4 and 5 until all SB18i enclosures composing the array are assembled. Turn the front grills of all SB18i composing the array towards the audience to obtain an omnidirectional acoustic pattern or turn one SB18i every four from front to rear to obtain a cardioid acoustic pattern (refer to the SB18 User manual [3.4]).
- Page 24 RIGGING PROCEDURES VERSION 1.1 If the array is intended to be a SB18i/KARAi mixed array, mount two KARAISB18LINK to a first KARAi (hereafter designated as KARAi#1) as follows (repeat on each side of the enclosure): The two KARAISB18LINK components are symmetric about the enclosure central axis. They are differentiated by a number engraved on each of them.
-
Page 25: Array Disassembling Procedure
Apply procedure [6.1.2, step 4 to 10]. Figure 18: Examples of SB18i/KARAi mixed arrays 6.2.3 Array disassembling procedure Apply the above procedure in the reversed sequence. w w w . l - a c o u s t i c s . c o m... -
Page 26: Stacking A Karai Standalone Array
9 KARAi enclosures along with all loudspeaker cables (refer to the KARAi User manual [3.4]). The platform must be installed in rear extension configuration if the KARAi array is intended to have a null WARNING site angle (refer to [9.2.1]). - Page 27 Respect the final orientation as shown in the bottom left or right box of Figure 19. b. If the bottom KARAi site angle is intended to be 0° (see the left box of Figure 20), raise the platform to approximately 10 mm (support material not included).
- Page 28 RIGGING PROCEDURES VERSION 1.1 Mount four arms to a first KARAi (hereafter designated as KARAi#1) as follows (repeat on each enclosure side): The four arms are different and can be identified by a number engraved on each of them. Mount arm 641 on the rear left, 642 on the front left, 801 on the front right, and 802 on the rear right.
- Page 29 Position KARAi#1 upside down and attach it to the M-BUMPi by driving four self-locking M6 hex bolts (included in the M-BUMPi package) into the KARAi#1 bottom link holes and the M-BUMPi link holes (5 mm hex bit, 10 mm hex key, 5 N.m/45 in.lb On each angle arm, select the angle hole corresponding to the chosen site angle [9.2.2].
- Page 30 35 mm Torx screw (T30 bit). ® b. Rotate KARAi#2 so as to position its rear bottom link holes with both KARAi#1 rear top link holes and secure each pair by slightly driving a 55 mm Torx screws (T30 bit).
-
Page 31: Array Disassembling Procedure
Repeat steps 5 and 6 until all KARAi enclosures composing the array are assembled. Secure the fixation points on the top KARAi as follows (repeat on both enclosure sides): a. Drive a 35 mm Torx screw into the front top hole (T30 bit, 5 N.m/45 in.lb ®... -
Page 32: Stacking A Sb18I/Karai Mixed Array Or A Sb18I Standalone Array
A ground stacked array requires to be installed on a perfectly plane and horizontal surface. It can be composed of a maximum of 4 SB18i/9 KARAi or 8 SB18i enclosures within the setup safety limits given in Table 2 regarding the angle between the top SB18i and the bottom KARAi (refer to [9.2.2] to obtain the... - Page 33 Procedure Mount four arms to a first SB18i (hereafter designated as SB18i#1) as follows (repeat on each corner of the enclosure): a. Undo the five 35 mm Torx ® screws on a corner of SB18#1 (T30 bit). b. Position an arm as shown in Figure 25 and slightly drive the five screws. Note: The four arms are identical and can be identified by number 611 engraved on each one.
- Page 34 ® KARA MODULAR WST ® SYSTEM RIGGING PROCEDURES VERSION 1.1 Attach SB18i#2 to SB18i#1 as follows: a. Position the four SB18i#2 bottom link holes face to the four SB18i#1 top link holes and secure each pair by driving a 35 mm Torx screw (T30 bit, 5 N.m/45 in.lb ®...
- Page 35 Repeat steps 2 and 3 until all SB18i enclosures composing the array are assembled. If the array is intended to be a SB18i standalone array, apply the following procedure: a. Fully drive all Torx ® screws on the four arms of the top SB18i enclosure (T30 bit, 5 N.m/45 in.lb b.
- Page 36 RIGGING PROCEDURES VERSION 1.1 If the array is intended to be a SB18i/KARAi mixed array, attach two M-BUMPi bars to the top SB18i as follows (repeat on each enclosure side): a. Position the M-BUMPi bar face to two SB18i arms as shown in Figure 29, and secure it by driving two self- locking M6 hex bolts (included in the M-BUMPi package) (5 mm hex bit, 10 mm hex key, 5 N.m/45 in.lb...
- Page 37 Mount four arms to a first KARAi (hereafter designated as KARAi#1) as follows (repeat for each enclosure side): The four arms are different and can be identified by a number engraved on each of them. Mount arm 641 on the rear left, 642 on the front left, 801 on the front right, and 802 on the rear right.
- Page 38 RIGGING PROCEDURES VERSION 1.1 Turn KARAi#1 arms downwards, position its bottom link holes face to the M-BUMPi link holes, and then secure as follows: a. Drive a self-locking M6 hex bolt with two M6 washers (included in the M-BUMPi package) into each front link hole pair, as shown in the bottom left box of Figure 31 (5 mm hex bit, 10 mm hex key, 5 N.m/45 in.lb...
- Page 39 35 mm Torx screw (T30 bit). ® b. Rotate KARAi#2 so as to position its rear bottom link holes with both KARAi#1 rear top link holes and secure each pair by slightly driving a 55 mm Torx screw (T30 bit).
-
Page 40: Array Disassembling Procedure
VERSION 1.1 10. Repeat steps 8 and 9 until all KARAi enclosures composing the array are assembled. 11. Secure the fixation points on the top KARAi as follows (repeat on both sides of the enclosure): a. Drive a 35 mm Torx screw into the front top hole (T30 bit, 5 N.m/45 in.lb... -
Page 41: Care And Maintenance
WARNING Replacement kit The replacement kit (KR) available for the customer is detailed in Table 3. Service and repair work for any other part must be carried out by an L-ACOUSTICS ® authorized representative. Otherwise, the customer may be exposed to dangerous situations and the warranty will no longer apply. -
Page 42: Specifications
706 x 160 x690 mm / 27.8 x 6.3 x 27.17 inch Weight 21 kg / 46.3 lbs Setup safety limits Maximum 12 KARAi or 4 SB18i/12 KARAi or 8 SB18i in flown configuration. Maximum 9 KARAi in stacked configuration Material High-grade steel coated with polyester powder... -
Page 43: Appendix
Flown array options and site angle setting 9.1.1 M-BUMPi rigging options The rigging options for flying a KARAi standalone array, SB18i/KARAi mixed array, or SB18i standalone array are given in Table 4 in which: Option 0 is adapted to SB18i standalone arrays. - Page 44 MODULAR WST ® SYSTEM RIGGING PROCEDURES VERSION 1.1 Option 3: KARAi or SB18i/KARAi 1 rigging point (3 positions) 2 rigging points (spacing = 637 mm/25 inch) Option 4: KARAi or SB18i/KARAi 1 rigging point (3 positions) 2 rigging points (spacing = 637 mm/25 inch) Option 5: KARAi or SB18i/KARAi ...
-
Page 45: M-Bumpi Site Angle Setting
Rigging options 2 to 7 with a single rigging point on the rear shackle offer one site angle each. The site angle depends on the M-BUMPi/SB18i/KARAi array size and shape. It can be calculated in SOUNDVISION Software [3.4] using an equivalent M-BUMP/SB18/KARA array. The equivalent array must be composed of the same number of... -
Page 46: Pullback Configuration Setup Safety Limits
Pullback configuration setup safety limits An M-BUMPi bar can be fixed to the bottom enclosure of a KARAi array to obtain a pullback configuration (array site angle settable down to -90°) within the mechanical safety limits given in Table 6. -
Page 47: Stacked Array Options And Site Angle Setting
The configurations shown in Figure 36 and Figure 37 are purely indicative. Refer to [6.3.1] for setup safety limits. WARNING Full view Positions of the KARAi rigging points 0° site angle Horizontal line Rear extension... -
Page 48: Array Site Angle Setting
9.2.2 Array site angle setting The site angle of the stacked KARAi array will be determined by the angle of the bottom enclosure in the range from -10° to 0°. Table 7 gives all possible site angle settings: Table 7: Possible site angles for a KARAi stacked array... - Page 49 L-Acoustics, an L-Group Company 13 rue Levacher Cintrat – 91460 Marcoussis – France +33 1 69 63 69 63 – info@l-acoustics.com www.l-acoustics.com L-Acoustics GmbH L-Acoustics Ltd. L-Acoustics Inc. Steiermärker Str. 3-5 PO. Box Adler Shine - Aston House 2645 Townsgate Road, Suite 600...
Need help?
Do you have a question about the KARAi and is the answer not in the manual?
Questions and answers