
Related Manuals for Ghibli & Wirbel RACER R 85 FD 65


Summary of Contents for Ghibli & Wirbel RACER R 85 FD 65
- Page 1 www.ghibliwirbel.com Professional Cleaning Machines Since 1968 RACER R 85 FD 65 R 85 FD 75 RANGER R 115 FD 75 R 115 FD 85 Use and Maintenance 49.0296.00 ed. 04/2021...
- Page 2 www.ghibliwirbel.com Professional Cleaning Machines Since 1968 IPX3 MADE IN ITALY Scrubber Dryer Mod: ........Battery: ........Art.: ....Charging: ........ Year: ....GVW: ... s/n: ......IPX3 MADE IN ITALY Scrubber Dryer Mod: ........ Battery: ..V .....W Art.: ....Charging: ........Year: .....
- Page 3 www.ghibliwirbel.com Professional Cleaning Machines Since 1968 Produttore Caratteristiche elettriche N° Matricola Manufacturer Electrical characteristics Serial N° Producteur Caractéristiques électriques N° Matricule Hersteller Elektrische Eigenschaften Serien-Nr. Fabricante Características eléctricas N° Matrícola Produtor Características elétricas Número de série Producent Elektrische eigenschappen Serienummer Výrobce Elektrické...
- Page 4 www.ghibliwirbel.com Professional Cleaning Machines Since 1968...
- Page 5 www.ghibliwirbel.com Professional Cleaning Machines Since 1968 English ......................EN - 1 (Translation of original instructions)
- Page 7 www.ghibliwirbel.com Professional Cleaning Machines Since 1968 Dear Customer, Thank you for choosing one of our cleaning products. The floor scrubber dryer that you have purchased has been designed to satisfy the user in terms of ease of use and reliability over time. We are aware that in order for a good product to stay that way, over time, it requires continuous updates aimed at meeting the expectations of those who use it on a daily basis.
-
Page 8: Table Of Contents
www.ghibliwirbel.com Professional Cleaning Machines Since 1968 INDEX INDEX ............................. 2 TECHNICAL DATA ......................... 3 1.1 - INTRODUCTION ........................5 1.1.a - Operator position ......................5 1.1.b - General warnings while using the machine ..............5 1.2 - NON-INTENDED MACHINE USE..................5 2.1 - GETTING TO KNOW THE MACHINE (Fig. -
Page 9: Technical Data
www.ghibliwirbel.com Professional Cleaning Machines Since 1968 TECHNICAL DATA RACER R 85 RANGER R 115 FD 65 FD 75 FD 75 FD 85 Driving type Ride-on Features Operation and Supply Battery 24 V N° 2 - 12V 105Ah (C5) N° 4 - 6V 240Ah (C5) Type of batteries N°... - Page 10 www.ghibliwirbel.com Professional Cleaning Machines Since 1968 RACER R 85 RANGER R 115 FD 65 FD 75 FD 75 FD 85 Suction Motor power 550 W Depression (water column) 125 mbar / 1250 mmH Air flow 30 l/sec Tank Typology Double tank Solution capacity 80 l 110 l...
-
Page 11: Introduction
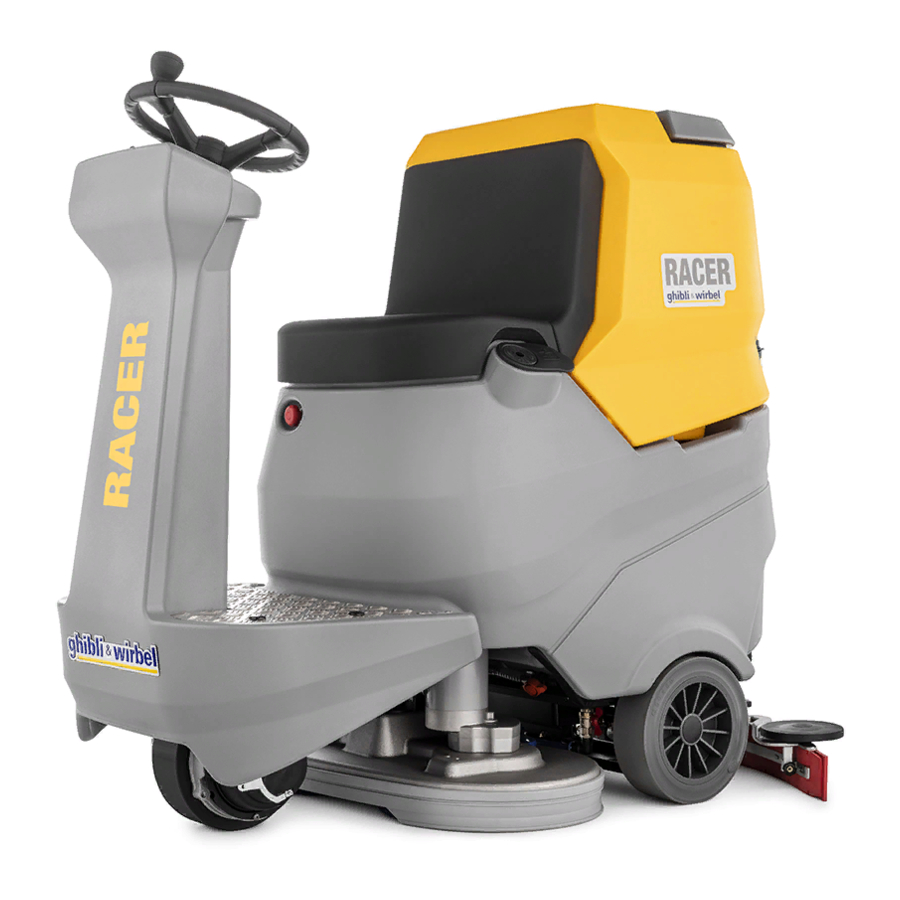
www.ghibliwirbel.com Professional Cleaning Machines Since 1968 1.1 - INTRODUCTION 2.1 - GETTING TO KNOW THE MACHINE (Fig. A) NOTE: (1) Steering-wheel (2) Dashboard The numbers and the figure references (3) Seat shown in brackets refer to the components (4) Operator presence sensor indicated in the annexed illustrative sheet. -
Page 12: A - Battery Installation (Fig. A)
www.ghibliwirbel.com Professional Cleaning Machines Since 1968 5.1 - CHARGING THE 3.1.a - Battery installation (Fig. A) BATTERY - Lift the recovery tank carefully (11). - Depending on the configuration (4 6 V batteries, 2 12 V batteries, 1 package of DANGER: 24 batteries), position and connect the Charge the batteries in rooms which... -
Page 13: A - Charging The Battery With An External Battery Charger (Fig. G)
www.ghibliwirbel.com Professional Cleaning Machines Since 1968 6.1 - MACHINE CONTROLS 5.1.a - Charging the battery with an external battery charger 6.1.a - Control panel (Fig. F) (Fig. G) - Check the function of the battery charger (29) Ignition key consulting the corresponding Manual. - Turned in a clockwise direction to “ON”... - Page 14 www.ghibliwirbel.com Professional Cleaning Machines Since 1968 (41) Display - See the specific chapter. (44) Suction button - Pressing the button (44) the suction de- (42) “Ready to go” button vice turns on and the icon “ ” shows up on the display and, if the forward gear is - Pressing the button (42) on the display, engaged or if the machine is in neutral, the squeegee lowers.
- Page 15 www.ghibliwirbel.com Professional Cleaning Machines Since 1968 (48) Chemical agent dosing but- NOTE: ton (if present) The brushes rotate both in forward and re- verse mode and with speed adjustment (30) - Pressing the button (48) the icon “ ” at “0”. shows up on the display, and the dosing of the chemical agent is prepared.
-
Page 16: B - Accelerator Pedal (Fig. A)
www.ghibliwirbel.com Professional Cleaning Machines Since 1968 (52) Operating light button Travel direction 6.1.b - Accelerator pedal (Fig. A) The travel direction arrow indicates the se- - Pressing the accelerator pedal (7), the lected advance function by acting on buttons machine moves either forward or back- ward, according to the travel direction but- (31a) “... -
Page 17: Emergency
www.ghibliwirbel.com Professional Cleaning Machines Since 1968 Extra-pressure Accelerator pedal pressed Is viewed on the display indicating the brush operation pressure. This icon inserts when the machine starts indicating a wrong starting operation se- Press the button (47) “ ” to change the quence, to remove the alarm release the ac- work pressure. -
Page 18: Filling The Tank (Fig. D)
www.ghibliwirbel.com Professional Cleaning Machines Since 1968 10.1 - FILLING THE TANK (Fig. D) DANGER: In case of contact of the detergent with the eyes and skin, or in case of WARNING: ingestion, please refer to the safety Only add clean mains water to the and application bulletin of the deter- tank at a temperature no greater than gent manufacturer. -
Page 19: C - Using The Machine
www.ghibliwirbel.com Professional Cleaning Machines Since 1968 Washing, brushing, drying cycle: DANGER: - Press the button “Ready to go” (42) “ ” Avoid sudden sharp turns. Turn the to prepare the detergent flow, the brushes wheel from lock to lock only at low rotation and the start of the suction device. -
Page 20: D - End Of Use And Shutdown
www.ghibliwirbel.com Professional Cleaning Machines Since 1968 11.1.d - End of use and shutdown - Once all of the cleaning operations have NOTE: been completed, shut off, in sequence, The amount of water that comes out can be the rotation of the brushes and the suction modulated by pressing on the end of the tube unit, using the relative controls according (15). -
Page 21: B - Cleaning The Recovery Water Tank (Fig. J)
www.ghibliwirbel.com Professional Cleaning Machines Since 1968 - Once finished cleaning, lift the tube (17), - Replace all the components in reverse close it with its appropriate cap (57) and order. position it within its appropriate lodgings. 13.3 - OPERATIONS TO BE 13.2.b - Cleaning the recovery water PERFORMED EVERY 3 MONTHS tank (Fig. -
Page 22: B - Replacing The Squeegee Rubber Blades (Fig. K)
www.ghibliwirbel.com Professional Cleaning Machines Since 1968 13.4.b - Splash guard rubber adjust- ment (Fig. M) NOTE: Depending on the type of floor to be treat- When the rubber blades (60) or (61) are worn ed or after replacing the brushes, it may be on one side, on one occasion they may be necessary to adjust the height of the splash turned over. -
Page 23: E - Checking The Wear Status Of The Three Wheels (Fig. A)
www.ghibliwirbel.com Professional Cleaning Machines Since 1968 13.4.e - Squeegee pressure adjust- ment (Fig. O) 14 - Depending on the type of floor to be treated or after replacing the squee- gee rubbers, it may be necessary to adjust squeegee floor pressure. -
Page 24: Parameter Setting (Fig. F)
www.ghibliwirbel.com Professional Cleaning Machines Since 1968 14.1 - PARAMETER SETTING General General (Fig. F) Main Main 14.1.a - OPERATOR parameters Language Language selection: selection: It is possible for the operator to have access to the menu to set the following parameters: •... - Page 25 www.ghibliwirbel.com Professional Cleaning Machines Since 1968 Language setting: Display setting - Contrast: General General General General Main Main Main Main Language Language Display Display selection: selection: Tune: Tune: min:0 min:0 max:50 max:50 General Main Principal configurations General Main Principal configurations Language selection Language selection Display Tune...
-
Page 26: Fuse Check/Replacement
www.ghibliwirbel.com Professional Cleaning Machines Since 1968 15.1 - FUSE CHECK/REPLACEMENT NOTE: All machine electrical circuits are protected by auto-resettable electronic devices. The safety fuses activates only in case of serious damage. It is recommended to have the fuses replaced by qualified personnel only. 16 - 16.1 - ALARMS DURING THE FUNCTIONING (Fig. - Page 27 www.ghibliwirbel.com Professional Cleaning Machines Since 1968 ALARM MEANING SOLUTION Turn off and wait for the machine to cool down. Check the consumption of the brush and suction AL_41: Function Overheating device motors, the status of the ambient ventila- tion and restart. Turn off the machine for at least 10 seconds, then AL_42: Function Power damaged...
- Page 28 www.ghibliwirbel.com Professional Cleaning Machines Since 1968 ALARM MEANING SOLUTION Turn off the machine, check the load (motor), Over-current the mechanics, the cabling and the connections, AL_62: Function Brush actuator then look for the presence of a short circuit on the outlet.
-
Page 29: Troubleshooting
www.ghibliwirbel.com Professional Cleaning Machines Since 1968 17.1 - TROUBLESHOOTING PROBLEM CAUSE SOLUTION The machine does not start Low battery. Check that the battery is up when the key is turned. charged. Main fuse blown. Replace the fuse found on the battery cable. (*) Defective key. -
Page 30: Demolition Of The Machine
www.ghibliwirbel.com Professional Cleaning Machines Since 1968 PROBLEM CAUSE SOLUTION The machine does not move Operator not properly seated Sit properly in the driver’s in working conditions. in the driver’s seat. seat. Defective motorwheel. Replace the motorwheel. (*) Faulty Electronic board. Replace the electronic board. -
Page 31: Wiring Diagram
www.ghibliwirbel.com Professional Cleaning Machines Since 1968 19.1 - WIRING DIAGRAM Legend: Colour codes: Accelerator Black Batteries Blue Battery charger Brown Flashing light (optional) Green Electromagnetic brake Grey Battery connector Orange Functions table Pink Display Command panel Violet Solenoid valve White Battery charger fuse (1A) Yellow Illumination fuse (if present) (3A) - Page 32 www.ghibliwirbel.com Professional Cleaning Machines Since 1968 ENGLISH - 26...
- Page 36 Professional Cleaning Machines Since 1968 DEALER Ghibli & Wirbel S.p.A. Via Circonvallazione, 5 - 27020 Dorno PV - Italia P. +39 0382 848811 - F. +39 0382 84668 - M. info@ghibliwirbel.com www.ghibliwirbel.com 100% MADE IN ITALY...
Need help?
Do you have a question about the RACER R 85 FD 65 and is the answer not in the manual?
Questions and answers