Advertisement
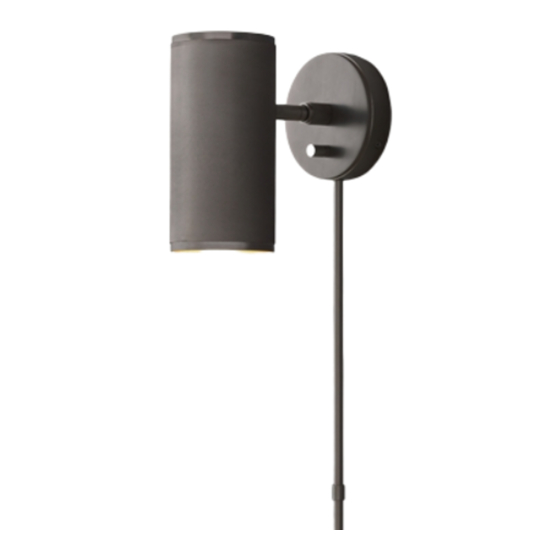
PARTS ENCLOSED:
(A) Wall Anchors (2)
(G) ON/OFF Rotating
(B) Mounting Plate (1)
(C) Wall Screws (2)
(H) Plate Screws (3)
(D) Top Cord Cover (1)
(I) Shade (1)
(E) Plug (1)
(J) LED Bulb (1)
(F) Bottom Cord Cover (1) (K) Shade Joint (1)
(L) Back Plate (1)
RIDLEY TASK SCONCE
Plug-In Installation
RIDLEY TASK SCONCE – ASSEMBLY INSTRUCTIONS
IMPORTANT SAFETY INSTRUCTIONS:
Switch (1)
The fixture can be used as a plug-in or a fixed unit when used with the appropriate
conversion kit. For your safety, this sconce is equipped with a 3-pronged polarized
plug. If the plug does not fit securely into your outlet, do not force it – contact a
professional electrician. Use the plug with an extension cord only if it can be fully
inserted into the cord's socket. Never alter the plug in any way.
This fixture has been rated for up to (1) 4w max Type T LED bulb (MODEL NO.: T8-4,
included) or (1) 40w max Type T incandescent bulb (not
fire, do not exceed the recommended wattage.
WARNINGS:
All wires are connected. When unpacking, be careful not to pull wires, as a bad
connection may result. Do not connect electricity until the fixture is fully
assembled. To reduce the risk of fire, electrical shock, or personal injury, always
turn off and unplug fixture and allow it to cool prior to replacing lightbulb.
Do not touch bulb when fixture is turned on or look directly at lit bulb.
Keep flammable materials away from lit bulb.
DO NOT REMOVE THE CARDBOARD INSULATOR SURROUNDING THE SOCKET.
THIS PRODUCT IS NOT A TOY AND HAS NO PLAY VALUE.
PLUG-IN ASSEMBLY INSTRUCTIONS:
1. Carefully remove all parts from the box and remove all plastic coverings.
2. Drill 2 holes in the wall that align with the holes on the mounting plate of the lamp
3. Place mounting plate (B) onto the wall anchors (A), then screw wall screws (C)
4. Attach the back plate (L) to the mounting plate (B) and use the plate
5. Screw the top cord cover (D) into the hole located on the bottom of the back
6. Screw the bottom cord cover (F) into the top cord cover (D).
7. Insert (1) LED bulb (J) into the threaded socket.
8. Adjust the shade joint (K) to get your desired angle for the shade (I).
9. Insert plug (E) into proper electrical outlet and rotate ON/OFF switch (G) to test
CARE INSTRUCTIONS:
To clean, use a soft, dry cloth.
Do not use polishes or cleaners on the fixture.
WARNING: STRANGULATION HAZARD
Keep cord at least 3 feet away from cribs, bassinets, and toddler beds.
Keep out of reach of children under 3 years of age.
(B) and insert wall anchors (A).
into anchors.
screws (H) to secure.
plate (L).
fixture.
included).
To avoid the risk of
Advertisement
Table of Contents

Subscribe to Our Youtube Channel
Related Manuals for RH Teen RIDLEY TASK SCONCE


Summary of Contents for RH Teen RIDLEY TASK SCONCE
- Page 1 RIDLEY TASK SCONCE – ASSEMBLY INSTRUCTIONS PARTS ENCLOSED: IMPORTANT SAFETY INSTRUCTIONS: (A) Wall Anchors (2) (G) ON/OFF Rotating (B) Mounting Plate (1) Switch (1) The fixture can be used as a plug-in or a fixed unit when used with the appropriate...
- Page 2 RIDLEY TASK SCONCE – ASSEMBLY INSTRUCTIONS IMPORTANT SAFETY INSTRUCTIONS: PARTS ENCLOSED: (A) Ground Wire Screw (1) (G) Plastic Wire The fixture can be used as a plug-in or a fixed unit when used with the appropriate (B) Mounting Plate (1) Connector(3) conversion kit.
Need help?
Do you have a question about the RIDLEY TASK SCONCE and is the answer not in the manual?
Questions and answers