Table of Contents
Advertisement
Advertisement
Table of Contents

Related Manuals for Kemper Profiling Amplifier


Summary of Contents for Kemper Profiling Amplifier
- Page 1 Kemper Profiling Amplifier The Basics & Profiling Guide...
-
Page 2: Legal Notice
Kemper GmbH. Kemper GmbH assumes no responsibility or liability for any errors or inaccuracies that may appear in this book. Except as permitted by such license, no part of this publication may be reproduced, stored in a retrieval system, or transmitted in any form or by any means, electronic, mechanical, recording, by smoke signals or otherwise without the prior written permission of Kemper GmbH. -
Page 3: Table Of Contents
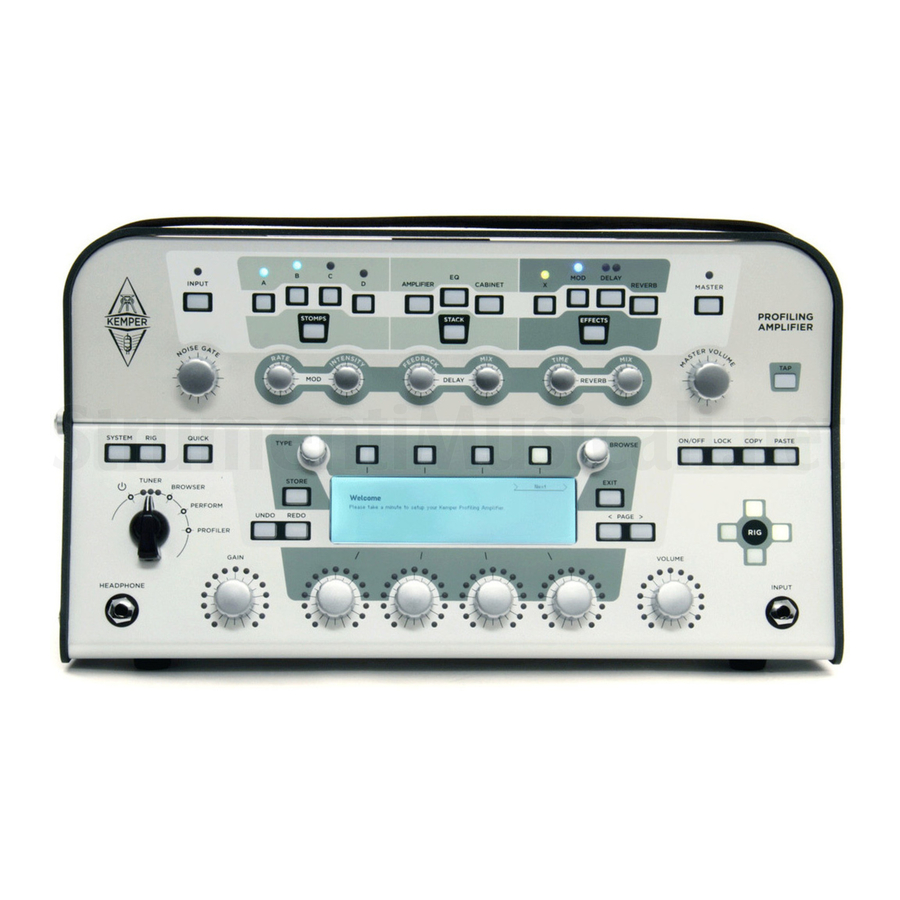
Table Of Contents Okay, so what did I just buy? What is profiling? Getting started More on connecting your gear Choose your rig Stomps Stack Effects Front Panel controls Rig navigation section Type knob Browse knob Page navigation Exit button On/Off button Lock button Copy and paste buttons... - Page 4 KEMPER PROFILING AMPLIFIER (14) Master button (15) Master volume knob (16) Volume knob Back panel overview Master out section Monitor Out section Direct Output/Send Return and Alternative Input Power connector Pedals and switches MIDI S/PDIF digital I/O Using the tuner...
-
Page 5: Making Connections
Updates, backup and sharing sounds Updating the operating system Creating and restoring backups Importing rigs, performances and local presets KPA and MIDI Profiling Guide 40 Profiling an amp General considerations 44 Making connections Connections for profiling a hardware guitar amp Connections for profiling a combination of amp and stomp box Connections for profiling a computer-based guitar amp simulation Taking a profile... - Page 6 KEMPER PROFILING AMPLIFIER...
-
Page 7: The Basics
The Basics... - Page 8 First of all, thank you for choosing the Kemper Profiling Amplifier — KPA for short. We’ve no doubt that once you realize everything it can do, you’ll be as thrilled with it as we are. We designed the Kemper Profil- ing Amplifier to be a complete solution for all your guitar playing needs.
- Page 9 WHAT IS PROFILING? What is profiling? Do you have a favorite setting on a favorite amp that produces your favorite sound? Would you like to be able to get that identical sound from the KPA, and not have to bring your amp to the rehearsal, gig or stu- dio? The method by which you can get that favorite sound into the KPA is what we call “profiling”.
-
Page 10: Getting Started
KEMPER PROFILING AMPLIFIER Getting started Okay, enough talk — let’s plug in and get playing! Connect your guitar to the INPUT on the right side of the front panel. Connect the MAIN OUTS on the rear side to the inputs of your mixer. -
Page 11: Choose Your Rig
GETTING STARTED You can connect two pedals to control parameters such as volume or individual stomp parameters. Finally, the KPA comes with USB connectors so you can connect it to your computer to transfer data and update the firmware. Choose your rig A complete signal chain is called a “rig”. -
Page 12: Stomps
KEMPER PROFILING AMPLIFIER Stomps The first section, labeled “STOMPS”, is for your stomp box effects. This section offers four stomp box slots which are represented by the four buttons labeled A, B, C, and D. Here you can place the built-in stomp effects in any order and configuration you’d like. -
Page 13: Stack
GETTING STARTED Finally, you can select more stomps and effects in the EFFECTS section, and change the settings of the delay and reverb using their dedicated knobs. Stack In the middle of this signal flow, you’ll find the “stack” section with the buttons for AMPLIFIER, EQ (equal- izer) and CABINET. -
Page 14: Front Panel Controls
KEMPER PROFILING AMPLIFIER Front Panel controls We already mentioned some of the buttons and knobs in the previous section, when we showed you how to adjust the various effects and settings within the upper half of the front panel. Below is a short explana- tion of what all of the front panel controls do. -
Page 15: Type Knob
FRONT PANEL CONTROLS Type knob When an effect or stomp is in the focus, the TYPE knob will select between different types of effect algo- rithms. For example, in stomp edit this knob will select distortions, compressor and modulations among others. -
Page 16: On/Off Button
KEMPER PROFILING AMPLIFIER On/Off button This button switches the currently selected module or section on and off. The light of the module or sec- tion button shows you if a module is active or bypassed. You can also switch a module on and off by press- ing the module button itself. -
Page 17: Copy And Paste Buttons
FRONT PANEL CONTROLS Copy and paste buttons Use the COPY and PASTE buttons to grab a module and copy its data to another similar location. For example, you can copy and paste the settings of one stomp to another, either within the same rig, or an- other rig entirely. -
Page 18: Gain Knob
“Input Clean Sens” parameter. This adjusts the sensitivity of the clean input so that the clean sound has the same loudness as the distorted version. Setting the correct input sensitivity is crucial if you want to get the most out of your Kemper Profiling Amplifier. Input button (11) Press this button to enter the input section where you set the input sensitivity for your guitar. -
Page 19: Input Led
FRONT PANEL CONTROLS Clean Sens and Distorted Sens ♦ Different types of guitars produce different output levels depending on their pickups and string gauge: for example, humbucker pickups generate higher voltages compared to single coils, and active guitars gener- ate even hotter signal levels. As we already mentioned, you can adjust the volume compensation of the instrument INPUT by setting “Clean Sens”... -
Page 20: Master Button
KEMPER PROFILING AMPLIFIER Master button (14) This button brings the master settings, such as “Master volume” and “Output Routing”, into focus. The set- tings are global and are therefore not saved with the rig. Instead, use local settings to store specific adjust- ments for different clubs, studios or rehearsal rooms. -
Page 21: Back Panel Overview
BACK PANEL OVERVIEW Back panel overview Now that we’ve gone over the front panel, let’s give you a basic overview of what you’ll find on the back panel. Master out section This is your MAIN STEREO out. Use these outputs to connect to a mixing desk in a recording studio, or to the front of house mixer in a live situation. -
Page 22: Monitor Out Section
KEMPER PROFILING AMPLIFIER Monitor Out section Use this mono output to connect the KPA to a stage monitor with its own level controls. This output also has its own GROUND LIFT. You can also connect this output to a power amp and a regular guitar cabinet. In this case, you need to switch the cabinet simulation off, using the soft button “Monitor Cab Off”... -
Page 23: Power Connector
BACK PANEL OVERVIEW In this case, the RETURN works in combination with the ALTERNATIVE INPUT to achieve a stereo loop re- turn. Power connector Connect this to your wall outlet using the supplied power cable. The internal, universal power supply ac- cepts 100 - 240V AC via the usual IEC inlet. -
Page 24: S/Pdif Digital I/O
KEMPER PROFILING AMPLIFIER S/PDIF digital I/O This is a digital input and output that can be used to connect the KPA to other S/PDIF compatible devices such as certain computers and audio interfaces. -
Page 25: Using The Tuner
USING THE TUNER Using the tuner The tuner LEDs above the chicken head knob are always active so you can monitor your tuning while you play. Even when you’re not in tuning mode, the LEDs give you general information whether your guitar is in tune or not. - Page 26 KEMPER PROFILING AMPLIFIER Building a rig If you have ever used a digital guitar processor before, you will know that building your own rigs is part of the fun! In the KPA you will find it surprisingly easy, as well. Simply bring any module or section into focus, activate it, and select from a range of presets using the BROWSE knob.
-
Page 27: Stack Section
USING THE TUNER Stack section This is your “amplifier stack” consisting of your amplifier profile, speaker cabinet profile, and EQ. Pressing the STACK button and holding it for a short moment will enter the stack edit mode. You can rename the stack using soft button “Rename”... - Page 28 KEMPER PROFILING AMPLIFIER Power Sagging ♦ Power sagging models the interaction between the guitar signal and the distortion stage. Often, you hear guitarists talk about how the tubes “breathe” — that’s power sagging. Increase the amount of “Power Sagging” to emphasize the velocity and energy of crunch sounds. The guitar sound gains additional energy and presence, without raising the perceived volume of the distorted signal.
-
Page 29: Eq Button
USING THE TUNER EQ button Holding the EQ button will bring it into focus. The soft knobs underneath the display control the following parameters for the EQ: Soft Knob #1 frequency range. Soft Knob #2 frequency range. Soft Knob #3 Treble frequency range. -
Page 30: Effects Section
KEMPER PROFILING AMPLIFIER wards the left most position, the sound will resemble that of analog cabinet simulations (which often have a very limited frequency response and little character). Effects section The Effects section is where you can add stereo effects after (post-) the mono stomps section and the amp stack. -
Page 31: Tap Tempo
USING THE TUNER The Profiling Amplifier provides three types of delays in the DELAY module on the right. Tap Delay The delay time is linked to the tempo as selected in RIG settings, or by the TAP tempo button. Free Delay Delay time is freely adjustable in milliseconds, and independent from the TAP tempo. - Page 32 KEMPER PROFILING AMPLIFIER modulation effects. All factory rigs have the tempo disabled by default, as we cannot know in advance what tempo you are going to need. When no tempo has been set, these parameters will show you the absolute time values in Hertz or sec- onds.
-
Page 33: Configure Your System Preferences
CONFIGURE YOUR SYSTEM PREFERENCES Configure your system preferences System button Press SYSTEM to access the “global settings” pages. Global settings remain unaffected when you change to another rig. Parameters in the system menu include “Pedal Settings”, “LED Intensities”, “Display Con- trast”, “Time And Date”, among others. -
Page 34: Using A Midi Pedal To Switch Rigs
KEMPER PROFILING AMPLIFIER Using a MIDI pedal to switch rigs You can assign a unique MIDI program change number to each rig (up to a maximum 128 rigs). To do so, select a rig in Browse mode and press the SYSTEM button. Navigate to the “MIDI Settings” page and lo- cate the “PrgChg Settings”... -
Page 35: Using Performance Mode
USING PERFORMANCE MODE Using performance mode Editing performances This mode is for live playing. It allows you to organize rigs in what we call “performances”. Each perfor- mance is a collection of five rigs together in one place. This allows you to switch between them quickly and easily, for instance from the verse to the chorus sounds of a song, by using a foot switch or MIDI pro- gram change. - Page 36 KEMPER PROFILING AMPLIFIER Updates, backup and sharing sounds The Kemper Profiling Amplifier’s operating system can be updated to receive refinements and new fea- tures. All you need is an internet connection, a PC or Mac and a USB stick. Updating the operating system...
- Page 37 UPDATES, BACKUP AND SHARING SOUNDS Backup ♦ Use this option to backup your KPA. The backup will contain all user rigs, performances and local presets. If an older backup is already present, it will not be deleted but renamed automatically. To backup, select the soft button “Backup”...
- Page 38 KEMPER PROFILING AMPLIFIER KPA and MIDI You can use MIDI to send program changes to switch between rigs. You can send MIDI messages to the KPA either using your computer and a MIDI interface, or by using a dedicated MIDI control pedal.
- Page 39 Profiling Guide...
-
Page 40: Profiling An Amp
KEMPER PROFILING AMPLIFIER Profiling an amp Now we’re getting to the fun stuff! Profiling your own amp, custom digital simulation, or favorite stomp box is what sets the KPA apart from every other digital amplifier out there. We’ve spent years getting our profiling system to deliver the goods in terms of sound quality, playability, and ease of use —... - Page 41 PROFILING AN AMP Profiling with effects in the recording chain ♦ Many guitarists get their signature sound by combining distortion pedals, booster pedals and equalizers/ filters with a tube amp. If you want to do this, you can keep these in the signal chain during the profiling process —...
- Page 42 Make sure that you are hearing the previously-selected rig in the KPA when you set the A/B comparison to “Kemper amp”, and the to “Reference Amp” when you switch to reference amp. If you don’t, re-connect your reference amp to the KPA.
- Page 43 PROFILING AN AMP best results it is crucial to do the profiling session in a typical studio setting using linear studio monitors or a PA. ✔ ✔ If your amp provides a spring reverb, remember to turn it off for the profiling process.
-
Page 44: Connections For Profiling Hardware Guitar Amp
KEMPER PROFILING AMPLIFIER Making connections Connections for profiling a hardware guitar amp Here are a few typical scenarios for the most common profiling setups: • Connect your guitar to the INPUT jack of the KPA. • Connect the DIRECT OUTPUT/SEND of the KPA to the guitar input of your hardware amplifier. - Page 45 FILING INPUT. You can use the EQ and phase switches on the mixer to optimize the mix. Make sure that the signal is only routed to the KPA and isn’t duplicated at the main outs of the mixer. Guitar In Reference Amp Cabinet Output Direct Out / Send Return Main Outs KEMPER PROFILING AMPLIFIER Input Main Outs...
- Page 46 KEMPER PROFILING AMPLIFIER It’s a good idea to make the KPA the central hub for all your guitar recordings and use it as your main switching device. That way you can use all of your favorite amps alongside the internal effects of the KPA.
- Page 47 MAKING CONNECTIONS ✔ ✔ The KPA can only accurately profile preamp stomp boxes such as overdrive and distortion pedals, Eqs and filters, tube preamp pedals, and so on. Attempting to profile a delay, reverb or modulation pedal is unlikely to work as expected. In other words: your mileage might vary. Connections for profiling a computer-based guitar amp simulation •...
- Page 48 KEMPER PROFILING AMPLIFIER Taking a profile Once the reference amp is setup just the way you like it, it’s time to start profiling Don’t worry, once you read through this guide and tried it for yourself, we are sure you’ll agree that profiling is a very simple and straightforward process.
- Page 49 TAKING A PROFILE Please remember to leave a few decibels of headroom in your microphone preamps and the rest of the signal chain. The test signals can get a bit louder than a regular guitar signal, and might cause clipping in your signal chain if you don’t leave enough headroom.
- Page 50 KEMPER PROFILING AMPLIFIER With completely clean sounds you don’t need to worry about refining the distortion characteristics, so “Refine profile” isn’t available. If you find that the profile offers a wider dynamic range, and a higher vol- ume in the transients compared to the original, the reason is probably that the original sound was, in fact, slightly distorted.
- Page 51 Profiling a rotary speaker cabinet ♦ The Kemper Profiling Amp already ships with some rotary speaker profiles and rigs which were captured from the real thing, but if you have access to a different brand of rotary speaker, you can take your own profiles, too.
- Page 52 KEMPER PROFILING AMPLIFIER probably sound weird and uninspiring on its own, but when you engage the “Rotary speaker” stomp in the MOD module, you’ll hear the rich and animated sound of your original rotary cabinet. ✔ ✔ Tip: Although the profile is captured in mono, you can use the “Rotary speaker” stomp in the MOD or X slot to recreate the typical stereo movement of the signal.
Need help?
Do you have a question about the Profiling Amplifier and is the answer not in the manual?
Questions and answers