Table of Contents
Advertisement
Quick Links
Advertisement
Table of Contents

Related Manuals for Electrolux HOB890FMF


Summary of Contents for Electrolux HOB890FMF
- Page 1 HOB890FMF User Manual...
-
Page 2: Table Of Contents
12. ENERGY EFFICIENCY.................. 22 WE’RE THINKING OF YOU Thank you for purchasing an Electrolux appliance. You’ve chosen a product that brings with it decades of professional experience and innovation. Ingenious and stylish, it has been designed with you in mind. So whenever you use it, you can be safe in the knowledge that you’ll get great results every time. - Page 3 ENGLISH responsible for any injuries or damages that are the result of incorrect installation or usage. Always keep the instructions in a safe and accessible location for future reference. 1.1 Children and vulnerable people safety This appliance can be used by children aged from 8 •...
-
Page 4: Safety Instructions
NEVER try to extinguish a fire with water, but switch • off the appliance and then cover flame e.g. with a lid or a fire blanket. CAUTION: The cooking process has to be supervised. • A short term cooking process has to be supervised continuously. - Page 5 ENGLISH • Always take care when moving the • Use the strain relief clamp on the appliance as it is heavy. Always use cable. safety gloves and enclosed footwear. • Make sure the mains cable or plug (if • Seal the cut surfaces with a sealant to applicable) does not touch the hot prevent moisture to cause swelling.
- Page 6 • Set the cooking zone to “off” after • Do not put aluminium foil on the each use. appliance. • Do not rely on the pan detector. • Cookware made of cast iron, • Do not put cutlery or saucepan lids on aluminium or with a damaged bottom the cooking zones.
-
Page 7: Installation
ENGLISH 3. INSTALLATION WARNING! Refer to Safety chapters. 3.1 Before the installation Before you install the hob, write down the information bellow from the rating plate. The rating plate is on the bottom of the hob. Serial number ......3.2 Built-in hobs Only use the built-in hobs after you assemble the hob into correct built-in units and work surfaces that align to the... -
Page 8: Product Description
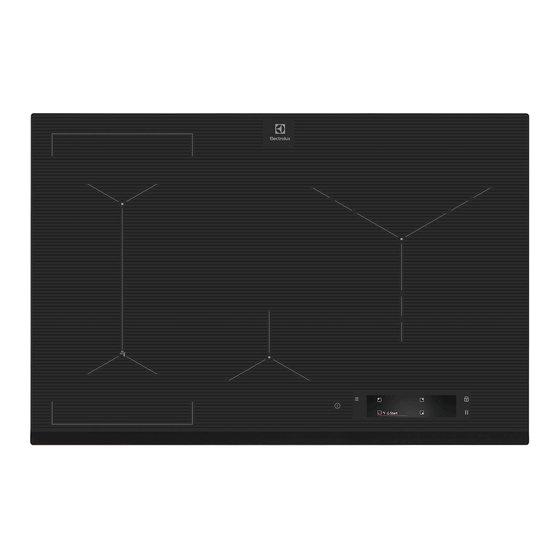
4. PRODUCT DESCRIPTION 4.1 Cooking surface layout Induction cooking zone Control panel 4.2 Control panel layout 10 9 To see the available settings touch the appropriate symbol. Sym‐ Comment ON / OFF To activate and deactivate the hob. Menu To open and close the Menu. -
Page 9: Quick Guide
ENGLISH Sym‐ Comment Pause To activate and deactivate the function. 0 - 9 To show the current heat setting. Bridge To activate and deactivate the function. 4.3 OptiHeat Control (3 step The induction cooking zones produce the heat necessary for the cooking process Residual heat indicator) directly in the bottom of the cookware. -
Page 10: Before First Use
Settings Child Lock Stopwatch Hob²Hood H0 - Off H1 - Light only H2 - Fan speed low H3 - Auto Fan Low H4 - Auto Fan Medium H5 - Auto Fan High H6 - Auto Fan Boost Setup Assisted Cooking... -
Page 11: Daily Use
ENGLISH 7. DAILY USE 7.3 Using the cooking zones WARNING! Refer to Safety chapters. Place the cookware in the centre of the selected cooking zone. Induction cooking 7.1 Activating and deactivating zones adapt to the dimensions of the bottom of the cookware automatically. Touch for 1 second to activate or Once you place a pot on the selected... - Page 12 7.7 Bridge function 1. Touch the desired zone symbol first. 2. Touch or slide your finger to the This function connects two cooking right to activate the function for the zones and they operate as one with the chosen cooking zone.
- Page 13 ENGLISH The timer menu window appears on the Stopwatch display. 4. Check to activate the function. The function automatically starts counting immediately after you activate a The symbols change to +STOP cooking zone. You can use this function 5. Slide your finger to the left or right to to monitor how long it operates.
- Page 14 Set the heat setting first. choose between the click (default) or beep. Touch to activate the function. 1. Touch on the display to open the To deactivate the function, touch for 3 Menu. seconds. 2. Select Settings > Setup> Key Tones / Buzzer Volume from the list.
- Page 15 ENGLISH • You can change the default heat temperature of the hottest pot on the level. hob. 3. Once the pot reaches the intended For most of the hoods the remote system temperature an acoustic signal is originally deactivated. Activate it sounds and a pop-up window before you use the function.
-
Page 16: Hints And Tips
When you finish cooking and deactivate Changing the modes the hob, the hood fan may still operate for a certain period of time. After that The modes change and adjust time the system deactivates the fan automatically. If you are not satisfied with... - Page 17 ENGLISH 8.4 Examples of cooking means that a cooking zone with the medium heat setting uses less than a applications half of its power. The correlation between the heat setting The data in the table is for of a zone and its consumption of power guidance only.
-
Page 18: Care And Cleaning
Cooker hoods with the Hob²Hood function To find the full range of cooker hoods which work with this function refer to our consumer website. The Electrolux cooker hoods that work with this function must have the symbol Keep the window of the Hob²Hood infrared signal... - Page 19 ENGLISH 10.1 What to do if... Problem Possible cause Remedy You cannot activate or op‐ The hob is not connected Check if the hob is correct‐ erate the hob. to an electrical supply or it ly connected to the electri‐ is connected incorrectly.
- Page 20 Problem Possible cause Remedy Hob²Hood does not work. You covered the control Remove the object from panel. the control panel. Hob²Hood operates, but You activated the H1 Change the mode to H2 - only the light is on. mode.
-
Page 21: Technical Data
Make sure, you operated the hob correctly. If not the 11. TECHNICAL DATA 11.1 Rating plate Model HOB890FMF PNC 949 596 939 00 Typ 62 D4A 03 CA 220 - 240 V / 400 V 2N 50 - 60 Hz Induction 7.35 kW... -
Page 22: Energy Efficiency
12. ENERGY EFFICIENCY 12.1 Product information according to EU 66/2014 valid for EU market only Model identification HOB890FMF Type of hob Built-In Hob Number of cooking zones Heating technology Induction Diameter of circular cook‐... - Page 23 ENGLISH • Before you activate the cooking zone • Use the residual heat to keep the food put the cookware on it. warm or to melt it. • Put the smaller cookware on the smaller cooking zones. • Put the cookware directly in the centre of the cooking zone.
- Page 24 www.electrolux.com/shop...
Need help?
Do you have a question about the HOB890FMF and is the answer not in the manual?
Questions and answers