Table of Contents
Advertisement
Available languages
Available languages
Operator's Manual
Manual del Operario
Model / Modelo
020258
ADVERTENCIA
WARNING
Before using this product, read this
Antes de utilizar el producto, lea este manual
manual and follow all Safety Rules
y siga todas las Reglas de Seguridad
and Operating Instructions.
e Instrucciones de Uso.
Questions? Help is just a moment away!
Preguntas? La ayuda es justa un momento lejos!
Call: Pressure Washer Helpline
Llame: Línea Directa del Lavador a Presión
1-800-743-4115 M-F 8-5 CT
web: www.briggsandstratton.com
BRIGGS & STRATTON POWER PRODUCTS GROUP, LLC
Manual No. 199145GS
JEFFERSON,WISCONSIN, U.S.A.
Revision 1 (03/21/2006)
Advertisement
Chapters
Table of Contents

Related Manuals for Briggs & Stratton 20258


Summary of Contents for Briggs & Stratton 20258
- Page 1 Operating Instructions. e Instrucciones de Uso. Questions? Help is just a moment away! Preguntas? La ayuda es justa un momento lejos! Call: Pressure Washer Helpline Llame: Línea Directa del Lavador a Presión 1-800-743-4115 M-F 8-5 CT web: www.briggsandstratton.com BRIGGS & STRATTON POWER PRODUCTS GROUP, LLC Manual No.
-
Page 2: Table Of Contents
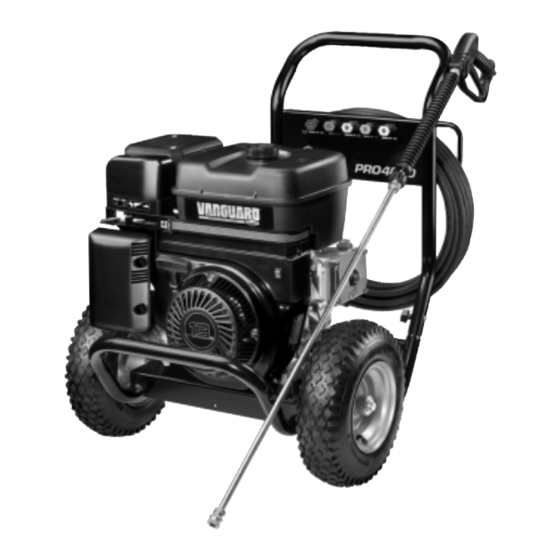
Warranties ........18-19 EQUIPMENT DESCRIPTION Read this manual carefully and become familiar with your pressure washer. Know its applications, its limitations and any hazards involved. This manual contains information for a high pressure washer that operates at 4,000 PSI at a flow rate of 4.0 gallons per minute.This powerful, high quality system... -
Page 3: Section 1: Safety Rules
Fire or explosion can cause severe burns or death. WHEN ADDING FUEL • Turn pressure washer OFF and let it cool at least 2 minutes before removing gas cap. • Fill fuel tank outdoors. • DO NOT overfill tank. Allow space for fuel expansion. - Page 4 • Always wear safety goggles when using this equipment or in vicinity of where equipment is in use. • Before starting the pressure washer, be sure you are wearing adequate safety goggles. WARNING Unintentional sparking can result in fire or electric shock.
- Page 5 • DO NOT by–pass any safety device on this machine. • Before starting pressure washer in cold weather, check all parts of the equipment to be sure ice has not formed there. • NEVER move machine by pulling on hoses. Use handle provided on unit.
-
Page 6: Section 2 - Features And Controls
KNOW YOUR PRESSURE WASHER Read this Operator’s Manual and safety rules before operating your pressure washer. Compare the illustrations with your pressure washer to familiarize yourself with the locations of various controls and adjustments. Save this manual for future reference. -
Page 7: Section 3 - Assembly
PREPARING PRESSURE WASHER FOR USE If you have any problems with the assembly of your pressure washer or if parts are missing or damaged, call the pressure washer helpline at 1-800-743-4115. Assembly To prepare your pressure washer for operation, you will need to perform these tasks: Fill out and send in registration card. -
Page 8: Section 3 - Assembly
• Always wear safety goggles when using this equipment or in vicinity of where equipment is in use. • Before starting the pressure washer, be sure you are wearing adequate safety goggles. Connect high pressure hose here Checklist Before Starting Engine Review the unit’s assembly to confirm you have performed... -
Page 9: Pressure Washer Location
Figure 5 — Pressure Washer Clearance How to Start Engine The best way to start your pressure washer for the first time is to follow these instructions step–by–step.This starting information also applies if have let the pressure washer sit idle for at least a day. -
Page 10: How To Stop Pressure Washer
When starting engine, position yourself as recommended in Figure 8 and start engine according to instructions given in engine operator’s manual.Also see operating instructions tag located on the pressure washer. Figure 8 - Recommended Starting Position WARNING Rapid retraction of starter cord (kickback) will pull hand and arm toward engine faster than you can let go. -
Page 11: Cleaning And Applying Detergent
Follow these instructions to change spray tips: Engage trigger lock on spray gun. CAUTION A pressure washer produces a high pressure spray which increases risk of injury and damage to unit. • NEVER exchange spray tips without engaging the trigger lock on the spray gun. -
Page 12: Section 4 - Operation
• Operate this unit on a stable surface. • Be extremely careful if you must use the pressure washer from a ladder, scaffolding or any other relatively unstable location. • Firmly grasp spray gun with both hands when using high pressure spray to avoid injury when gun kicks back. -
Page 13: Specifications
Shipping Weight ......144 lbs. GENERAL MAINTENANCE RECOMMENDATIONS The pressure washer warranty does not cover items that have been subjected to operator abuse or negligence.To receive full value from the warranty, the operator must maintain the pressure washer as instructed in this manual. -
Page 14: Nozzle Maintenance
Purchase an O–Ring/Maintenance Kit, part number 191922GS by contacting the nearest authorized service center. It is not included with the pressure washer.This kit includes replacement o-rings, rubber washer and water inlet filter. Refer to the instruction sheet provided in the kit to service your unit’s o-rings. -
Page 15: Section 5 - Maintenance
DO NOT fill above red dot! Oil Change Procedure Place pressure washer on an outside level surface. Start and run pressure washer for at least 5 minutes. Turn off pressure washer and disconnect spark plug wire from spark plug. -
Page 16: Section 6 - Storage
30 days, follow this procedure: Flush detergent siphon tube by placing filter into a pail of clean water while running pressure washer in low pressure mode. Flush for one to two minutes. Shut off engine and let it cool, then remove high pressure and garden hoses. -
Page 17: Section 7 - Troubleshooting
TROUBLESHOOTING Problem Pump has following problems: failure to produce pressure, erratic pressure, chattering, loss of pressure, low water volume. Detergent fails to mix with spray. Engine shuts down during operation. Troubleshooting Cause Low pressure spray tip installed. Water inlet is blocked. Inadequate water supply. -
Page 18: Warranties
ONE YEAR from date of manufacturer’s shipment except: • FIVE YEARS for 2SF, 4SF and 66DX pumps and all portable fresh water PRESSURE WASHER pumps. • TWO YEARS for 2DX, 3DX, 3SP and all CAR WASH pumps except FIVE YEARS for 5CP2120W, 5CP2140WCS, 5CP2150W. -
Page 19: Warranties
Effective December 1, 2005 replaces all undated Warranties and all Warranties dated before December 1, 2005 Briggs & Stratton Power Products Group, LLC will repair or replace, free of charge, any part(s) of the pressure washer* that is defective in material or workmanship or both. Transportation charges on product submitted for repair or replacement under this warranty must be borne by purchaser. -
Page 20: Reglas De Seguridad
Sección Reglas de Seguridad CONSERVE ESTAS INSTRUCCIONES TABLA DE CONTENIDOS Sección 1 - Reglas De Seguridad ..... . 20-23 Sección 2 - Características y Controles ....24 Sección 3 - Montaje . -
Page 21: Sección 1: Reglas De Seguridad
ADVERTENCIA Al motor funcionar, se produce monóxido de carbono, un gas inodoro y venenoso. El respirar el monóxido de carbono, producirá náusea, desmayo o la muerte. Algunas sustancias químicas o los detergentes pueden ser perjudiciales si inhalados o ingeridos, causando la náusea severa, desmayando o para envenenar. - Page 22 Sección 1: Reglas de Seguridad ADVERTENCIA El rápido repliegue del cable del arrancador (retroceso) impedirá que el usuario suelte el cable a tiempo y tirará de su mano y brazo hacia el motor. Como resultado, podrían producirse fracturas, contusiones o esguinces. •...
- Page 23 PRECAUCIÓN Hacer funcionar el motor a velocidades excesivas aumenta el riesgo de lesiones personales. • NO juegue con partes que puedan aumentar o disminuir la velocidad de mando. • NO opere la máquina lavadora a presión con un valor de presión superior a su clasificación de presión.
-
Page 24: Características Y Controles
Sección Características y Controles CONOZCA SU MAQUINA LAVADORA DE PRESION Lea el manual del operario y las reglas de seguridad antes de poner en marcha su máquina lavadora a presión. Compare las ilustraciones con su máquina lavadora a presión para familiarizarse con las ubicaciones de los diferentes controles y ajustes. -
Page 25: Conecte El Manubrio
MONTAJE IMPORTANTE: Lea totalmente el manual del operario antes que intente ensamblar u operar su lavador a alta presión. Desembale la Lavadora a Presión Saque todo el contenido de la caja de cartón, a excepción de la lavadora a presión. Abra completamente la caja de cartón cortando cada una de sus esquinas de arriba abajo. -
Page 26: Sección 3: Montaje
Sección 3: Montaje • Consulte el manual del operario del motor para añadir al motor el aceite y el combustible recomendado. NOTA: Verifique el aceite del motor de manera frecuente cuando éste se esfuerce demasiado. Consulte el manual del operario del motor para conocer cuáles son las recomendaciones al respecto. -
Page 27: Operación
CÓMO USAR SU LAVADORA A PRESIÓN Si tiene problemas operando su máquina lavadora a presión, por favor llame a la línea de ayuda para máquinas lavadoras a presión al 1-800-743-4115. Ubicación del Lavadora a Presión Espacio Libre Alrededor del Lavadora a Presión ADVERTENCIA Los gases y el calor de escape pueden inflamar los materiales combustibles y las estructuras o dañar el... -
Page 28: Sección 4: Operación
Sección 4: Operación Cuando arranque el motor, colóquese en la posición recomendada en la Figura 23 y siga las instrucciones del manual del usuario del motor. Consulte también la etiqueta de instrucciones situada en la limpiadora a presión. Figura 23 - Posición Recomendada para el Arranque ADVERTENCIA El rápido repliegue del cable del arrancador (retroceso) impedirá... -
Page 29: Limpieza Y Aplicación Del Detergente
Cómo Usar las Puntas de Rociado El conector rápido del prolongador de la boquilla admite varios tipos distintos de puntas de rociado. Cada punta de rociado proporciona un patrón de rociado diferente (Figura 24). PRECAUCIÓN El lavadora de presión produce un rocío alto de la presión cuál riesgo de aumentos de la herida y dañe a la unidad. -
Page 30: Sistema De Enfriamiento Automático (Alivio Térmico)
Sección 4: Operación Asegúrese que la manguera de jardín esté conectada a la entrada del agua. Revise que la manguera de alta presión esté conectada a la pistola de rociado y a la bomba. Dele arranque al motor. Aplique el detergente sobre la superficie seca, comenzando en la parte inferior del área y dirigiéndose hacia arriba, utilizando movimientos largos, parejos y superpuestos. -
Page 31: Recomendaciones Generales
ESPECIFICACIONES Presión de Salida ......4,000 PSI Promedio de Flujo ... 4,0 galones por minuto (gpm) Detergente Use el detergente adecuado para lavadores a presión Temperatura del Suministro de Agua . -
Page 32: Mantenimiento Del Motor
Sección 5: Mantenimiento Mantenimiento de la Puntas de Rocío Si siente una sensación pulsante al momento de apretar el gatillo de la pistola rociadora, puede que sea causada por la presión excesiva en la bomba. La causa principal de la presión excesiva en la bomba es cuando la punta de rocío se encuentra atascada o tapada con materiales extraños, tales como tierra, etc. -
Page 33: Mantenimiento Del Bomba
MANTENIMIENTO DEL BOMBA Para prolongar al máximo la vida útil del equipo, siga las instrucciones contenidas en la Figura 28. IMPORTANTE: Use 0,55 litros (18,6 onzas) de aceite multiviscosidad CAT para bombas modelo 6107.También se pueden utilizar otros aceites como Mobil DTE16,Texaco Rondo 1660-HD150,Amoco Rykon-68, Shell Tellus T-68 y Exxon Univis-68. - Page 34 Sección Almacenamiento PREPARANDO LA UNIDAD PARA SU ALMACENAMIENTO El agua no debe permanecer en la unidad por un largo periodo de tiempo. Los sedimentos o minerales se pueden depositar en las piezas de la bomba y "congelar" la acción de la bomba. Si usted no piensa usar el lavador a presión por mas de 30 días, siga este procedimiento: Vacíe el tubo de detergente, colocando el filtro en un envase...
-
Page 35: Diagnosticos De Averías
DIAGNOSTICOS DE AVERÍAS Problema La bomba presenta los siguientes problemas: no produce presión, produce una presión errada, traqueteo, pérdida de presión, bajo volumen de agua. El detergente no se mezcla con el rociado. El motor se apaga durante la operación. Diagnosticos de Averías Causa Está... -
Page 36: Garantia
POLÍTICA DE GARANTÍA PARA EL PROPIETARIO DE UNA LAVADORA A PRESIÓN BRIGGS & STRATTON POWER PRODUCTS GROUP, LLC Fecha de entrada en vigor:1 de Diciembre de 2005. Sustituye a todas las garantías sin fecha y a las de fecha anterior al 1 Diciembre de 2005. Briggs &...
Need help?
Do you have a question about the 20258 and is the answer not in the manual?
Questions and answers