Table of Contents
Advertisement
Available languages
Available languages
Owner's Manual
Manual del Propietario
Questions? Help is just a moment away!
Preguntas? La ayuda es justa un momento lejos!
Call: Pressure Washer Helpline
Llame: Línea Directa del Lavador a Presión
1-800-743-4115 M-F 8-5 CT
Web: www.briggsandstratton.com
Model No. 020228 Manual No. 195764GS Rev. 2 (01/19/2005)
Advertisement
Table of Contents

Related Manuals for Briggs & Stratton 2200 PSI


Summary of Contents for Briggs & Stratton 2200 PSI
-
Page 1: Manual Del Propietario
Owner’s Manual Manual del Propietario Questions? Help is just a moment away! Preguntas? La ayuda es justa un momento lejos! Call: Pressure Washer Helpline Llame: Línea Directa del Lavador a Presión 1-800-743-4115 M-F 8-5 CT Web: www.briggsandstratton.com Model No. 020228 Manual No. 195764GS Rev. 2 (01/19/2005) -
Page 2: Table Of Contents
Section Safety Rules SAVE THESE INSTRUCTIONS TABLE OF CONTENTS SAFETY RULES Section 1 - Safety Rules ......2-4 This is the safety alert symbol. -
Page 3: Section 1: Safety Rules
Section 1: Safety Rules WARNING WARNING Running engine gives off carbon monoxide, an Fuel and its vapors are extremely flammable an odorless, colorless, poison gas. explosive. Breathing carbon monoxide will cause nausea, Fire or explosion can cause severe burns or fainting or death. - Page 4 Section 1: Safety Rules WARNING CAUTION Running engines produce heat.Temperature of Excessively high or low operating speeds increase risk muffler and nearby areas can reach or exceed of injury and damage to pressure washer. 150°F (65°C). • DO NOT tamper with governed speed. Severe burns can occur on contact.
-
Page 5: Section 2 - Features And Controls
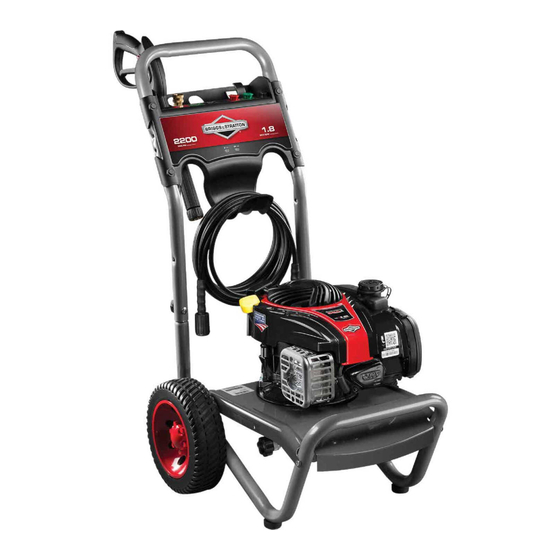
Features and Controls Section KNOW YOUR PRESSURE WASHER Read this owner’s manual and safety rules before operating your pressure washer. Compare the illustrations with your pressure washer to familiarize yourself with the locations of various controls and adjustments. Save this manual for future reference. Nozzle Extension Spray Gun with Quick Connect... - Page 6 Assembly Section ASSEMBLY PREPARING PRESSURE IMPORTANT: Read entire owner’s manual before you WASHER FOR USE attempt to assemble or operate your new pressure washer. If you have any problems with the assembly of your Remove Pressure Washer From pressure washer or if parts are missing or damaged, call the Carton pressure washer helpline at 1-800-743-4115.
-
Page 7: Section 3: Assembly
Section 3: Assembly Insert carriage bolts through holes from outside of unit Insert multi–colored ProjectPro™ nozzles and other and attach a plastic knob from inside of unit (Figure 2). supplied accessories in spaces provided in accessory Tighten by hand. tray. See “How to Use Accessory Tray”. Figure 2 —... - Page 8 Section 3: Assembly Connect Hose and Water Supply to Run water through your garden hose for 30 seconds to clean out any debris. Pump IMPORTANT: DO NOT siphon standing water for the IMPORTANT: To avoid pump damage, you must assemble water supply.
-
Page 9: Section 4 - Operation
Operation Section HOW TO USE YOUR How to Start Your Pressure Washer To start your pressure washer for the first time, follow PRESSURE WASHER these instructions step-by-step.This starting information also applies if you have let the pressure washer sit idle for If you have any problems operating your pressure washer, at least a day. -
Page 10: How To Use Accessory Tray
Section 4: Operation Start engine according to instructions given in engine WARNING owner’s manual. Also see operating instructions tag The high pressure stream of water that this located on the pressure washer. equipment produces can pierce skin and its WARNING underlying tissues, leading to serious injury and possible amputation. -
Page 11: Low Pressure
Section 4: Operation How to Use ProjectPro™ Nozzle Pull back collar on quick–connect and pull current ProjectPro™ nozzles off. Store ProjectPro™ nozzles in System holder provided on the accessory tray. The quick–connect on the nozzle extension allows you to Select desired ProjectPro™ nozzle: switch between four different ProjectPro™... -
Page 12: Cleaning And Applying Detergent
Section 4: Operation • For maximum rinsing (higher pressure and lower How to Use the Turbo Nozzle flow), for stubborn or hard to reach surface such The turbo nozzle rotates the high pressure stream in a as second story surfaces, paint removal, oil stains, rapid circular pattern. -
Page 13: Section 4 - Operation
Section 4: Operation Place small filter end of detergent siphoning tube into Keep spray gun a safe distance from the area you plan detergent container. to spray. CAUTION WARNING Keep the chemical injection tube from coming in contact with the hot muffler. High pressure spray could cause you to fall if you are too close to the cleaning surface. - Page 14 Maintenance Section SPECIFICATIONS PRESSURE WASHER Maximum Outlet Pressure ....2200 psi MAINTENANCE Maximum Flow Rate ..2.2 gallons per minute (gpm) Detergent Use detergent approved for pressure washers Check and Clean Inlet Screen Water Supply .
-
Page 15: Section 5: Maintenance
Section 5: Maintenance Check In-Line Filter Use a small paper clip to free any foreign material clogging or restricting nozzle (Figure 19). Refer to Figure 18 and service the in-line filter if it Figure 19 — Nozzle Maintenance becomes clogged, as follows: Figure 18 —... - Page 16 Section 5: Maintenance Pump Maintenance Tilt pressure washer to drain oil into an approved container until it drips slowly from pump. Changing Pump Oil Tilt pressure washer in opposite direction and empty Change oil every 50 hours or once yearly, whichever premeasured pump oil bottle into same opening (a occurs first.
-
Page 17: Section 6 - Storage
Section Storage PREPARING THE UNIT CAUTION FOR STORAGE You must protect your unit from freezing temperatures. • Failure to do so will permanently damage your pump and Water should not remain in the unit for long periods of render your unit inoperable. time. -
Page 18: Section 7 - Troubleshooting
Section Troubleshooting TROUBLESHOOTING Problem Cause Correction Low pressure nozzle installed. Replace nozzle with high pressure nozzle. Water inlet is blocked. Clear inlet. Inadequate water supply. Provide adequate water flow. Inlet hose is kinked or leaking. Straighten inlet hose, patch leak. Pump has following problems: Clogged inlet hose strainer. -
Page 19: Warranty
BRIGGS & STRATTON POWER PRODUCTS GROUP, LLC EQUIPMENT OWNER WARRANTY POLICY Effective September 1, 2004 replaces all undated Warranties and all Warranties dated before September 1, 2004 LIMITED WARRANTY Briggs & Stratton Power Products Group, LLC will repair or replace, free of charge, any part(s) of the equipment that is defective in material or workmanship or both. -
Page 20: Reglas De Seguridad
Sección Reglas de Seguridad CONSERVE ESTAS INSTRUCCIONES TABLA DE CONTENIDOS REGLAS DE SEGURIDAD Sección 1 - Reglas De Seguridad ..... . 20-22 Éste es el símbolo de alerta de seguridad. - Page 21 Sección 1: Reglas de Seguridad ADVERTENCIA ADVERTENCIA Al motor funcionar, se produce monóxido de La gasolina y sus vapores son extremadamente carbono, un gas inodoro y venenoso. inflamables y explosivos. El respirar el monóxido de carbono, producirá El fuego o una explosión pueden causar quemaduras náusea, desmayo o la muerte.
- Page 22 Sección 1: Reglas de Seguridad ADVERTENCIA PRECAUCIÓN Hacer funcionar el motor a velocidades excesivas aumenta el Los motores al funcionar producen calor. La riesgo de lesiones personales. temperatura del silenciador y de las áreas cercanas puede alcanzar o pasar los 150ºF (65ºC). •...
- Page 23 Sección Características y Controles CONOZCA SU MAQUINA LAVADORA DE PRESION Lea el manual del propietario y las reglas de seguridad antes de poner en marcha su máquina lavadora a presión. Compare las ilustraciones con su máquina lavadora a presión para familiarizarse con las ubicaciones de los diferentes controles y ajustes. Guarde este manual para referencias futuras.
-
Page 24: Conecte El Manubrio Y Bandeja Accesoria
Sección Montaje MONTAJE PREPARANDO EL LAVADOR A ALTA PRESIÓN PARA SU USO IMPORTANTE: Lea totalmente el manual del propietario antes que intente ensamblar u operar su lavador a alta presión. Si usted tiene un problema al ensamblar la unidad o si hacen falta algunas piezas o se encuentran dañadas, llame a la línea directa del Remueva el Lavador a Presión del lavador a alta presión, al 1-800-743-4115. - Page 25 Sección 3: Montaje Inserte el perno del soporte a través de los orificios desde Inserte las boquillas de colores ProjectPro™ y el resto de fuera de la unidad y sujete una perilla de plástico desde el los accesorios en los espacios correspondientes de la bandeja interior de la misma unidad.Apriete manualmente (Figura 23).
- Page 26 Sección 3: Montaje Conecte la Manguera y el Suministro de Haga correr el agua a través de la manguera de su jardín por 30 segundos para limpiar cualquier escombro que se Agua a la Bomba encuentre en ella. Corte el agua. IMPORTANTE: Usted deberá...
- Page 27 Sección Operación CÓMO USAR SU MÁQUINA Cómo Darle Arranque a su Máquina Lavadora a Presión LAVADORA A PRESIÓN Para darle arranque a su máquina lavadora a presión movida a Si tiene problemas operando su máquina lavadora a presión, por motor por primera vez, siga estas instrucciones paso a paso. Esta favor llame a la línea de ayuda para máquinas lavadoras a presión información acerca del arranque inicial también se aplica cuando vaya al 1-800-743-4115.
- Page 28 Sección 4: Operación Pour démarrer le moteur, suivez les instructions qui figurent ADVERTENCIA dans le manuel d'utilisation. Consulte también la etiqueta de instrucciones situada en la limpiadora a presión. La corriente de agua de alta presión que produce este equipo pueden perforar la piel y sus tejidos ADVERTENCIA profundos, ocasionando lesiones serias y posible amputación.
- Page 29 Sección 4: Operación Cómo Usar el Sistema de Boquillas Desplace hacia atrás el anillo del conector rápido y tire de las boquillas ProjectPro™. Guarde las boquillas ProjectPro™ ProjectPro™ en el soporte de la bandeja de accesorios. El conector rápido del prolongador de la boquilla permite cambiar Elija la boquilla ProjectPro™...
- Page 30 Sección 4: Operación • Para un enjuagado de máxima potencia (alta presión y bajo Cómo Usar la Boquilla a Chorro caudal), para superficies rebeldes o de difícil acceso, como La boquilla a chorro hace girar la corriente de alta presión en un superficies de plantas altas, eliminación de pintura, manchas patrón circular rápido.
- Page 31 Sección 4: Operación Coloque el pequeño extremo final del filtro del tubo de Mantenga la pistola de rociado a una distancia segura del área inyección del detergente dentro del contenedor del que planea rociar. detergente. ADVERTENCIA PRECAUCIÓN El rociado de la alta presión podría hacerlo caer si Evite que el tubo de inyección de químicos entre en contacto está...
-
Page 32: Recomendaciones Generales
Sección Mantenimiento ESPECIFICACIONES MANTENIMIENTO DE LA Presión de Salida Máxima ..... 2200 PSI MAQUINA LAVADORA A Caudal Máximo ....2.2 galones por minuto (gpm) PRESION Detergente Use el detergente adecuado para lavadores a presión Temperatura del Suministro... -
Page 33: Mantenimiento De La Boquilla
Sección 5: Mantenimiento Retire la pistola y la extensión para boquillas de la manguera Conecte de nuevo la extensión de la boquilla a la pistola de alta presión. Retire la extensión para boquillas de la rociadora. pistola y retire el anillo 'o' y el colador de la extensión para Conecte de nuevo el suministro de agua, prenda el agua, y boquillas. -
Page 34: Mantenimiento Del Motor
Sección Sección 5 y 6: Mantenimiento y Almacenamiento Instale el tapón negro de aceite de la bomba y apriételo Proteger la Bomba firmemente. A protege al PumpSaver de uso de bomba a previene congelar el Coloque la limpiadora de presión en su posición normal (de daño y lubrica émbolos y sellos. - Page 35 Sección Diagnosticos de Averías REPARACION DE AVERIAS Problema Causa Solución Está usando la boquilla de baja presión Cambie la boquilla a una de las tres (negra). boquilla de alta presión. La entrada de agua está bloqueada. Limpie la entrada. Suministro de agua inadecuado. Proporcione flujo de agua adecuado.
- Page 36 POLÍTICA DE GARANTÍA PARA EL PROPIETARIO DE EQUIPOS BRIGGS & STRATTON POWER PRODUCTS GROUP, LLC Fecha de entrada en vigor: 1 de Septiembre de 2004. Sustituye a todas las garantías sin fecha y a las de fecha anterior al 1 de Septiembre de 2004 GARANTÍA LIMITADA Briggs &...
Need help?
Do you have a question about the 2200 PSI and is the answer not in the manual?
Questions and answers