
Related Manuals for NetterVibration VAC Series


Summary of Contents for NetterVibration VAC Series
- Page 1 Assembly instructions for Dec. 2020 No. 1555 Netter vacuum mounts Page 1/28 series VAC / VAC TWIN These assembly instructions apply to: VAC 6 VAC 13 VAC 8 VAC 15 VAC 10 VAC 20 VAC 11 VAC 30 VAC 12 VAC 40 Series VAC TWIN...
-
Page 2: Table Of Contents
Contents General information Safety Technical data Design and function Transport and storage Installation Start-up and operation Maintenance and servicing Troubleshooting Spare parts and accessories Disposal Annex Please refer to the delivery note for the scope of delivery. Scope of delivery Check the packaging for possible transport damage. -
Page 3: General Information
General information General information Before installing the VAC read these instructions carefully. It is the basis Use and for any action when dealing with the VAC, and may be used for training storage purposes. The instructions should be subsequently stored at the operation site. - Page 4 General information Instruction The following instruction and warning symbols are used in these instruc- and warning tions: symbols Personal DANGER injuries indicates an immediate danger. Disregard of this notice will result in death or severe person- al injuries. WARNING indicates a potential danger. Disregard of this notice can result in death or severe per- sonal injuries.
-
Page 5: Safety
Safety Safety The VAC are used for quick attachment of vibrators to smooth or, within Intended use limitation, convex surfaces. Among other applications, the VAC can be used in combination with vibrators for emptying transport containers or cleaning tubes and hoppers. The VAC are used where there are otherwise no conventional mounting options for vibrators, where frequent relocation is necessary and where welding or screwing is not possible. - Page 6 Safety Compressed WARNING Compressed air A loosened hose which is under pressure can lead to personal injuries. ➢ Screw the hose lines on carefully. ➢ Check the hose lines and connections after one hour of operation and thereafter regularly (generally monthly). ➢...
- Page 7 Safety Assembly NOTICE If VAC and vibrator are ordered separately, the vibrator must first be mounted on the VAC, then the VAC on the container. Silencer NOTICE Operation of the VAC with silencers is mandatory. Silencers reduce the noise level and protect the VAC from contamination entering.
-
Page 8: Technical Data
Technical data Technical data Permissible Drive The VAC must be operated with filtered compressed air (fil- ter ≤ 5 µm). medium operating Further drive medium requirements to be respected can be found conditions in the operating instructions of the mounted vibrator. Lubrication The VAC do not need lubrication. - Page 9 Technical data Approved Type Applicable vibrators combinations of VAC and VAC 6 1, 2 80 - 180 (HF, vibrator VAC 8 1, 2 1, 2 8 AL 120 (HF, NF), 180 (HF, NF) VAC 10, 1, 2, 3 3, 4 15 X, 120 - 250 (HF, 190*...
- Page 10 Technical data Netter Vibration recommends the following cross sections for grommets Grommets / hoses and hoses: Type Hose grommet Hose size Hose size [inch] to the VAC* to the vibrator* VAC 6 DN 4 DN 4 VAC 8, VAC 10, VAC 11 DN 6 DN 6 VAC 12, VAC 13, VAC 15, VAC 20...
- Page 11 Technical data Dimensions VAC 15 / 20 Type: VAC ... [mm] [mm] [mm] [mm] [mm] [mm] Dimension X depending on the vibrator Dimensions VAC 30 / 40 Type: VAC ... [mm] [mm] [mm] [mm] [mm] [mm] 337.5 Dimension X depending on the vibrator...
- Page 12 Technical data Netter Vibration recommends the following tightening torques for fastening Tightening torques screws and nuts of the quality 8.8 (coefficient of sliding friction 0.14): Tightening torque 1,422 [Nm] Minimum screw depth [mm] for tapped hole in S 235 JR* * Material S 235 JR = St 37-2, minimum screw depth for other materials on request...
-
Page 13: Design And Function
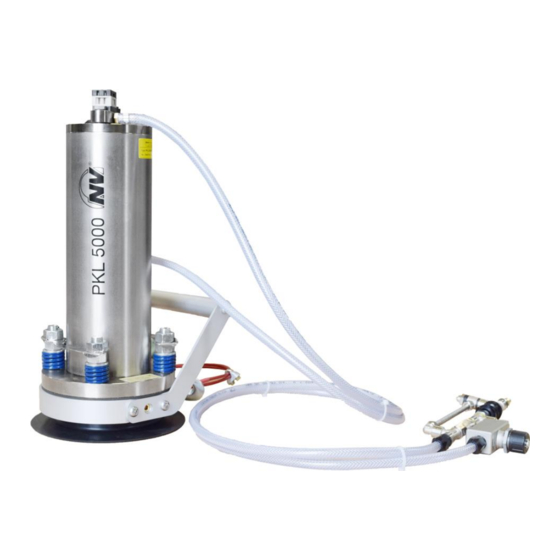
Design and function Design and function Design Ground plate with suction cup Vacuum nozzle Hose set connection Silencer 2/2-way ball valve Vibrator VAC mainly consist of a ground plate with suction cup(s) (1), a 2/2-way Function ball valve (3) and a vacuum nozzle (4). By actuating the 2/2-way valve (3) a vacuum is generated with the vacuum nozzle (4). - Page 14 Design and function Vibrator con- Hose set HG S nection with DRV Throttle check valve (DRV) 3/2-way manual slide valve Compressed air connection Throttle screw (air-saving func- tion) Throttle valve VAC connection In addition to the standard version N the hose set HG ... S has an econo- my switch position.
-
Page 15: Transport And Storage
Transport and storage Transport and storage Observe the safety instructions in Ch. Safety, from page 5 on. Special conditions of transport are not required. Transport conditions Lifting VAC 40 Due to its own weight, the VAC 40 may only be lifted with a suitable load handling device. -
Page 16: Installation
Installation Installation Observe the safety instructions in Ch. Safety, from page 5 on. Information on tightening torques for screws and cross-sections for hoses Technical data can be found in Ch. Technical data, from page 8 on. Procedure When installing the VAC, carry out the following steps in succession: Adapter plate IMPORTANT Some vibrators require an adapter plate for mounting on certain types of... - Page 17 Installation Template for Thread Vibrator : dimension bores VAC 6 [mm] NTS 180 NTS 120 NCT (1, 2) : NTS 80 NTP 18 : 43 Note: The grey marked area may not be drilled. VAC 8 There are the following options for screwing the approved vibrator on the VAC 10 retaining/adapter plate of the VAC: VAC 11...
- Page 18 Installation Option C Drill through the suction cup (3) and the ground plate (2) from be- low. Screw each countersunk screw with an O-ring from below into the ground plate and the adapter plate (x) so that the screw is flush with the adapter plate and do not protrude.
- Page 19 Installation Template for Ø bores Vibrator : [mm] dimension [mm] bores VAC 13 (thread) 17 (M16) PKL 5000 : Ø152 13 (M12) NTP 48 : 78x78 PKL 740 : 100x50 PKL 1000 : Ø116 PKL 2100 : Ø152 11 (M10) NTP 32 : 51x51 9 (M8) NCB (10, 20),...
- Page 20 Installation Template for bores VAC 20 Note: The grey marked area may not be drilled. Ø bores Vibrator : dimension [mm] [mm] (thread) 17 (M16) PKL 5000 : Ø152 13 (M12) NTP 48 : 78x78 PKL 2100 : Ø152 NCR 57, NCT (55, 108) : 130 NTS 50/04 : 124x124 11 (M10) NTP 32 : 51x51...
- Page 21 Installation Bores VAC 40 The VAC 40 consists of two VAC 20 and an adapter plate. The adapter plate is delivered with the through-holes necessary for the installation of the vibrator. Standard installation 3/2-way valve with hose set Non-return HG ... N with throttle valve Vibrator Vacuum nozzle...
- Page 22 Installation Checklist Check that the following steps have been carried out: installation Compliance with permissible ambient temperatures ensured? Mounting surface clean? Vibrator and hose set mounted? Screw size and tightening torques observed? Fastening screws secured with liquid safety agent, if neces- sary? VAC and vibrator connected according to circuit diagram? Compressed air supply line fastened securely?
-
Page 23: Start-Up And Operation
Start-up and operation Start-up and operation Observe the safety instructions in Ch. Safety, from page 5 on. Please refer to Ch. Technical data, page 8 for permissible operating condi- Permissible tions. operating conditions Procedure When starting-up the VAC carry out the following steps in succession: Switch on the compressed air to supply the VAC and the vibrator. -
Page 24: Maintenance And Servicing
Maintenance and servicing Maintenance and servicing Observe the safety instructions in Ch. Safety, from page 5 on. Maintenance of the VAC must be carried out as follows: Maintenance plan Interval Action After an hour of opera- Check fastening screws, retighten if necessary. tion after initial start-up Check hose screw connections and hose fittings, retighten if necessary. -
Page 25: Troubleshooting
Troubleshooting Troubleshooting In the case of malfunctions of the VAC proceed as follows: Malfunctions and causes Malfunction Possible causes Corrective actions VAC does Air supply insuffi- Check pressure before VAC and set to 2 to 6 bar. not gener- cient ate vacuum Hose connections Check the hose connection assembly. -
Page 26: Spare Parts And Accessories
Spare parts and accessories 10 Spare parts and accessories Please provide the following details when ordering spare parts: Ordering of spare parts • required amount • description and position of spare part • type of VAC The following accessories are available for the VAC: Possible accessories Accessory... -
Page 27: Disposal
Disposal 11 Disposal Prices All parts of the VAC must be properly disposed of according to the material specifications. The valid disposal prices of the VAC are available on request. All parts of the VAC can be recycled. Material- specifications Material VAC 6 VAC 8 / 10 / 11 / 12... -
Page 28: Annex
Annex 12 Annex...
Need help?
Do you have a question about the VAC Series and is the answer not in the manual?
Questions and answers