Molecular Devices StakMax User Manual
Microplate handling system
Hide thumbs
Also See for StakMax:
- User manual (110 pages) ,
- User manual (140 pages) ,
- User manual (146 pages)
Table of Contents
Advertisement
Quick Links
Advertisement
Table of Contents

Subscribe to Our Youtube Channel
Related Manuals for Molecular Devices StakMax


Summary of Contents for Molecular Devices StakMax
- Page 1 StakMax® Microplate Handling System User Guide 5016072 B October 2018...
- Page 2 For research use only. Not for use in diagnostic procedures. The trademarks mentioned herein are the property of Molecular Devices, LLC or their respective owners. These trademarks may not be used in any type of promotion or advertising without the prior written permission of Molecular Devices, LLC.
-
Page 3: Table Of Contents
Contents Safety Information Warnings, Cautions, Notes, and Tips Chapter 1: Introduction Computer Integration Chapter 2: Set Up the StakMax Microplate Handler Package Contents Unpack the Microplate Handler Connect the Microplate Handler to an Instrument Connect Cables Chapter 3: Load the Microplate Handler... -
Page 4: Safety Information
Follow the related safety information. The following user attention statements might be displayed in the text of Molecular Devices user documentation. Each statement implies the amount of observation or recommended procedure. - Page 5 For products under the requirement of the WEEE directive, contact your dealer or local Molecular Devices office for the procedures to facilitate the proper collection, treatment, recovery, recycling, and safe disposal of the device. - - California proposition 65 requires businesses to provide warnings to Californians about significant exposures to chemicals that cause cancer, birth defects, or other reproductive harm.
- Page 6 StakMax Microplate Handling System User Guide Electrical Safety To prevent electrical injuries and property damage, inspect all electrical equipment before use and report all electrical deficiencies. Contact Molecular Devices technical support for equipment service that requires the removal of covers or panels. WARNING! HIGH VOLTAGE.
- Page 7 When this symbol displays in this guide, follow the specific safety information related to the symbol. ® The StakMax Microplate Handling System is rated a Class 2 Laser Product because it can house an optional bar code reader with an embedded laser module.
- Page 8 StakMax Microplate Handling System User Guide Moving Parts Safety The instrument contains moving parts that can cause injury. Under normal conditions, the instrument is designed to protect you from these moving parts. WARNING! If the instrument is used in a manner not specified by Molecular Devices, the protection provided by the equipment might be impaired.
-
Page 9: Chapter 1: Introduction
Chapter 1: Introduction The StakMax Microplate Handling System is an integrated microplate handler for use with Molecular Devices microplate readers and microplate washers to provide simple, powerful, walk-away benchtop automation. The StakMax Microplate Handling System is compatible with the following instruments: Gemini™ EM Microplate Reader... -
Page 10: Computer Integration
StakMax Microplate Handling System User Guide Computer Integration Each Molecular Devices microplate reader is shipped with a license key for the SoftMax® Pro Data Acquisition and Analysis Software that you install on the computer that you use to operate the instrument. The SoftMax Pro Software provides integrated instrument control, data display, and statistical data analysis. -
Page 11: Chapter 2: Set Up The Stakmax Microplate Handler
Before you unpack the StakMax Microplate Handler, prepare a dry, flat area with enough space for the microplate handler, the microplate reader or microplate washer, the operating computer, and the cables. -
Page 12: Unpack The Microplate Handler
StakMax Microplate Handling System User Guide Baseplate 2 screws and washers For microplate reader mounted baseplate connections, the baseplate and the following additional connection accessories are shipped in a separate box. Rail Plate drawer protection stand 2 spacer bushings 8 screws 4 rail studs The accessory kit includes the following for the SpectraMax Paradigm and the SpectraMax i3x... - Page 13 9. Remove the foam block from the plate handler arm. Pull the foam block down and to the left. Install Barcode Reader When you order a barcode reader with the StakMax Microplate Handler, the barcode reader is factory installed. The microplate handler has two barcode reader positions and you can install two barcode readers. For details see Compatible Barcode Types on page The barcode reader position is dependent on where the barcode label is placed on the plate.
- Page 14 StakMax Microplate Handling System User Guide WARNING! Power off the instrument and disconnect the power cord before you do maintenance procedures that require removal of a panel or cover or disassembly of an interior instrument component. The following is included with the barcode reader or the instrument:...
- Page 15 Chapter 2: Set Up the StakMax Microplate Handler The left side of the microplate handler is the side that is adjacent to the connected microplate reader. If you need to access this position, you need to first move the microplate handler away from the microplate reader.
-
Page 16: Connect The Microplate Handler To An Instrument
The following instruments use a baseplate that is mounted to the StakMax Microplate Handler for this connection: See Microplate Handler Mounted Baseplate Connection on page Gemini EM... - Page 17 Chapter 2: Set Up the StakMax Microplate Handler Microplate Handler Mounted Baseplate Connection This procedure provides instructions to connect the microplate handler to the following instruments: Gemini EM Gemini XPS SpectraMax M2 SpectraMax M2e SpectraMax M3 SpectraMax M4 SpectraMax M5 SpectraMax M5e SpectraMax Plus384 SpectraMax 340PC384 SpectraMax 190 ...
- Page 18 StakMax Microplate Handling System User Guide To connect the baseplate: 1. Place the microplate handler and the microplate reader on a level surface. 2. On the left side of the microplate handler, slide the baseplate under the protruding angle bracket that is attached to the microplate handler until the holes in the baseplate align with the holes in the microplate handler angle bracket.
- Page 19 Chapter 2: Set Up the StakMax Microplate Handler 4. Lift the right side of the microplate reader and place the feet into the two mounting cups on the baseplate. Make sure that the microplate reader feet are completely seated in the mounting cups.
- Page 20 StakMax Microplate Handling System User Guide To connect the baseplate: 1. Place the microplate handler and the SpectraMax L on a level surface. 2. Place the baseplate on the left side of the microplate handler so that the holes on the baseplate align with the two mounting holes towards the rear of the microplate handler “L”...
- Page 21 Chapter 2: Set Up the StakMax Microplate Handler 4. Lift the right side of the microplate reader and place the feet into the two mounting cups on the baseplate. Make sure that the microplate reader feet are completely seated in the mounting cups.
- Page 22 StakMax Microplate Handling System User Guide 3. Thread the two screws through the baseplate to the microplate handler "L" bracket. After both screws are connected, use the hex key to tighten the screws. 5016072 B...
- Page 23 Chapter 2: Set Up the StakMax Microplate Handler 4. Lift the right side of the microplate washer and place the positioning pins, on the bottom of the microplate washer, into the corresponding holes in the baseplate. When the microplate washer is positioned correctly over the baseplate, you can hear and feel the pins drop in.
- Page 24 This should only be done by your Molecular Devices representative. The baseplate that your Molecular Devices representative attaches to the microplate reader has a notched rail onto which you slide the rail studs on the microplate handler for the following instruments: SpectraMax i3x (without the SpectraMax MiniMax 300 Imaging Cytometer attached)
- Page 25 SpectraMax MiniMax 300 Imaging Cytometer, the microplate handler connects to the microplate reader via a microplate handler stand. You install the microplate handler stand onto the baseplate that your Molecular Devices representative installed on the microplate reader.
- Page 26 StakMax Microplate Handling System User Guide Side-by-Side Install the microplate handler stand in the side-by-side position for the SpectraMax i3x and to deliver plates to the SpectraMax Paradigm in landscape orientation. If you want to deliver plates to the SpectraMax Paradigm in portrait orientation see the next section to install the microplate handler stand in the front position.
- Page 27 Chapter 2: Set Up the StakMax Microplate Handler Front To deliver plates to the SpectraMax Paradigm in portrait orientation, attach the microplate handler stand in the front position. 1. Use the 2.5 mm hex key to remove the four screws from the inner edge of the microplate handler stand and remove the detached side-by-side installation panel.
- Page 28 StakMax Microplate Handling System User Guide 3. Align the threaded holes on the front installation panel with the screws on the front of the baseplate. 4. Use the 2.5 mm hex key to tighten the screws. 5016072 B...
- Page 29 Chapter 2: Set Up the StakMax Microplate Handler Install Plate Drawer Protection Stand All microplate handler installations that use the microplate reader mounted baseplate include a plate drawer protection stand. You use the clamp on the right side of the baseplate to secure the plate drawer protection stand to the baseplate.
- Page 30 StakMax Microplate Handling System User Guide 3. Slide the lock bracket into the baseplate to secure the plate drawer protection stand. Set Height of Plate Drawer Protection Stand Set the height of the plate drawer protection stand to a safe distance between the top of the plate drawer protection stand and the bottom of the microplate reader plate drawer.
- Page 31 Chapter 2: Set Up the StakMax Microplate Handler 4. Insert the gap distance check tool between the top of the plate drawer protection stand and the bottom of the microplate reader plate drawer. Item Description 1 Plate drawer protection stand 2 ...
- Page 32 StakMax Microplate Handling System User Guide Connect the Microplate Handler to the Microplate Reader Before you connect the microplate handler to the microplate reader, note the following: The injector hood on the SpectraMax iD3 and the SpectraMax iD5 cannot open when the microplate handler is connected.
- Page 33 Chapter 2: Set Up the StakMax Microplate Handler 2. Lift the microplate handler and align the rail studs with the slots on the baseplate rail or on the microplate handler stand. Then slide the rail studs on the microplate handler firmly into the slots on the rail or the inner edge of the microplate handler stand.
- Page 34 StakMax Microplate Handling System User Guide Separate the Microplate Handler from the Microplate Reader The injector hood on the SpectraMax iD3 and the SpectraMax iD5 cannot open when the microplate handler is connected. The detection cartridge drawers on the SpectraMax Paradigm and the SpectraMax i3x cannot open when the microplate handler is connected.
- Page 35 Chapter 2: Set Up the StakMax Microplate Handler Microplate Handler Stand Mount Access Detection Cartridges For the SpectraMax i3x and SpectraMax Paradigm, the microplate handler blocks access to the microplate reader detection cartridges and the detection cartridge drawers are locked closed when the microplate handler is installed.
-
Page 36: Connect Cables
StakMax Microplate Handling System User Guide Connect Cables The microplate handler must be connected to the power supply with the power cable and to the computer with the USB cable. Note: When you connect the microplate handler to the AquaMax Microplate Washer, use the provided RS-232 serial cable to connect the instruments. - Page 37 Chapter 2: Set Up the StakMax Microplate Handler 3. Insert the power supply power cord into a wall outlet, surge suppressor or UPS, and then wait three seconds. Note: Connection through a surge suppressor or UPS is preferred. 4. Insert one end of the USB cable into the port on the microplate handler and insert the other end into a USB port on the computer.
-
Page 38: Chapter 3: Load The Microplate Handler
Chapter 3: Load the Microplate Handler Load plates with well A1 in the top-left when looking at the front of the microplate handler. Note: Do not use substances that can bond plates together in the microplate handler. Example: Build up of proteins on the plate top or adhesive from plate seals are common substances that can cause plates to bond together. -
Page 39: Magazine Load/Unload Tool
6. Place an empty magazine in the Output stack on the microplate handler. Magazine Load/Unload Tool The optional StakMax Magazine Load and Unload Tool helps you load and unload a group of plates to and from a magazine. Use the StakMax Magazine Load and Unload tool if: You want to load or unload a group of plates, without lifting plates in or out of the top of the magazine. - Page 40 Chapter 3: Load the Microplate Handler You do not want to leave the last plate on the workbench after you load from the bottom. The tool assembly consists of two parts: The plate load base, labeled Load Plates The unload plate ring, labeled Unload Plates The unload plate ring fits in the recessed channel of the plate load base for storage of the tool and to unload plates.
- Page 41 StakMax Microplate Handling System User Guide 5. Gently press down on the top of the magazine until the black metal base is fully seated in the recessed channel of the plate load base. When the empty magazine is fully seated, the four hooks at the four corners at the bottom of the magazine are released to stop the plates from falling off the magazine.
- Page 42 Chapter 3: Load the Microplate Handler 7. Replace the unload plate ring in the recessed channel of the plate load base for storage of the tool and to unload plates. Unload Plates from the Magazine 1. Place the unload plate ring onto the plate load base and make sure it is securely seated in the base.
- Page 43 StakMax Microplate Handling System User Guide 5. Carefully lift up the empty magazine and the unload plate ring until you clear the plate stack. Note: When you remove the empty magazine and the unload plate ring, be careful to not topple the unsupported stack of plates.
- Page 44 Chapter 3: Load the Microplate Handler 6. Place the empty magazine and the unload plate ring in a stable location. 7. Use your thumbs to unclip the unload plate ring from the magazine by pushing the two spring clips on the unload plate ring away from the crossing bars on the sides of the magazine.
-
Page 45: Single Plate Adapter
StakMax Microplate Handling System User Guide Single Plate Adapter If you load one plate at a time, use the single plate adapter. To install the single plate adapter, place it in the input stack on the microplate handler. To load a plate, grasp the plate by its longer sides and place the plate in the adapter. -
Page 46: Continuously Load The Microplate Handler
Chapter 3: Load the Microplate Handler Never load more than one plate at a time into the adapter. Continuously Load the Microplate Handler You can continuously feed plates into the microplate handler to permit non-stop automated reads. Before the read, enter the number of plates to read or select the All of Input Stack option. -
Page 47: Chapter 4: Get Started
Chapter 4: Get Started After you connected the microplate reader or microplate washer to the microplate handler, you are ready to power on the StakMax Microplate Handling System. Power On the Microplate Handler Power on the microplate handler before you start the SoftMax Pro Software software. The power interrupt button that is located on the front side of the microplate handler enables you to power on the microplate handler. -
Page 48: Aligning The Gripper
The first time you connect the microplate handler to the computer, after you power on the microplate handler and then start the SoftMax Pro Software the USB instrument driver automatically installs and activates the StakMax Software that is part of the SoftMax Pro Software. - Page 49 1. Start the SoftMax Pro Software. 2. In the SoftMax Pro Software, select the Operations tab and click Plate Stacker. After a few seconds, the StakMax Software dialog displays. See StakMax Software on page 3. Loosen the silver thumbscrew on the cover that is between the microplate handler arm and the input stack.
- Page 50 StakMax Microplate Handling System User Guide 5. In the StakMax Software dialog, click Alignment to start the Alignment wizard. 6. Follow the instructions on the Alignment wizard. This process takes approximately 15 minutes to complete. 7. After you finish the alignment, replace the cover on the microplate handler arm and tighten the thumbscrew.
- Page 51 Chapter 4: Get Started Aligning the Plate Transfer Position: SpectraMax Paradigm and SpectraMax i3x When you connect the microplate handler to the SpectraMax Paradigm and SpectraMax i3x, you must adjust the plate transfer position before you use the microplate handler. The SoftMax Pro Software includes a Transfer Position Teaching wizard to assist with the alignment process.
- Page 52 3. Start the SoftMax Pro Software and select the SpectraMax Paradigm or SpectraMax i3x as the connected instrument. 4. In the SoftMax Pro Software, select the Operations tab and click Info to display the Instrument Information dialog. 5. Click StakMax Alignment Wizard to display the Transfer Position Teaching wizard. 5016072 B...
- Page 53 Chapter 4: Get Started 6. On the Integration Layout page: Select Side-By-Side when you install the microplate handler in the side-by-side position to deliver plates to the SpectraMax Paradigm in the landscape orientation. This is the only option for the SpectraMax i3x. Select Stacker in Front of the Reader when you install the microplate handler in the front position to deliver plates to the SpectraMax Paradigm in the portrait orientation.
- Page 54 StakMax Microplate Handling System User Guide 8. On the Preparation page, select the You Have Both Teaching Plates...) check box and the There Are No Plates in the Stacker Magazines to confirm that you are ready to proceed. Note: Make sure there is no plate in the microplate reader drawer.
- Page 55 Chapter 4: Get Started 10. Place the Top Adjustment Plate into the input stack of the microplate handler with the label in the A1 position. 2. On the Stacker - Arm Movement page, click Move to Transfer Position. 11. Make sure the gripped plate is above the plate protection stand where the plate drawer opens and then select the Check That the Gripped Plate is Above the Reader Plate Drawer check box to confirm.
- Page 56 StakMax Microplate Handling System User Guide 13. On the Reader - Eject Plate Drawer page, click Eject. The plate drawer opens on the opposite side from the microplate handler arm to make it easier to place the Bottom Alignment Plate on the drawer.
- Page 57 Chapter 4: Get Started 15. Make sure a plate is placed properly on the drawer and select the Check That You Placed the Plate On the Reader Plate Drawer Properly... check box. 16. Click Next. The plate drawer closes and then ejects directly under the microplate handler arm and Top Adjustment Plate.
- Page 58 StakMax Microplate Handling System User Guide 18. On the Reader - Position Transport page, click Left, Right, Backward, or Forward (or use the arrow keys on the keyboard) to move the Bottom Adjustment Plate and align the marks on the two adjustment plates.
- Page 59 Chapter 4: Get Started 21. Remove the Bottom Adjustment Plate from the drawer and then select the confirmation check box to have the plate drawer close and then eject under the microplate handler arm and the Top Adjustment Plate. 22. Click Place Plate and then click OK in the confirmation message that displays to place the Top Adjustment Plate in the plate drawer.
-
Page 60: Gripper Functional Check
1. Turn on the StakMax Microplate Handler. 2. Start the SoftMax Pro Software. 3. Select the Operations tab and click Plate Stacker. After a few seconds, the StakMax Software dialog displays. 4. Place 5 plates in the input stack or the magazine. - Page 61 Chapter 4: Get Started The microplate handler loads the first of the 5 plates into the plate drawer. The drawer closes then re-opens. The microplate handler picks up the plate and places it in the output stack. This process continues for all 5 plates. After the plates have been processed, they are moved from the output stack and are re-stacked in the input stack.
-
Page 62: Chapter 5: Stakmax Software
See Scripting on page To start the StakMax Software from the SoftMax Pro Software, select the Operations tab and click Plate Stacker. The SoftMax Pro Software goes into Automation mode and prevents user interaction with the SoftMax Pro Software. - Page 63 StakMax Microplate Handling System User Guide The StakMax Software dialog displays on top of the SoftMax Pro Software. Load Plate Click Load Plate to move one plate from the input stack to the microplate reader. Click this button to confirm that the plate alignment between the input stack and the microplate reader is still accurate.
- Page 64 Note: In case of emergency, press the power-interrupt button on the front of the StakMax Microplate Handling System to reset the entire system. Scripting Click Scripting to create and edit optional scripts to run the microplate handler. The Scripting dialog displays to enable you write scripts that are a series of commands to control and automate more complex runs.
- Page 65 Click Emergency Stop to immediately shut down the entire system, including the microplate handler and the microplate reader. After you click Emergency Stop, clear objects that are in the way, remove plates that are in the drawer, and then click Reset in the StakMax Software dialog.
-
Page 66: Settings
Settings Click to display the StakMax Settings dialog where you define how to name Plate sections in the data files when a barcode reader is installed, whether to append the date and time to script commands, and whether to display a prompt during script editing. -
Page 67: Reading Plates
Reading Plates CAUTION! To prevent data loss, enable Auto Save for each protocol before you start the StakMax Software. See the SoftMax Pro Data Acquisition and Analysis Software User Guide or the application help. You should not do data analysis or other operations in the SoftMax Pro Software until the process completes. - Page 68 Chapter 5: StakMax Software 5. In the StakMax dialog, click Start Read to display the Read Plate dialog. Note: The Destination area should display The Results Will Be Saved Using Autosave. If not, click Cancel and enable AutoSave. 6. Select a Number of Plates option.
-
Page 69: Scripting
Click Edit to edit the open script. Run Scripts 1. Click New or Edit to display the Script Editor dialog. The title bar displays StakMax: <script file name>. 2. Click Open to display the Open a Script dialog. Navigate to and select the script file to run and then click Open. - Page 70 Chapter 5: StakMax Software As the script is runs, the Stop button enables you to stop the run before it completes. Note: If the script has unsaved changes on the Script Editor, the unsaved commands do not run. Script Editor The Scrip Editor dialog enables you to manage scripts.
- Page 71 StakMax Microplate Handling System User Guide StakMax Commands Command Description Reset Resets the microplate handler to its initial start-up state and position. Home Returns all axes of the microplate handler to their home positions. Put Plate Opens the microplate reader plate drawer and moves one plate from the microplate handler input stack to the microplate reader plate drawer.
- Page 72 Chapter 5: StakMax Software Command Description Name Current Section Gives the name you enter to the current section and adds the current with Barcode barcode to the end of the name. Append Section Name Adds a text string to the end of the section name.
- Page 73 StakMax Microplate Handling System User Guide Miscellaneous Commands Command Description Comment Adds a comment or note to the current script. Begin Repeat Indicates the start of a set of commands that are to be repeated the number of times you enter.
- Page 74 Navigate to and select the path to the file or folder. Note: The StakMax Software uses the file extensions for SoftMax Pro Software version 5.x and earlier (.pda or .eda). To use a script with version 6.x or 7.0.x, you must edit the file name in the path statement to use the appropriate version 6.x...
- Page 75 StakMax Microplate Handling System User Guide 4. Click Add to add the Begin Repeat command to the script. 5. In the Command Script field, click the last line of the repeat loop. 6. From the Commands list, select the End Repeat command to display the End Repeat command in the left side Command Edit field.
- Page 76 Chapter 5: StakMax Software Move a command in the script Remove a Command Select the command to remove and then click Remove. When you select the Allow Edit Prompting check box in the Settings dialog, you must click OK to confirm the removal. See Settings on page To clear the Command Script area, click Remove All.
-
Page 77: Chapter 6: Maintenance And Troubleshooting
See Safety Information on page CAUTION! Maintenance procedures other than those specified in this guide must be performed by Molecular Devices. When service is required, contact Molecular Devices technical support. WARNING! Power off the instrument and disconnect the power cord before you do maintenance procedures that require removal of a panel or cover or disassembly of an interior instrument component. -
Page 78: Status Dialog Error Codes
Status Dialog Error Codes The following error messages can display in the Status dialog. To access the Status dialog, click Status Window in the StakMax Software dialog. 200 Error: A problem was encountered during Reset The homing routine could not find a state change on the home flag. A sensor or flag problem is the likely source. -
Page 79: Installing Usb Drivers For Windows 7
Chapter 6: Maintenance and Troubleshooting Contact Molecular Devices Technical Support. 207 Error: A problem occurred during a motion Carriage drop off exceeds the maximum travel of the X axis. Solution: Realign the microplate handler. 208 Error: A problem occurred during a motion The jaws snapped shut after opening. -
Page 80: Obtaining Support
Molecular Devices for repair. Molecular Devices does not accept items that have not been decontaminated where it is applicable to do so. If parts are returned, they must be enclosed in a sealed plastic bag stating that the contents are safe to handle and are not contaminated. -
Page 81: Appendix A: Instrument Specifications And Diagrams
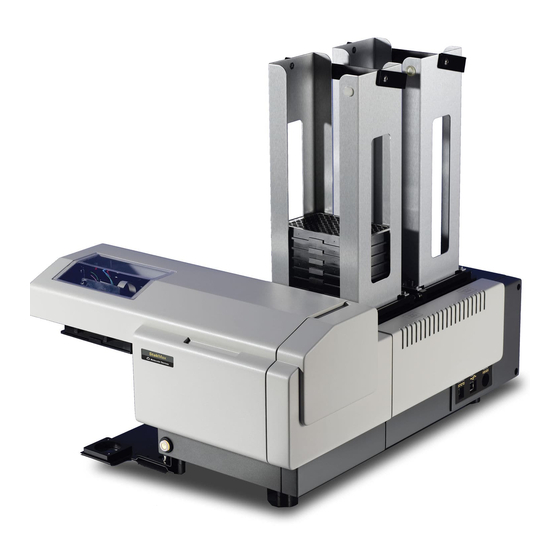
Appendix A: Instrument Specifications and Diagrams This appendix lists the general specifications and shows diagrams of the StakMax® Microplate Handling System. General Specifications for the StakMax Microplate Handling System Item Description Environment Indoor use only Power requirements 100–240 VAC, autoranging line voltage, 50/60 Hz, ~1.5A... - Page 82 StakMax Microplate Handling System User Guide Dimensions of the StakMax Microplate Handling System Item Description 1 Width: 44.0 cm (17.3 in) 2 Height: 23.1 cm (9.1 in) 3 Depth: 50.9 cm (20.0 in) 5016072 B...
-
Page 83: Space Requirements
Appendix A: Instrument Specifications and Diagrams Space Requirements Most microplates require approximately this much space. See the following sections for specific instrument space requirements. The following table lists the footprint for the SpectraMax M series, VersaMax, SpectraMax 190, SpectraMax Plus384, SpectraMax 340PC384, Gemini EM, and Gemini XPS. Item Description 1 ... - Page 84 StakMax Microplate Handling System User Guide Required Area for the SpectraMax iD3 and SpectraMax iD5 Footprint for the SpectraMax iD3 and SpectraMax iD5 Item Description 1 Width: 80.2 cm (31.6 in) 2 Depth: 73.8 cm (29.1 in) Microplate reader Microplate handler 5016072 B...
- Page 85 Appendix A: Instrument Specifications and Diagrams Required Area for the SpectraMax Paradigm and SpectraMax i3x Footprint for the SpectraMax i3x and SpectraMax Paradigm (side-by-side installation) Item Description 1 Width: 81.5 cm (32.1 in) 2 Depth: 86.5 cm (34.1 in) 3 Required clearance for microplate reader 4 ...
- Page 86 StakMax Microplate Handling System User Guide Footprint for the SpectraMax Paradigm (front installation) Item Description 1 Width: 54.5 cm (21.5 in) 2 Depth: 129.0 cm (50.8 in) 3 Required clearance for microplate reader 4 Microplate reader 5 Microplate handler 6 Required clearance for microplate handler...
- Page 87 Appendix A: Instrument Specifications and Diagrams Required Area for the SpectraMax L Footprint for the SpectraMax L Item Description 1 Width: 82.6 cm (32.5 in) For a microplate reader with the optional injector module, add 15.3 cm (6.0 in) to the width 2 Depth: 76.4 cm (30.1 in) 3 ...
- Page 88 StakMax Microplate Handling System User Guide Required Area for the AquaMax Microplate Washer Footprint for the AquaMax Microplate Washer Item Description 1 Width: 86.9 cm (34.2 in) 2 Depth: 66.9 cm (26.3 in) 3 Required clearance for microplate washer 4 Microplate washer 5 Microplate handler 6 ...
- Page 89 The microplate handler supports ANSI/SLAS-standard 96-well and 384-well plates with a plate height of 12 mm to 16 mm. Some, but not all, 96-well “strip” plates are also supported. For more information, contact your Molecular Devices sales representative or technical support. See Obtaining Support on page...
- Page 90 The trademarks used herein are the property of Molecular Devices, LLC or their respective owners. ©2018 Molecular Devices, LLC. Specifications subject to change without notice. Patents: www.moleculardevices.com/productpatents All rights reserved. FOR RESEARCH USE ONLY. NOT FOR USE IN DIAGNOSTIC PROCEDURES...
Need help?
Do you have a question about the StakMax and is the answer not in the manual?
Questions and answers