Table of Contents
Advertisement
Quick Links
Advertisement
Table of Contents

Related Manuals for Rice Lake EZ Mount


Summary of Contents for Rice Lake EZ Mount
- Page 1 EZ Mount Load Cell Mounting Kit Installation Guide March 10, 2018 PN 25710 Rev C...
- Page 2 All information contained within this publication is, to the best of our knowledge, complete and accurate at the time of publication. Rice Lake Weighing Systems reserves the right to make changes to the technology, features, specifications and design of the equipment without notice.
-
Page 3: Table Of Contents
2.2 Installing the EZ Mount 1 ........ - Page 4 EZ Mount Load Cell Mounting Kit Rice Lake continually offers web-based video training on a growing selection of product-related topics at no cost. Visit www.ricelake.com/webinars. Visit our website www.RiceLake.com...
-
Page 5: Introduction
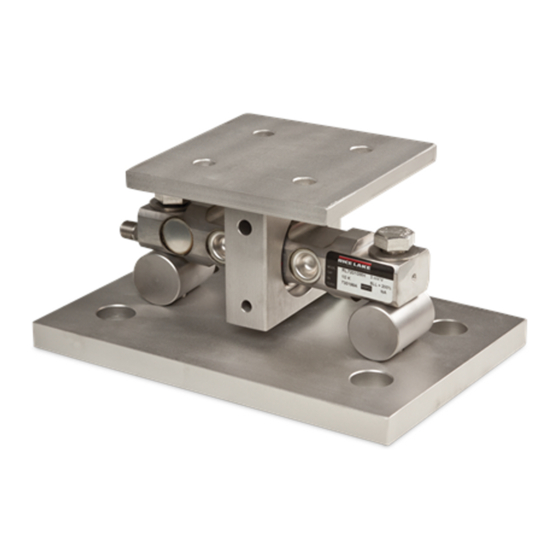
The EZ Mount 1 is available in mild steel or stainless steel in five sizes from 5,000 lb to 250,000 lb. The mount is compatible with RL70000 and RTI 5103 mild steel load cells in capacities from 5,000 lb to 250,000 lb. -
Page 6: Safety
General Safety Do not operate or work on this equipment unless this manual has been read and all instructions are understood. Contact any Rice Lake Weighing Systems dealer for replacement manuals. WARNING Failure to heed may result in serious injury or death. -
Page 7: Mechanical Installation
Also, protect the load cell and cable from weld splatter. © Rice Lake Weighing Systems ● All Rights Reserved... -
Page 8: Installing The Ez Mount 1
1. Determine where to position the mount and in which direction it should be oriented. The EZ Mount 1 is designed to allow for lateral movement in the direction perpendicular to the longitudinal axis of the load cell. These tank weighing units should be oriented so that the movement due to thermal expansion/contraction is perpendicular to the longitudinal axis. - Page 9 10. Attach the base plates to the foundation using suitable anchors for concrete or by bolting or welding to a steel structure. Verify that the base plates are no more than ±0.5° out of level. Shim as necessary. © Rice Lake Weighing Systems ● All Rights Reserved...
- Page 10 EZ Mount Load Cell Mounting Kit 11. Check that the top plates are no more than ±0.5° out or level. Shim if necessary and fully tighten mounting bolts. 12. If dummy cells are used, replace with actual load cells. Refer to step 3.
-
Page 11: Load Cell Wiring
25 feet. Drip Loop Load Cell Wire Color Function +EXC Black –EXC Green +SIG White –SIG Gray or Bare SHIELD Table 3-1. Load Cell Wiring © Rice Lake Weighing Systems ● All Rights Reserved... -
Page 12: Junction Box
Junction Box Connections, Adjustments & Calibration • Refer to Junction Box manual for trimming details. • Refer to indicator manual or “Technical Information” section in Rice Lake Weighing Systems’ Load Cell Product Selection Guide (PN 22054) for system calibration details. -
Page 13: Maintenance & Troubleshooting
8. Disconnect each load cell’s signal leads at the junction box and check individual load cell outputs with a multimeter. Then check input/output impedances for comparison with load cell manufacturer’s specifications. © Rice Lake Weighing Systems ● All Rights Reserved... - Page 14 EZ Mount Load Cell Mounting Kit Symptom Possible Cause Mechanical binding or debris in seals or under load cells No return to zero May have lost system calibration Non-linearity Thermal expansion or deflection under load causing binding or side load...
-
Page 15: Replacement Parts
26067 Locating Pin 18261 18262 18263 18263 26076 Cotter Pins 15229 15251 15257 15257 26069 JB4SS Junction Box 107700 (30 to 250K Capacity Kits) Table 6-1. Mild Steel Mount Parts List © Rice Lake Weighing Systems ● All Rights Reserved... - Page 16 EZ Mount Load Cell Mounting Kit Stainless Steel Mounts Item Description Replacement Part Numbers Top Plate Loading Bracket 18376 18377 18378 29013 Load Cell Bolt 14774 14796 14798 14798 Washer 15178 15187 15187 15187 Double-Ended Shear Beam Load See Load Cell Selection Guide...
- Page 17 Replacement Parts © Rice Lake Weighing Systems ● All Rights Reserved...
- Page 18 EZ Mount Load Cell Mounting Kit www.RiceLake.com Visit our website...
- Page 20 Specifications subject to change without notice. Rice Lake Weighing Systems is an ISO 9001 registered company. 230 W. Coleman St. • Rice Lake, WI 54868 • USA U.S. 800-472-6703 • Canada/Mexico 800-321-6703 • International 715-234-9171 • Europe +31 (0)26 472 1319...
Need help?
Do you have a question about the EZ Mount and is the answer not in the manual?
Questions and answers