Table of Contents
Advertisement
Quick Links
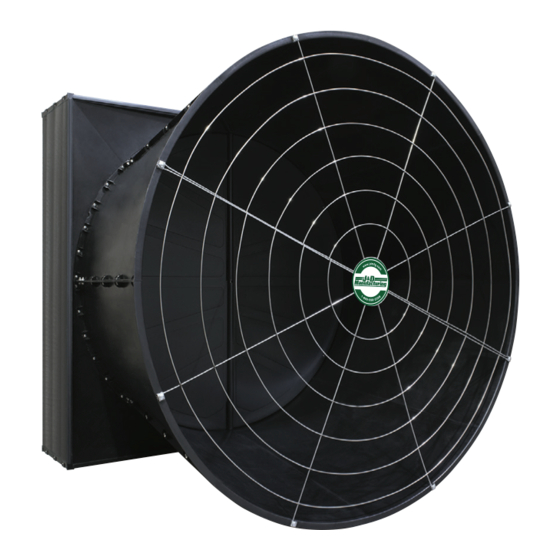
MAGNUM 58" EXHAUST FAN
If you have any questions please call your local dealer, or contact J&D Manufacturing at 1-800-998-2398.
(4) Motor
Brackets
Motor
Prop
Damper Door
Mounting
Bracket
Back
(2) Damper
Doors
IS295-21C
Please read over ALL instructions carefully before you begin.
Front
J&D Manufacturing • 6200 Hwy 12 • Eau Claire, WI 54701 • 1-800-998-2398 • www.jdmfg.com
J&D Mfg. warrants this products is free from defects in materials and workmanship under
normal use for the period of three years from date of purchase. Our warranty does not cover
ordinary wear and tear. J&D Mfg can repair or replace at our option, any product or part of
the product that is found to be defective. Our warranty applies to materials only and does not
include return freight, delivery, loss or damage to personal property, cost of removal or
installation, any incidental or consequential damages or labor. This warranty does not apply to
products which are misused, abused, altered, improperly installed or subject to negligence. All
warranties must be approved through our warranty department. The original purchaser must
present a copy of the invoice for the defective product.
RECOMMENDED TOOLS & SUPPLIES FOR INSTALLATION
• Safety Glasses
• Socket Wrench
• 1/2" Socket
• 1/4" Nut Driver
• Impact Driver
INSTALLATION
PARTS LEGEND
(4) Venturi
Sections
Rubber
Gasket
Housing
Side Panels
(4) Housing
Corner Caps
WARRANTY
AND ASSEMBLY (NOT PROVIDED)
• 1/2" Wrench
• 10 ft-lbs Torque Wrench
• 3/8" Wrench
• 23 ft-lbs Torque Wrench
• Drill
• Cutting Device
(for Rubber Gasket)
• 1/8" Drill Bit
• Sealant (Minimal-Expanding
• 13/64" Drill Bit
Foam / Polyurethane Caulk)
(8) Cone
Sections
(2) Front
Guards
(2) Rear
Guards
Page 1/13
Advertisement
Table of Contents

Related Manuals for J&D MAnufacturing Magnum


Summary of Contents for J&D MAnufacturing Magnum
- Page 1 MAGNUM 58” EXHAUST FAN WARRANTY J&D Mfg. warrants this products is free from defects in materials and workmanship under normal use for the period of three years from date of purchase. Our warranty does not cover ordinary wear and tear. J&D Mfg can repair or replace at our option, any product or part of the product that is found to be defective.
-
Page 2: Site Requirements
> Install snow guards according to manufacturers - (24) #14-10 x 2” Screws (Use #3 Phillips Bit from Bag 1) recommendations * The depth of J&D’s Magnum fan is 57” Bag 3 (Motor) 65¼” - (8) 3/8”-16 x 3/4“ Bolts - (8) 3/8”... -
Page 3: Eye Bolt Installation
Bolts from Bag 2 (Part 1) Eye Bolt Installation: • Using (28) 5/16”-18 x 7/8“ and (28) 5/16” Nuts from Bag 2 (Part 2) -18 Serrated Flange , assemble the motor • Stand the housing assembly up. mount brackets and venturi sections. •... - Page 4 • Assemble (2) SS Eyebolts and (2) SS Serrated Flange Nuts #10-24 Housing Side Panel Assembly: Bag 9 (Misc. Hardware) from • Start on a corner. With the front and back venturi section channels — With the flange facing up, thread (1) Serrated Flange Nut onto inserted into the grooves of the housing side panel, slide the housing...
-
Page 5: Motor Installation
Installing Housing Corner Caps: Motor Installation: • Place a housing corner cap onto the housing between (2) housing side NOTE: 2 person lift is recommended for handling of 105lb motor panels assembled in the previous step. • Using the pallet the fan came on, place the motor in the center between #3 Phillips Bit from Bag 1 (Tools) •... - Page 6 • Line up the holes of the motor mount brackets to the holes in the Prop Installation: motor housing. Machine Key from Bag 9 (Misc. Hardware) • Insert the 1/4” x 2” Bolts Washers from • Assemble the (8) 3/8”-16 x 3/4“ and (8) 3/8”...
- Page 7 Damper Door Mounting Bracket Installation: Damper Door Striker Plates Installation: • Using the illustrations below identify the top and bottom of the damper • On the edge of the housing venturi under the just placed rubber gasket door mounting bracket locate the 4 striker plate grooves nearest the center of the fan venturi, (do not use the ones nearest the top or the bottom of the fan).
-
Page 8: Cone Assembly
Installing Damper Door: Cone Assembly: • Insert damper door rod fully into the top part of the damper door • Lay out the (8) cone pieces, place the (2) sections with the J&D logo mounting bracket then slide damper door down so that the damper door across from each other as shown below. -
Page 9: Cone Installation
• Align the top and bottom of the cone at the areas of the damper door Cone Installation: #3 Phillips Bit bracket (see Step 10) and secure using the included • Using (2) people lift the cone assembly onto the housing assembly. from Bag 1 (Tools) Screws from Bag 5 (4) #14-10 x 2”... -
Page 10: Front Guard Installation
#3 Phillips Front Guard Installation: • Finish securing the cone to the housing using the included Bit from Bag 1 (Tools) Screws from Bag 5 #14-10 x 2” • Place front guards onto cone and align guard tabs to the mounting holes (Part 1) in the cone flange. - Page 11 Damper Door Spring Installation: Magnum Installation: Springs from Bag 9 • Secure the coiled end of the (2) SS Damper Door • From the exterior of the building insert fan into opening. (Misc. Hardware) , onto the eyebolts by expanding and rotating as #3 Phillips Bit from Bag 1 (Tools) •...
-
Page 12: Disconnect Power
DISCONNECT POWER Rear Guards Installation: #3 Phillips Bit from Bag 1 (Tools) • Using the included (5) #12- BEFORE INSTALLING OR SERVICING. Screws from Bag 8 (Motor Guard) 11 x 5/8” per guard, secure rear guard sections to housing as shown below. ALL ELECTRICAL WORK SHOULD BE COMPLETED BY QUALIFIED PERSONNEL AND MEET NATIONAL (NEC), Cable Ties from... -
Page 13: Maintenance Instructions
Single Phase Wired for 190-240v Common Wiring Options White Motor to On/Off - No Speed Control (Fan Will Run at Full Speed) Power Black +10V OUT Green Ground 0-10V IN White w/Green Stripe STOP/RUN +10V OUT Switched Control Signal Ground Orange w/White Stripe 0-10V IN Motor to...
Need help?
Do you have a question about the Magnum and is the answer not in the manual?
Questions and answers