Table of Contents
Advertisement
IMPORTANT SAFETY INSTRUCTION – READ FIRST
This symbol, whenever it appears,
alerts you to the presence of uninsulated
dangerous voltage inside the enclosure-voltage
that may be sufficient to constitute a risk of shock.
Read instructions:
Retain these safety and operating instructions for future reference. Heed all warnings printed here and on the equipment.
Follow the operating instructions printed in this user guide.
Do not open:
There are no user serviceable parts inside. Refer any service work to qualified technical personnel only.
Power sources:
Connect the unit to mains power only of the type described in this user guide or marked on the rear panel. The power
source must provide a good ground connection.
Power cord:
Use the power cord with sealed mains plug appropriate for your local main supply as provided with the equipment. If the
provided plug does not fit into you outlet consult your service agent. Route the power cord so that it is not likely to be
walked on, stretched or pinched by items placed upon or against.
Grounding:
Do not defeat the grounding and polarization means of the power cord plug. Do not remove or tamper with the ground
connection on the power cord.
Ventilation:
Do not obstruct the ventilation slots or position the unit where the air required for ventilation is impeded. If the unit is to be
operated in a rack, case or other furniture ensure that it is constructed to allow adequate ventilation.
Moisture:
To reduce the risk of fire or electrical shock do not expose the unit to rain, moisture or use in damp or wet conditions. Do
not place container of liquid on it, which may spill into any openings.
Heat:
Do not locate the unit in a place close to excessive heat or direct sunlight, as this could be a fire hazard. Locate the unit
away from any equipment, which produces heat such as: power supplies, power amplifiers and heaters.
Environment:
Protect from excessive dirt, dust, heat, and vibration when operating and storing. Avoid tobacco ash, drink spillage and
smoke, especially that associated with smoke machines.
Handling:
To prevent damage to the controls and cosmetics avoid rough handling and excessive vibration. Protect the controls form
damage during transit. Use adequate padding if you need to ship the unit. To avoid injury to yourself or damage to the
equipment take care when lifting, moving or carrying the unit.
Servicing:
Switch off the equipment and unplug the power cord immediately if it is exposed to moisture, spilled liquid, objects fallen
into opening, the power cord or plug becomes damaged during a lightening storm or if smoke odor or noise is noted.
Refer servicing to qualified technical personnel only.
Installation:
Install the unit in accordance with the instruction printed in the user guide.
This symbol, wherever it appears, alerts
you to important operating and maintenance
instructions in the accompanying literature.
Read manual.
-1-
Advertisement
Table of Contents

Related Manuals for Art DPS II


Summary of Contents for Art DPS II
- Page 1 IMPORTANT SAFETY INSTRUCTION – READ FIRST This symbol, whenever it appears, alerts you to the presence of uninsulated dangerous voltage inside the enclosure-voltage that may be sufficient to constitute a risk of shock. Read instructions: Retain these safety and operating instructions for future reference. Heed all warnings printed here and on the equipment. Follow the operating instructions printed in this user guide.
-
Page 2: Table Of Contents
Optical ADAT Input (Rear) ... 13 Optical ADAT Output/TOSLINK (Rear)... 13 Word Clock Input (Rear) ... 13 ¼” Inserts (Rear)... 14 DPS II™ Signal Flow Diagram ... 14 Operation ... 15 Using V3 ... 16 Warranty Information ... 17 Service ... 18 DPS II... -
Page 3: Introduction
Thank you for purchasing an ART DPS II (DI/O Preamp System II) - and congratulations: You now own one of the most versatile preamplifiers available. Offering a superb level of sound quality, the DPS II hybrid tube and solid state circuit design, combined with a straightforward user interface, quickly and easily gives you access to all of its features - and moves you forward into the digital recording domain. -
Page 4: Features
DPS II FEATURES: • Dual Analog VU metering • Dual LED input metering • V3 (Variable Valve Voicing) with OPL (switch selectable) • Over 75 dB of gain • Adjustable input impedance • Hand selected 12AX7A dual triode tube • Balanced XLR inputs and outputs •... -
Page 5: Installation
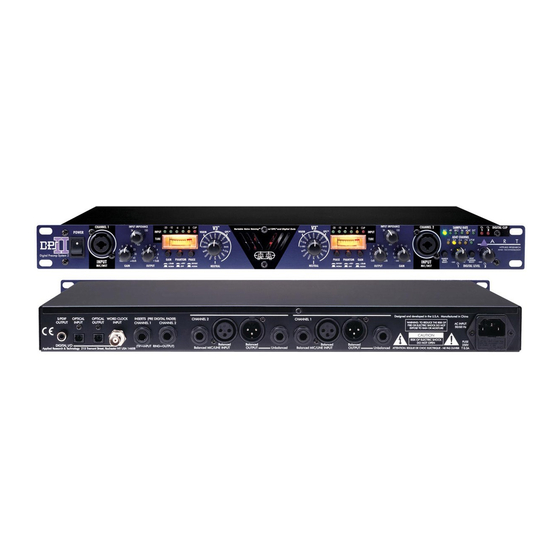
Analog Audio Connections Audio connections to and from the DPS II are balanced XLR (Pin 2 = Hot (+), Pin 3 = Cold (-), Pin 1 = Ground) and unbalanced ¼” (Tip = Hot (+), Sleeve = Ground). We recommend that you switch off the +48V Phantom Power whenever changing connections to the XLR input. -
Page 6: Controls And Indicators
CONTROLS & INDICATORS Input Control The Input Control sets the amount of input gain of the DPS II. Turn the control clockwise to increase gain and counterclockwise to decrease gain. You may control two ranges of gain with this control, +20 to +68dB and +0 to +48dB. -
Page 7: Front Panel Controls (Picture)
The DPS II circuitry slowly applies and removes the +48volts, to prevent damage to microphones. Be sure to turn down or mute the output of the DPS II when engaging or disengaging Phantom power. Additionally, when disengaging, allow 30 to 45 seconds for the power to completely discharge. -
Page 8: V3 Variable Valve Voicing Control
“out of position”, try reversing the phase to correct the problem. V3 – Variable Valve Voicing Control The DPS II features ART’s proprietary V3 technology. V3 (which stands for Variable Valve Voicing), provides optimized reference points to begin the recording process for guitars, bass guitars, synths, acoustic instruments, percussion and more. -
Page 9: Vu Meter
OPL is activated, and the signal is brought out of the “red”. Output Control The Output Control sets the output level of the DPS II. When the control is fully counterclockwise, there is no output. Turning the control clockwise increases the level of the output signal. -
Page 10: Digital Controls (Picture)
DPS II™ automatically go into the digital converters. On the back of the DPS II™ there are insert jacks. One can either send out the signals to an effects processor, such as an ART Dual Levelar for additional compression, and return it to the DPS II™... -
Page 11: Adat Channel Control
ADAT Channel Control This button controls the current ADAT channel the DPS II™ is transmitting over. The DPS™ only transmits over ADAT when the sample rate is set to 44.1KHz, 48KHz (ADAT master clock mode), ADAT (ADAT Slave Clock mode), or EXT (Word Clock Sync mode). -
Page 12: Rear Input Jacks
Input Impedance control from 150 to 3000 Ohms. Use the front panel ¼” input for instruments and unbalanced line level signals. If the front ¼” input is in use, the DPS II will use the instrument input and ignore the rear panel inputs. -
Page 13: Connections (Digital)
S/PDIF Coax connection. OPTICAL ADAT Input (Rear) The optical input of the DPS II™ allows the user to use the DPS II™ within an ADAT chain. The DPS II™, when set to ADAT mode, synchronizes its sample rate with that of incoming ADAT clock signals. -
Page 14: ¼" Inserts (Rear)
DPS II™ SIGNAL FLOW DIAGRAM The above diagram outlines the signal flow of the DPS II™. It provides for a handy optical reference for what is occurring to the signal, and the various features of the DPS II™, and their location and interaction with the signal. -
Page 15: Operation
OPERATION The DPS II is one of the most versatile preamplification systems available. Through use of the V3 technology, the DPS II™ can process numerous instruments. Simply mic the instrument (if acoustic), amp, speaker, or plug the instrument directly in to take full advantage of V3™ technology. -
Page 16: Using V3
If you need to, give it a twist…you’ll find the setting for the tone you are searching for! The DPS II is ideal for use as a DI box. Plug the instrument into either input and use the XLR or ¼” (or both) outputs to connect to your recorder, board or PA system. -
Page 17: Warranty Information
WARRANTY INFORMATION Limited Warranty Applied Research and Technology will provide warranty and service for this unit in accordance with the following warrants: Applied Research and Technology, (A R T) warrants to the original purchaser that this product and the components thereof will be free from defects in workmanship and materials for a period of three years from the date of purchase. -
Page 18: Service
SERVICE The following information is provided in the unlikely event that your unit requires service. 1) Be sure that the unit is the cause of the problem. Check to make sure the unit has the proper power supplied, all cables are connected correctly, and the cables themselves are in working condition. -
Page 19: Dps Ii Specifications
Tube Type Power Requirements ART maintains a policy of constant product improvement. ART reserves the right to make changes in design or make additions to or improvements upon this product without any obligation to install same on products previously manufactured. Therefore, specifications are subject to change without notice.