Table of Contents
Advertisement
TABLE OF CONTENTS
Introduction ......................................................................................... 2
Installation ........................................................................................... 3
AC Power Hookup ............................................................................. 3
Audio Connections ............................................................................ 3
Safety Precautions ............................................................................ 3
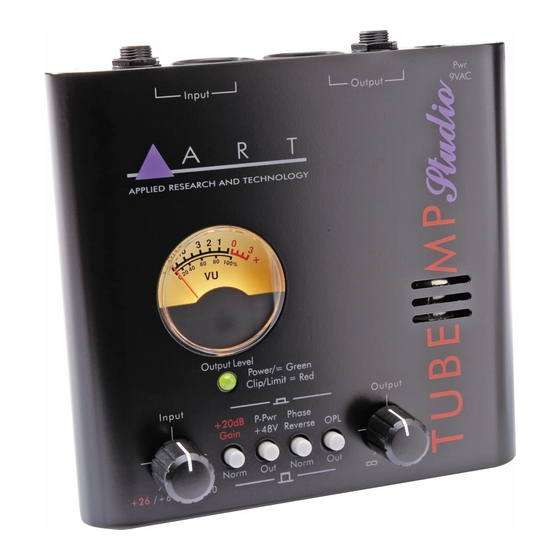
Controls and Indicators ....................................................................... 4
Input Control ...................................................................................... 4
+20 dB Gain Switch ........................................................................... 4
Phantom Power +48V Switch ............................................................ 4
Phase Reverse Switch ...................................................................... 5
OPL (Peak Limiter) Switch ................................................................ 5
Power/Clip/Limit LED ........................................................................ 6
VU Meter ........................................................................................... 6
Output Control ................................................................................... 6
Connections ........................................................................................ 7
¼" Input Jack...................................................................................... 7
XLR Input Jack .................................................................................. 7
XLR Output Jack ............................................................................... 7
¼" Output Jack .................................................................................. 8
Power Jack ....................................................................................... 8
Operation ............................................................................................. 9
Warranty Information ........................................................................ 10
Service ............................................................................................... 11
Tube MP Studio Specifications ........................................................ 12
The ART
TUBE MP STUDIO
- 1 -
Advertisement
Table of Contents

Related Manuals for Art Tube MP Studio


Summary of Contents for Art Tube MP Studio
-
Page 1: Table Of Contents
XLR Input Jack ... 7 XLR Output Jack ... 7 ¼” Output Jack ... 8 Power Jack ... 8 Operation ... 9 Warranty Information ... 10 Service ... 11 Tube MP Studio Specifications ... 12 The ART TUBE MP STUDIO - 1 -... -
Page 2: Introduction
(OPL) to precisely control output peaks, and analog VU metering to aid in setting and maintaining proper signal levels. The Tube MP Studio can be used in a wide variety of applications including recording, project and home studios, where its metering functionality and OPL circuitry really shines. -
Page 3: Installation
INSTALLATION The Tube MP Studio may be used in a wide variety of applications and environments. Self-contained in an all-steel enclosure, the Tube MP Studio is designed for continuous professional use. Because the unit is compact and lightweight, mounting location is not critical. However, for greater reliability we recommend that you not place the Tube MP Studio on top of power amps or other sources of heat. -
Page 4: Controls And Indicators
Phantom power. Phantom power is supplied to pins 2 and 3 of the XLR Input jack when this switch is depressed. The Tube MP Studio slowly applies and removes the +48volts, to prevent damage to microphones. Be sure to turn down or mute the output of the Tube MP Studio when engaging disengaging disengaging, allow 30 to 45 seconds for the power to completely discharge. -
Page 5: Phase Reverse Switch
This FET (field effect transistor) peak limiter has a fast attack for peaks and slow release time. This helps you to prevent clipping or overload of equipment that follows the Tube MP Studio, such as the A/D converters on a sound card or digital recorder, in-ear monitor systems, or live monitoring system. -
Page 6: Power/Clip/Limit Led
“red” . OUTPUT CONTROL The Output Control sets the output level of the Tube MP Studio. When the control is fully counterclockwise, there is no output. Turning the control clockwise increases the level of the output signal. When setting the Output level control, refer to the VU Meter for an accurate level leaving the Tube MP Studio. -
Page 7: Connections
CONNECTIONS Despite the Tube MP Studio’s sophistication, it is easy to interface the unit with a wide variety of equipment. All inputs and outputs, are located on the rear panel. Standard ¼” and XLR inputs and outputs make patching simple. -
Page 8: ¼" Output Jack
POWER JACK An external 9 Volt AC adapter powers the Tube MP Studio. Plug the adapter into the PWR jack and then into a power outlet. Only use the adapter that came with the Tube MP Studio. If the adapter ever becomes damaged, immediately discontinue use. -
Page 9: Operation
The Tube MP Studio is ideal for use as a DI box. Plug the instrument into either input and use the XLR or ¼” (or both) outputs to connect to your recorder, board or PA system. -
Page 10: Warranty Information
WARRANTY INFORMATION Limited Warranty Applied Research and Technology will provide warranty and service for this unit in accordance with the following warrants: Applied Research and Technology, (A R T) warrants to the original purchaser that this product and the components thereof will be free from defects in workmanship and materials for a period of three years from the date of purchase. -
Page 11: Service
SERVICE The following information is provided in the unlikely event that your unit requires service. 1) Be sure that the unit is the cause of the problem. Check to make sure the unit has the proper power supplied, all cables are connected correctly, and the cables themselves are in working condition. -
Page 12: Tube Mp Studio Specifications
Tube Type Power Requirements ART maintains a policy of constant product improvement. ART reserves the right to make changes in design or make additions to or improvements upon this product without any obligation to install same on products previously manufactured. Therefore, specifications are subject to change without notice.
Need help?
Do you have a question about the Tube MP Studio and is the answer not in the manual?
Questions and answers